82 - The Complete Miter Saw Workstation, страница 25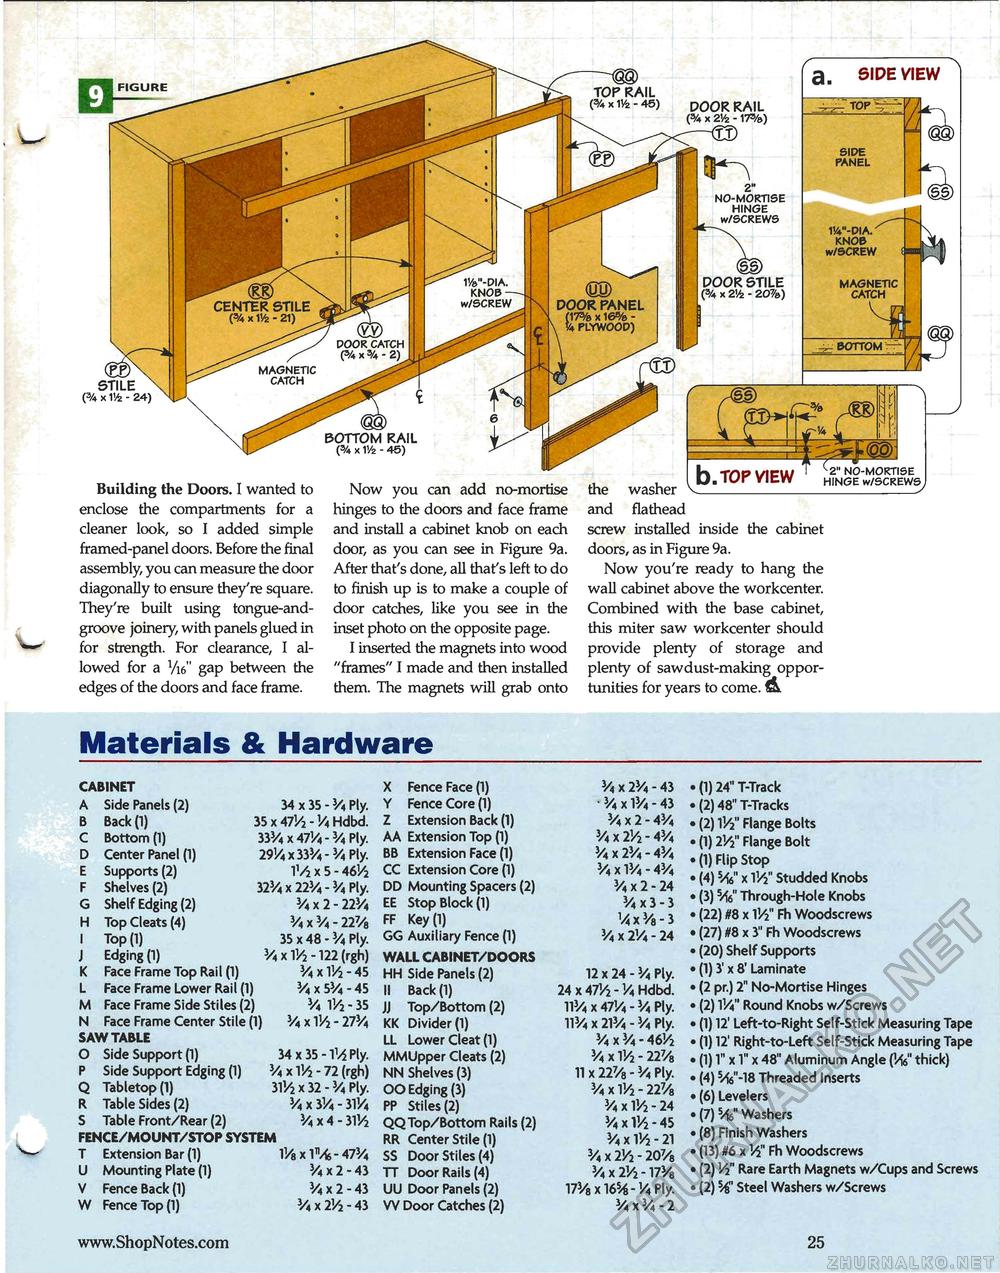
Materials & Hardware CABINET A Side Panels (2) Back (1) Bottom (1) Center Panel (1) Supports (2) Shelves (2) Shelf Edging (2) Top Cleats (4) Top(l) Edging (1) Face Frame Top Rail (1) Face Frame Lower Rail (1) Face Frame Side Stiles (2) Face Frame Center Stile (1) SAW TABLE O Side Support (1) Side Support Edging (1) Tabletop (1) Table Sides (2) Table Front/Rear (2) P Q R S FENCE/MOUNT/STOP SYSTEM T Extension Bar (1) U Mounting Plate (1) V Fence Back (1) W Fence Top (!) 34 x 35 - Va Ply. 35 x AlVi - Va Hdbd. 33H x 47Vi - Va Ply. 29]/a x 33Vi - Va Ply. 1V2 x 5 - A6V2 323/i x 22Va - Va Ply. 3/4 x 2 - 22H V, x 3/4 - 227/a 35 x 48 - Va Ply. K x V/2 -122 (rgh) V4 x V/2 - 45 Va x SVa - 45 Va V/2 - 35 V4 x V/i - 27Va 34 x 35 - V/i Ply. Va x V/2 - 72 (rgh) m X 32 - Va Ply. VA x 3V4 - 3V/4 VaX.4- 3lVi V/8x^/S-47VA Vax2- 43 Vax 2-43 Vax2V2-43 X Fence Face (1) Y Fence Core (1) Z Extension Back (1) AA Extension Top (1) BB Extension Face (1) CC Extension Core (1) DD Mounting Spacers (2) EE Stop Block (1) FF Key (1) GG Auxiliary Fence (1) WALL CABINET/DOORS HH Side Panels (2) II Back (1) JJ Top/Bottom (2) KK Divider (1) LL Lower Cleat (1) MMUpper Cleats (2) NN Shelves (3) OO Edging (3) PP Stiles (2) QQTop/Bottom Rails (2) RR Center Stile (1) SS Door Stiles (4) TT Door Rails (4) UU Door Panels (2) W Door Catches (2) VA x 2V4 - 43 ■ Va x lJ/4 - 43 Vax2-4Va Va x 2V2 - 4Va Vax2Va-4Va Va x IVa - 4Va v4x2- 24 3/4 x 3 - 3 VaxVs-S Va x 2Va - 24 12 x 24 - J/4 Ply. 24 x 47V2 - Va Hdbd. ll3/4 x 47'/, - Va Ply. ll3/4 x 213/4 - 3/4 Ply. VaxVa-46V2 Va x V/2 - 227/a 11 x 227/8 - Va Ply. 3/4 x V/2 - 227/a 3/4 x V/2 - 24 Va x V/2 - 45 3/4 x V/2 - 21 3/4 x 2Yi - 207/a 3/4 x 2V2 - 17J/a 173/8 x 165/6 - Va Ply. 3/4 x 3/4 - 2 (1) 24" T-Track (2) 48" T-Tracks (2) V/2 Flange Bolts (1) 2V2 Flange Bolt (1) Flip Stop (4) Vfe" x l1/2" Studded Knobs (3) Vfe" Through-Hole Knobs (22) m x V/2" Fh Woodscrews (27) #8 x 3" Fh Woodscrews (20) Shelf Supports (1) 3' x 8' Laminate (2 pr.) 2" No-Mortise Hinges (2) V/a" Round Knobs w/Screws (1) 12' Left-to-Right Self-Stick Measuring Tape (1) 12' Right-to-Left Self-Stick Measuring Tape (1) 1" x 1" x 48" Aluminum Angle (Ks" thick) (4) Hs"-18 Threaded Inserts (6) Levelers (7) Hs" Washers (8) Finish Washers (13) #6 x V{' Fh Woodscrews (2) V2 Rare Earth Magnets w/Cups and Screws (2) 54" Steel Washers w/Screws m DOOR PANEL (17% x 16% -, V* PLYWOOD) CENTER STILE (% x V/2 - 21) (SS) POOR CATCH (3/4 X 'A " 2) MAGNETIC CATCH b .TOP VIEW 2" NO-MORTISE HINGE w/SCREWS, Building the Doors. I wanted to enclose the compartments for a cleaner look, so I added simple framed-panel doors. Before the final assembly, you can measure the door diagonally to ensure they're square. They're built using tongue-and-groove joinery, with panels glued in for strength. For clearance, I allowed for a Vi6" gap between the edges of the doors and face frame. Now you can add no-mortise hinges to the doors and face frame and install a cabinet knob on each door, as you can see in Figure 9a. After that's done, all thafs left to do to finish up is to make a couple of door catches, like you see in the inset photo on the opposite page. I inserted the magnets into wood "frames" I made and then installed them. The magnets will grab onto the washer and flathead screw installed inside the cabinet doors, as in Figure 9a. Now you're ready to hang the wall cabinet above the workcenter. Combined with the base cabinet, this miter saw workcenter should provide plenty of storage and plenty of sawdust-making opportunities for years to come. figure (EK STILE (% x 1Vfe - 24) DOOR RAIL x 2Vfe - 17%) 2" NO-MORTISE HINGE w/SCREWS ©S) DOOR STILE (% x 2Vfe - 20%) 11/e"-DIA. KNOB-w/SCREW -V- BOTTOM ^ SIDE VIEW ^ TOP SIDE PANEL BOTTOM RAIL (% x V/2 - 45) W-DIA. KNOB w/SCREW MAGNETIC CATCH 25 |


