82 - The Complete Miter Saw Workstation, страница 29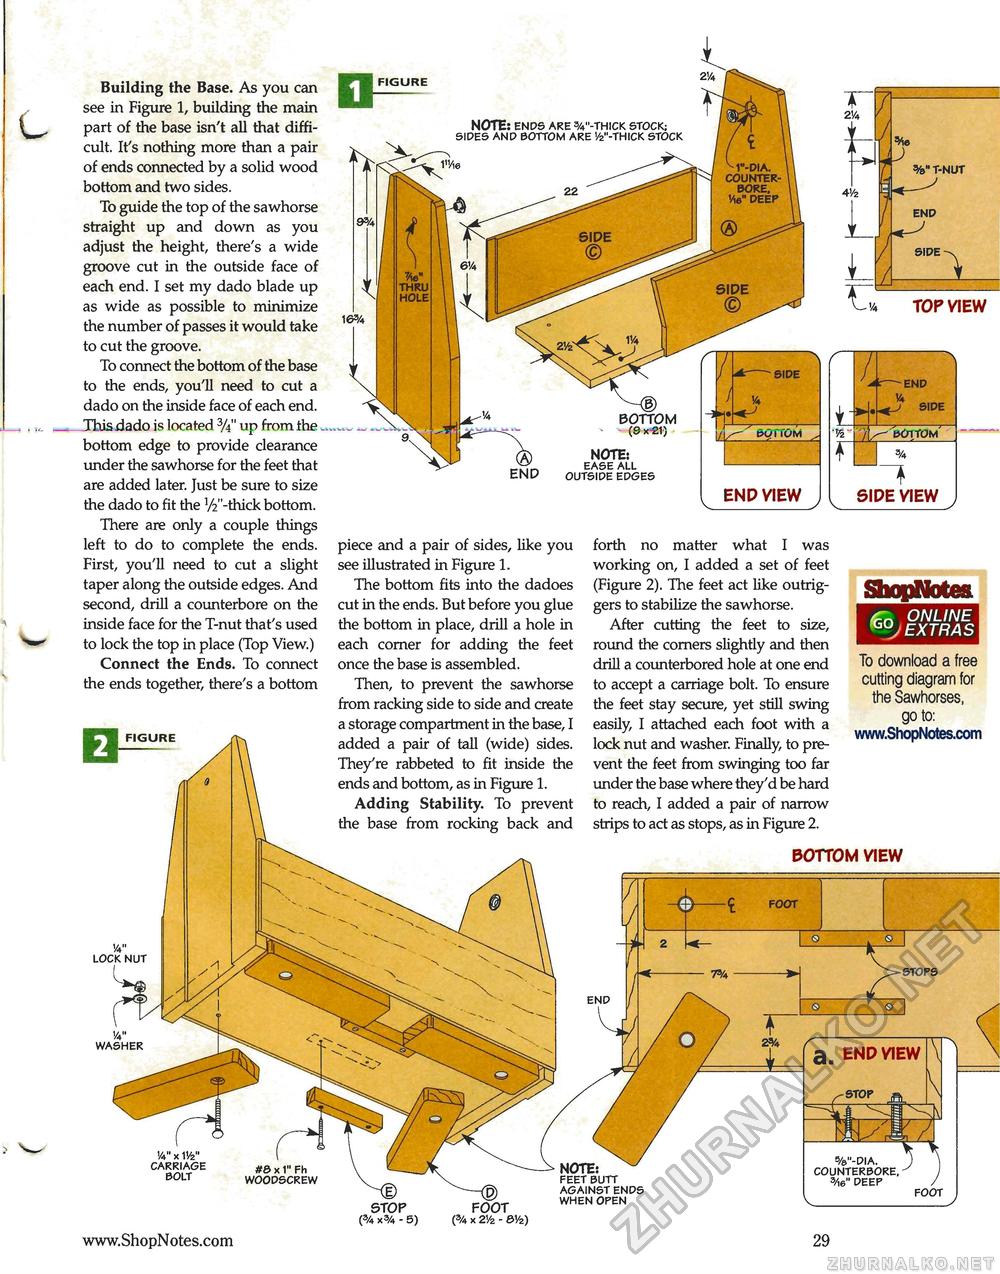
Building the Base. As you can see in Figure 1, building the main part of the base isn't all that difficult. It's nothing more than a pair of ends connected by a solid wood bottom and two sides. To guide the top of the sawhorse straight up and down as you adjust the height, there's a wide groove cut in the outside face of each end. I set my dado blade up as wide as possible to minimize the number of passes it would take to cut the groove. To connect the bottom of the base to the ends, you'll need to cut a dado on the inside face of each end. This dado is located 3/i" up from the. bottom edge to provide clearance under the sawhorse for the feet that are added later. Just be sure to size the dado to fit the V2"-thick bottom. There are only a couple things left to do to complete the ends. First, you'll need to cut a slight taper along the outside edges. And second, drill a counterbore on the inside face for the T-nut that's used to lock the top in place (Top View.) Connect the Ends. To connect the ends together, there's a bottom piece and a pair of sides, like you see illustrated in Figure 1. The bottom fits into the dadoes cut in the ends. But before you glue the bottom in place, drill a hole in each corner for adding the feet once the base is assembled. Then, to prevent the sawhorse from racking side to side and create a storage compartment in the base, I added a pair of tall (wide) sides. They're rabbeted to fit inside the ends and bottom, as in Figure 1. Adding Stability. To prevent the base from rocking back and forth no matter what I was working on, I added a set of feet (Figure 2). The feet act like outriggers to stabilize the sawhorse. After cutting the feet to size, round the corners slightly and then drill a counterbored hole at one end to accept a carriage bolt. To ensure the feet stay secure, yet still swing easily, I attached each foot with a lock nut and washer. Finally, to prevent the feet from swinging too far under the base where they'd be hard to reach, I added a pair of narrow strips to act as stops, as in Figure 2. ShopNotes. fT- ONLINE GOj EXTRAS To download a free cutting diagram for the Sawhorses, goto: www.ShopNotes.com W x 1V2" CARRIAGE BOLT STOP (% x% - 5) FOOT (3/4 X ZVz - BVz) FEET BUTT AGAINST ENDS WHEN OPEN 29 |


