82 - The Complete Miter Saw Workstation, страница 31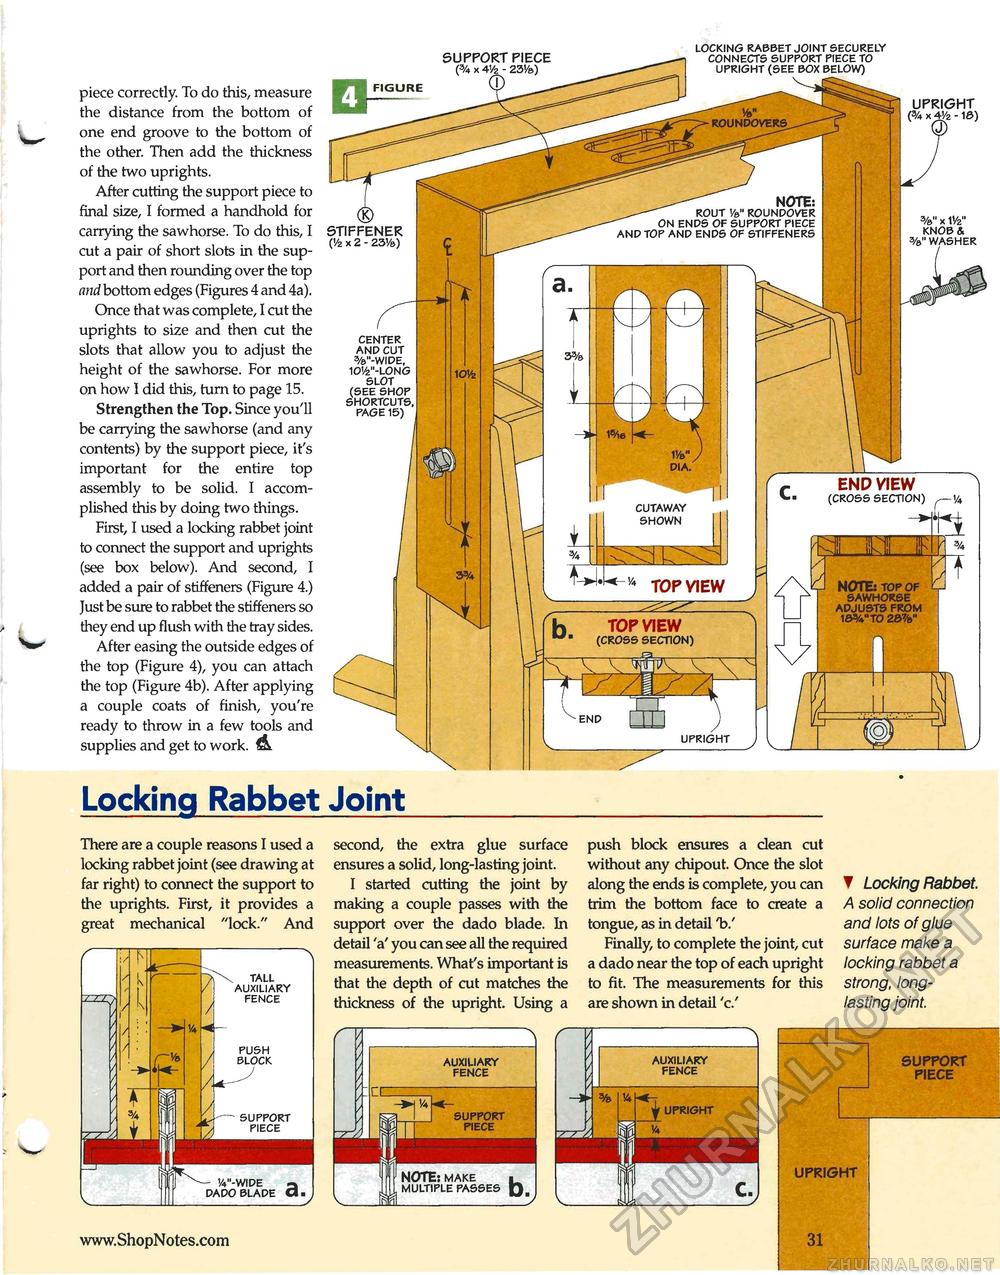
piece correctly. To do this, measure the distance from the bottom of one end groove to the bottom of the other. Then add the thickness of the two uprights. After cutting the support piece to final size, I formed a handhold for carrying the sawhorse. To do this, I cut a pair of short slots in the support and then rounding over the top and bottom edges (Figures 4 and 4a). Once that was complete, I cut the uprights to size and then cut the slots that allow you to adjust the height of the sawhorse. For more on how I did this, turn to page 15. Strengthen the Top. Since you'll be carrying the sawhorse (and any contents) by the support piece, it's important for the entire top assembly to be solid. I accomplished this by doing two things. First, I used a locking rabbet joint to connect the support and uprights (see box below). And second, I added a pair of stiffeners (Figure 4.) Just be sure to rabbet the stiffeners so they end up flush with the tray sides. After easing the outside edges of the top (Figure 4), you can attach the top (Figure 4b). After applying a couple coats of finish, you're ready to throw in a few tools and supplies and get to work. Locking Rabbet Joint There are a couple reasons I used a locking rabbet joint (see drawing at far right) to connect the support to the uprights. First, it provides a great mechanical "lock." And second, the extra glue surface ensures a solid, long-lasting joint. I started cutting the joint by making a couple passes with the support over the dado blade. In detail 'a' you can see all the required measurements. What's important is that the depth of cut matches the thickness of the upright. Using a push block ensures a clean cut without any chipout. Once the slot along the ends is complete, you can trim the bottom face to create a tongue, as in detail Finally, to complete the joint, cut a dado near the top of each upright to fit. The measurements for this are shown in detail 'c/ ▼ Locking Rabbet. A solid connection and lots of glue surface make a locking rabbet a strong, long-lasting joint. SUPPORT PIECE UPRIGHT LOCKING RABBET JOINT SECURELY CONNECTS SUPPORT PIECE TO UPRIGHT (SEE BOX BELOW) SUPPORT PIECE (% x 41/2 - 23Ve) UPRIGHT (% x 4'/z -10) ^^ NOTE: ROUT Va" ROUNDOVER ON ENDS OF SUPPORT PIECE AND TOP AND ENDS OF STIFFENERS %u x iy2" KNOB & %"WASHER CENTER AND CUT %"-WIDE, 10'/fe"-L0NG SLOT (SEE SHOP SHORTCUTS, PAGE 15) END VIEW (CROSS SECTION) CUTAWAY SHOWN NOTEj top of sawhorse adjusts from 10vto 20%" TOP VIEW (cross section) UPRIGHT 31 |


