82 - The Complete Miter Saw Workstation, страница 4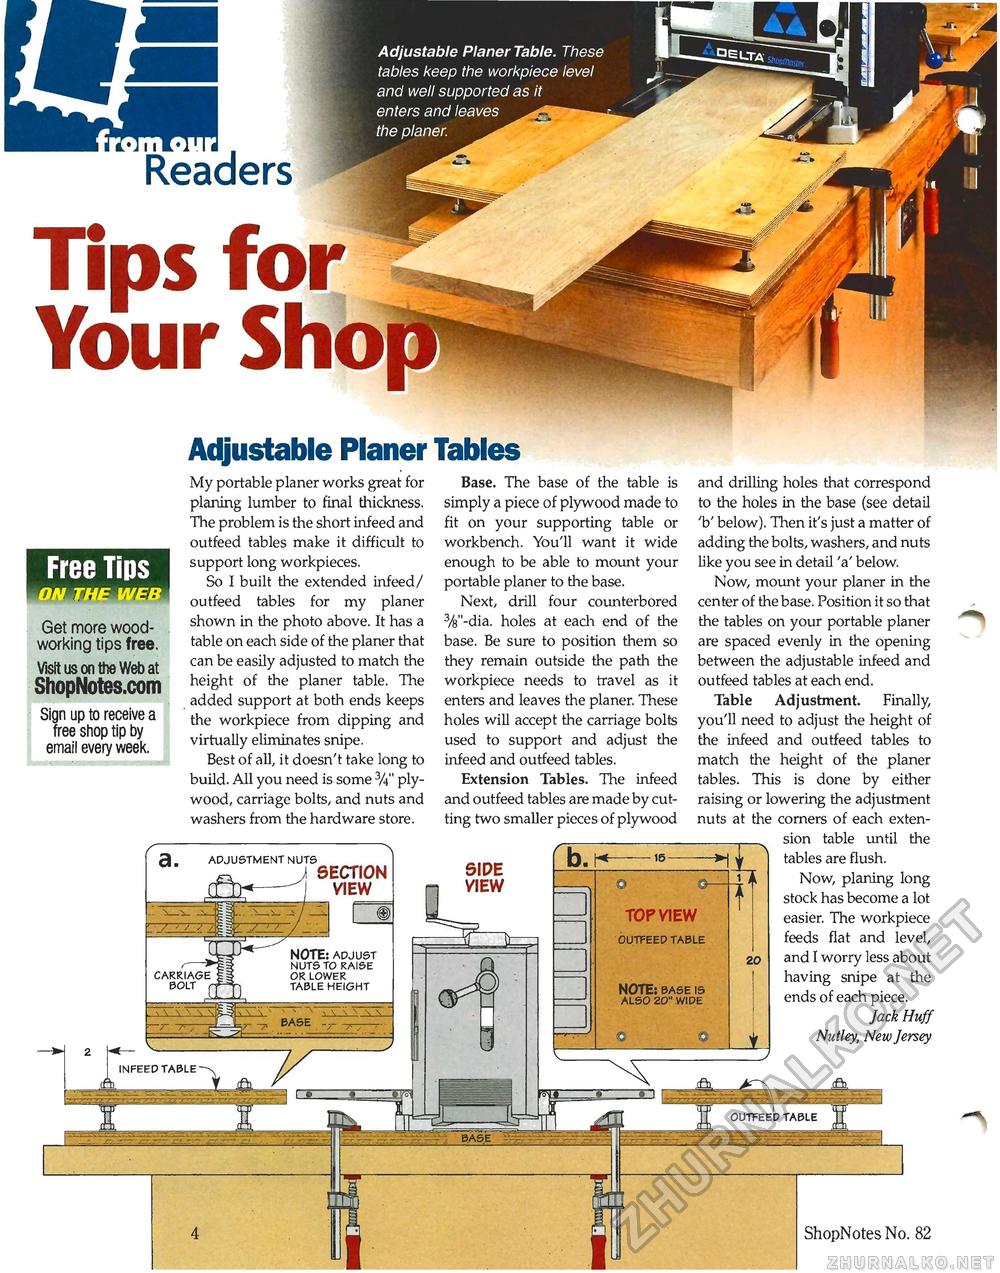
Adjustable Planer Table. These tables keep the workpiece level and well supported as it enters and leaves the planer. - „ 8j Readers Tips for Your Sho Adjustable Planer Tables Free Tips WUSmiUH'.'lJ:* Get more woodworking tips free. Visit us on the Web at ShopNotes.com Sign up to receive a free shop tip by email every week. My portable planer works great for planing lumber to final thickness. The problem is the short infeed and outfeed tables make it difficult to support long workpieces. So I built the extended infeed/ outfeed tables for my planer shown in the photo above. It has a table on each side of the planer that can be easily adjusted to match the height of the planer table. The added support at both ends keeps the workpiece from dipping and virtually eliminates snipe. Best of all, it doesn't take long to build. All you need is some 3/4" plywood, carriage bolts, and nuts and washers from the hardware store. Base. The base of the table is simply a piece of plywood made to fit on your supporting table or workbench. You'll want it wide enough to be able to mount your portable planer to the base. Next, drill four counterbored 3/8"-dia. holes at each end of the base. Be sure to position them so they remain outside the path the workpiece needs to travel as it enters and leaves the planer. These holes will accept the carriage bolts used to support and adjust the infeed and outfeed tables. Extension Tables. The infeed and outfeed tables are made by cutting two smaller pieces of plywood and drilling holes that correspond to the holes in the base (see detail V below). Then it's just a matter of adding the bolts, washers, and nuts like you see in detail 'a' below. Now, mount your planer in the center of the base. Position it so that the tables on your portable planer are spaced evenly in the opening between the adjustable infeed and outfeed tables at each end. Table Adjustment. Finally, you'll need to adjust the height of the infeed and outfeed tables to match the height of the planer tables. This is done by either raising or lowering the adjustment nuts at the corners of each extension table until the tables are flush. Now, planing long stock has become a lot easier. The workpiece feeds flat and level, and I worry less about having snipe at the ends of each piece. Jack Huff Nutley, New Jersey -s 4 ShopNotes No. 82 |


