83, страница 34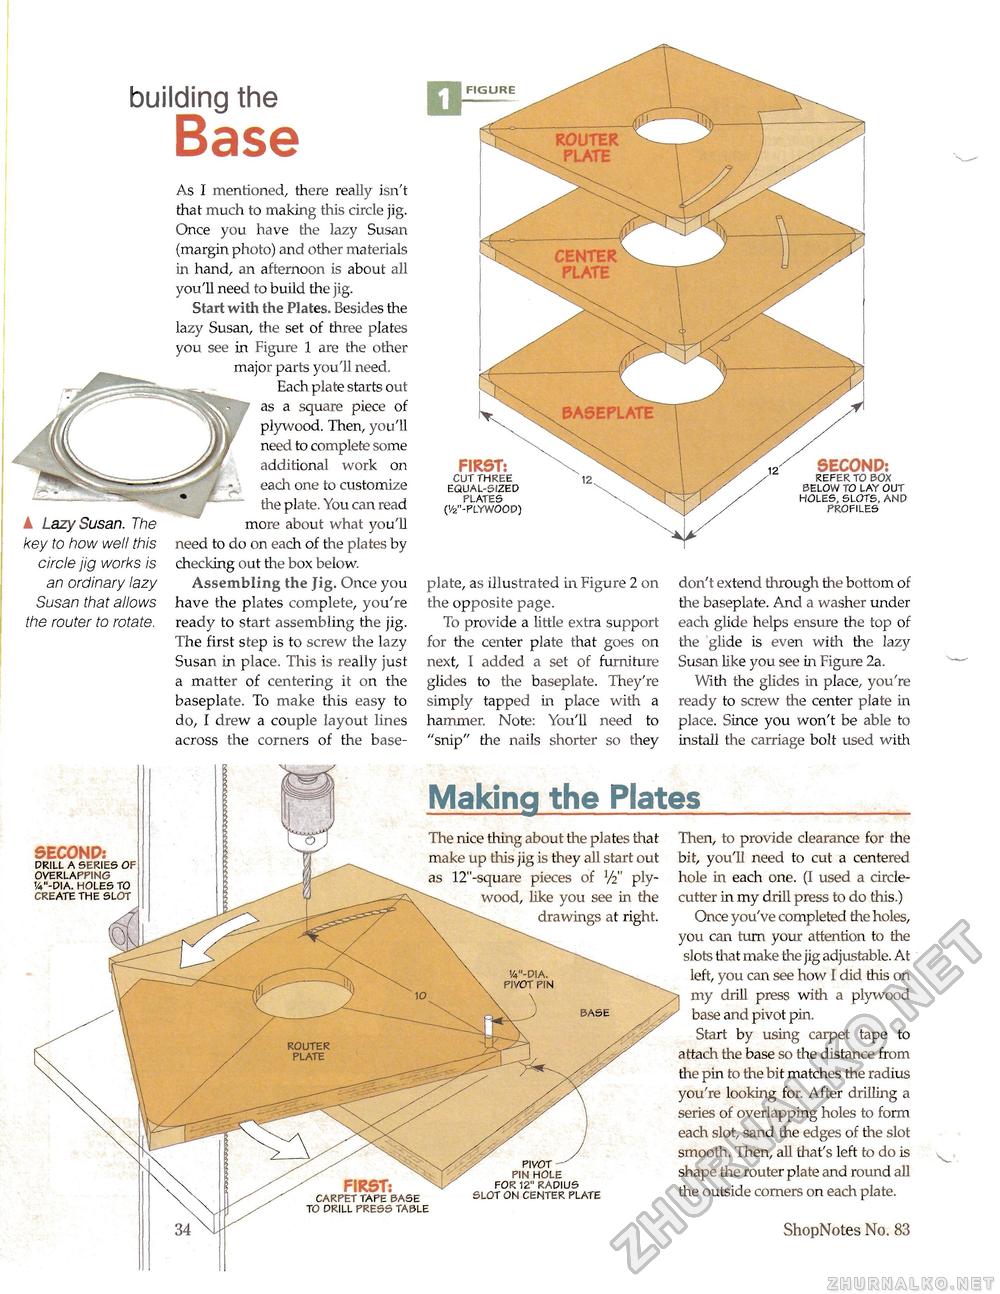
building the A Lazy Susan. The key to how well this circle jig works is an ordinary lazy Susan that allows the router to rotate. As I mentioned, there really isn't that much to making this circle jig. Once you have the lazy Susan (margin photo) and other materials in hand, an afternoon is about all you'll need to build the jig. Start with the Plates. Besides the lazy Susan, the set of three plates you see in Figure 1 are the other major parts you'll need. Each plate starts out as a square piece of plywood. Then, you'll need to complete some additional work on each one to customize the plate. You can read more about what you'll need to do on each of the plates by checking out the box below. Assembling the Jig. Once you have the plates complete, you're ready to start assembling the jig. The first step is to screw the lazy Susan in place. This is really just a matter of centering it on the baseplate. To make this easy to do, I drew a couple layout lines across the corners of the base FIRST: cut three equal-sized plates (y2"-plyw00d) plate, as illustrated in Figure 2 on the opposite page. To provide a little extra support for the center plate that goes on next, I added a set of furniture glides to the baseplate. They're simply tapped in place with a hammer. Note: You'll need to "snip" the nails shorter so they SECOND: refer to box below to lay out holes. slots, and profiles don't extend thrOLigh the bottom of the baseplate. And a washer under each glide helps ensure the top of the glide is even with the lazy Susan like you see in Figure 2a. With the glides in place, you're ready to screw the center plate in place. Since you won't be able to install the carriage bolt used with SECOND: drill a series overlapping v-dia. holes to create the slot Making the Plates The nice thing about the plates that make up this jig is they all start out as 12"-square pieces of V2" plywood, like you see in the drawings at right. Then, to provide clearance for the bit, you'll need to cut a centered hole in each one. (I used a circle-cutter irv my drill press to do this.) Once you've completed the holes, you can turn your attention to the slots that make the jig adjustable. At left, you can see how I did this on my drill press with a plywood base and pivot pin. Start by using carpet tape to attach the base so the distance from the pin to the bit matches the radius you're looking for. After drilling a series of overlapping holes to form each slot, sand the edges of the slot smooth. Then, all that's left to do is shape the router plate and round all the outside corners on each plate. 34 ShopNotes No. 83 carpet tape base to drill press table pin hole for 12" radius slot on center plate |


