83, страница 36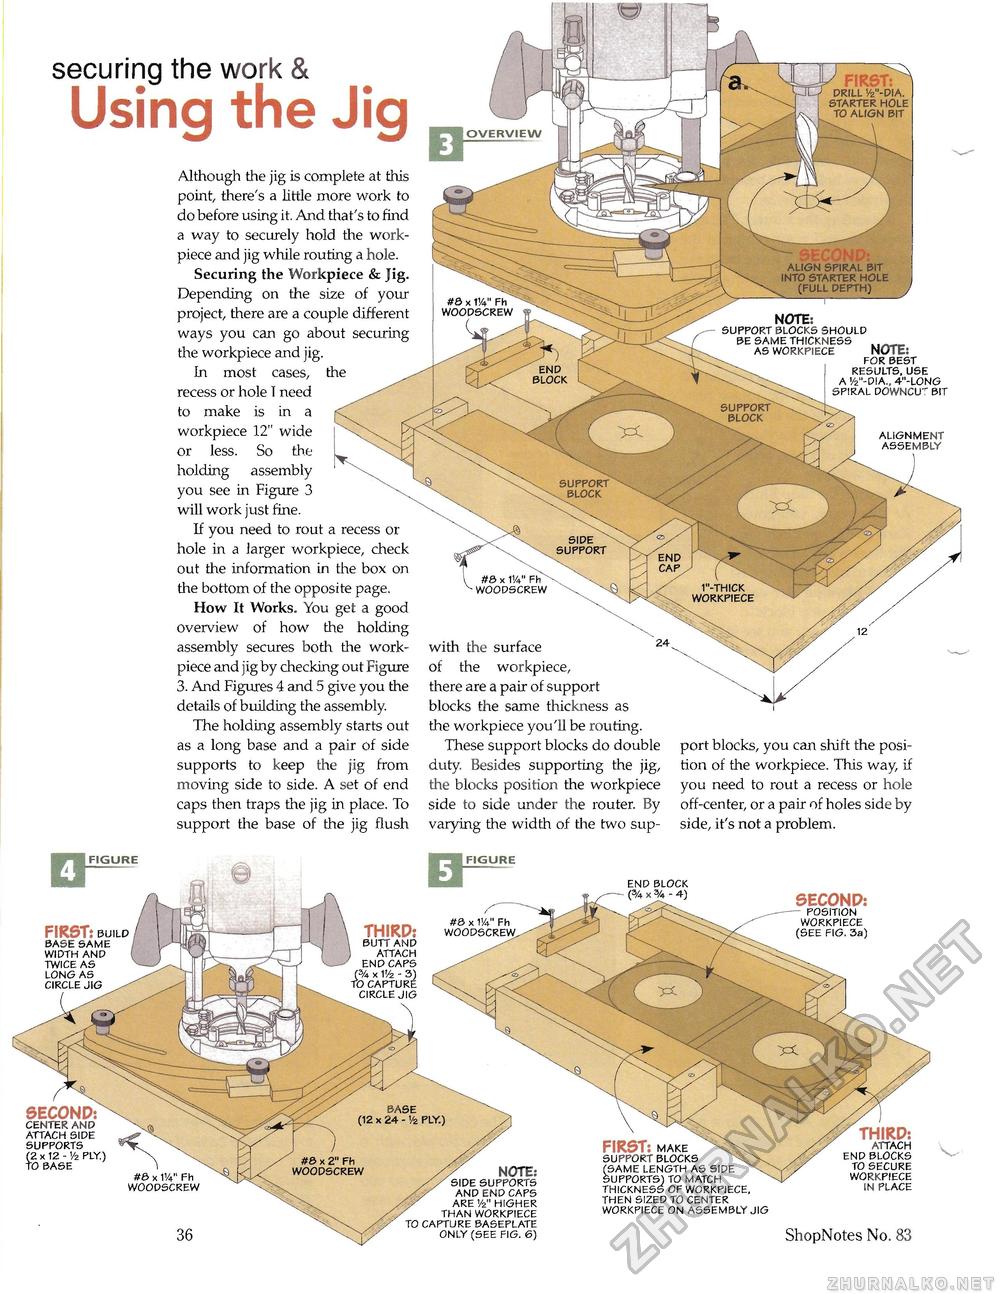
end block SUPPORT BLOCK SUPPORT BLOCK side support #0 x W Fb woodscrew 1"-thick workpiece securing the work & Using the Jig * OVERVIEW Although the jig is complete at this point, there's a little more work to do before using it. And that's to find a way to securely hold the work-piece and jig while routing a hole. Securing the Workpiece & Jig. Depending on the size of your project, there are a couple different ways you can go about securing the workpiece and jig. In most cases, the recess or hole I need to make is in a <* workpiece 12" wide ^ or less. So the holding assembly you see in Figure 3 ~ will work just fine. If you need to rout a recess or hole in a larger workpiece, check out the information in the box on the bottom of the opposite page. How It Works. You get a good overview of how the holding assembly secures both the work-piece and jig by checking out Figure 3. And Figures 4 and 5 give you the details of building the assembly. The holding assembly starts out as a long base and a pair of side supports to keep the jig from moving side to side. A set of end caps then traps the jig in place. To support the base of the jig flush FIGURE FIGURE FIRST: build base same width and twice as long as circle jig #6 x W Fh woodscrew firstT^ DRILL '/2"-DIA. STARTER HOLE to ALIGN BIT end block (3/4 x % - 4) SECOND: POSITION WORKPIECE (SEE FIG. 3a) second: CENTER AND ATTACH SIDE SUPPORTS (2 x 12 - Vz PLY.) TO BASE NOTE: side supports and end caps are v2" higher than workpiece to capture baseplate only (see fig. 6) first: make support blocks (same length as side supports) to match thickness of workpiece, then sized to center workpiece on assembly jig 36 ShopNotes No. 83 ~ SECONP: ALIGN SPIRAL BIT INTO STARTER HOLE (FULL DEPTH) NOTE: support blocks should be same thickness _ as workpiece NOTE: for best results, use av2-dia., 4"-l0ng spiral downcut bit alignment ASSEMBLY with the surface 2 of the workpiece, there are a pair of support blocks the same thickness as the workpiece you'll be routing. These support blocks do double duty. Besides supporting the jig, the blocks position the workpiece side to side under the router. By varying the width of the two sup port blocks, you can shift the position of the workpiece. This way, if you need to rout a recess or hole off-center, or a pair of holes side by side, it's not a problem. third: attach end blocks to secure workpiece in place #0 x 114 Fh woodscrew third: butt and attach caps '/2 - 3) ture circle jig |


