84, страница 19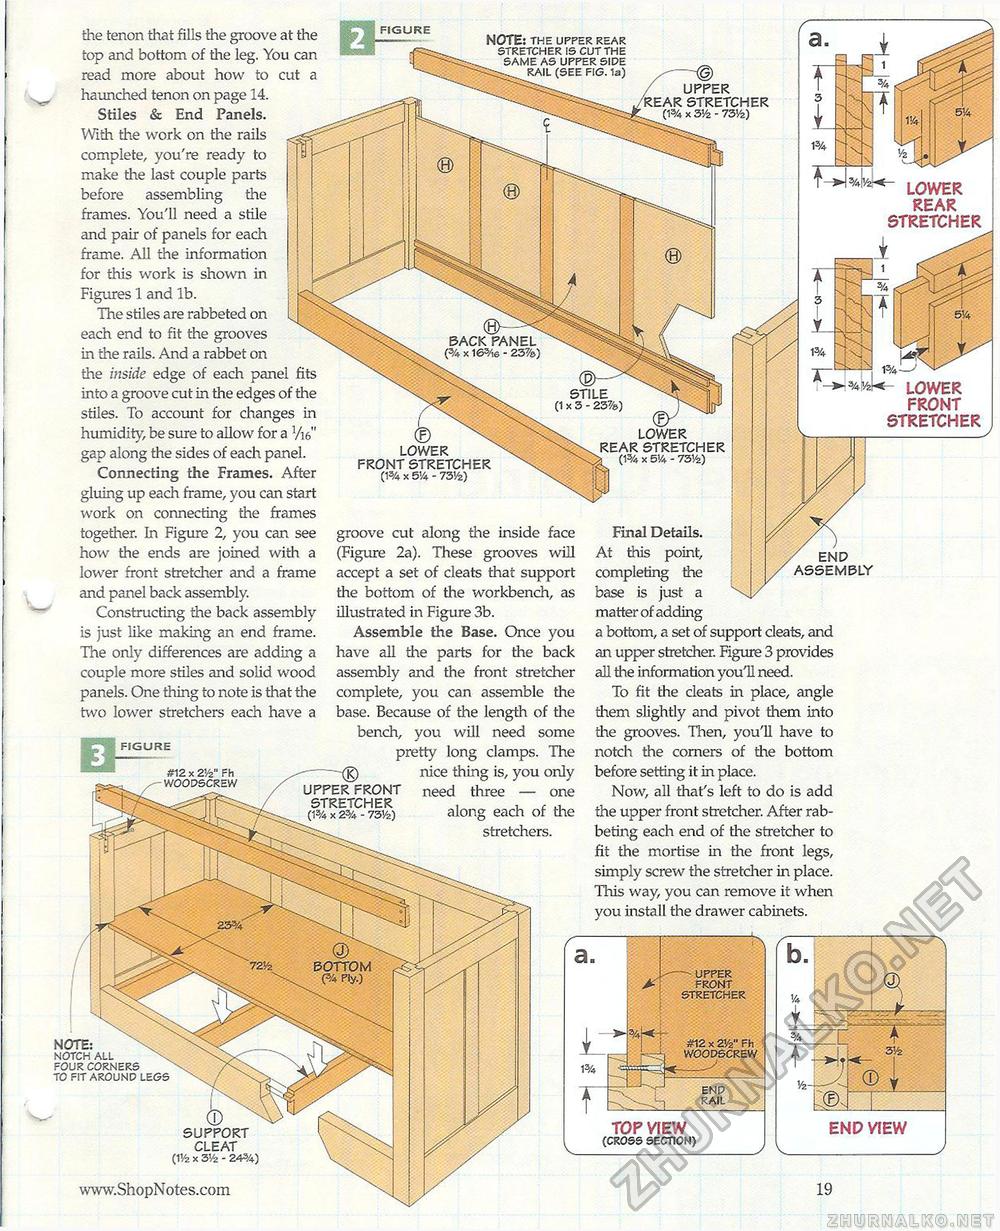
the tenon that fills the groove at the top and bottom of the leg. You can read more about how to cut a haunched tenon on page 14. Stiles & End Panels. With the work on the rails complete, you're ready to 0 ' make the last couple parts before assembling the frames. You'll need a stile and pair of panels for each frame. All the information for this work is shown in Figures 1 and lb. j <\ The stiles are rabbeted on L. each end to fit the grooves \ in the rails. And a rabbet on the inside edge of each panel fits into a groove cut in the edges of the stiles. To account for changes in humidity, be sure to allow for a W gap along the sides of each panel. Connecting the Frames. After gluing up each frame, you can start work on connecting the frames together. In Figure 2, you can see how the ends are joined with a lower front stretcher and a frame and panel back assembly. Constructing the back assembly is just like making an end frame. The only differences are adding a couple more stiles and solid wood panels. One thing to note is that the two lower stretchers each have a NOTE: THE UPPER REAR STRETCHER IS CUT THE SAME AS UPPER SIDE ^ RAIL (SEE FIG. 1a) X--<§> upper rear stretcher (1% x 3</2 - 73'/2) ~ LOWER REAR STRETCHER back panel (% X 165/16 - 23%) - LOWER FRONT STRETCHER lower rear stretcher > (1% x m - 73V2) lower front stretcher (1% x S'A - 73'/z) groove cut along the inside face (Figure 2a). These grooves will accept a set of cleats that support the bottom of the workbench, as illustrated in Figure 3b. Assemble the Base. Once you have all the parts for the back assembly and the front stretcher complete, you can assemble the base. Because of the length of the bench, you will need some pretty long clamps. The -{K) nice thing is, you only need three — one along each of the stretchers. Final Details. j/ 7\ At this point, completing the / assembly base is just a matter of adding a bottom, a set of support cleats, and an upper stretcher. Figure 3 provides all the information youH need. To fit the cleats in place, angle diem slightly and pivot them into the grooves. Then, you'll have to notch the corners of the bottom before setting it in place. Now; all that's left to do is add the upper front stretcher. After rabbeting each end of the stretcher to fit the mortise in the front legs, simply screw the stretcher in place. This way, you can remove it when vou install the drawer cabinets. #12 x 2'/2" Fh W00DSCREW upper front stretcher (1% x 2% - 73V2) bottom (% Ply.) —- UPPER FRONT STRETCHER note: notch all \ four corners to fit around legs #12 x ZVz" Fh WOODSCREW TOP VIEW (CROSS SECTION) support cleat (1'/z x 3V2 - 24%) |


