84, страница 23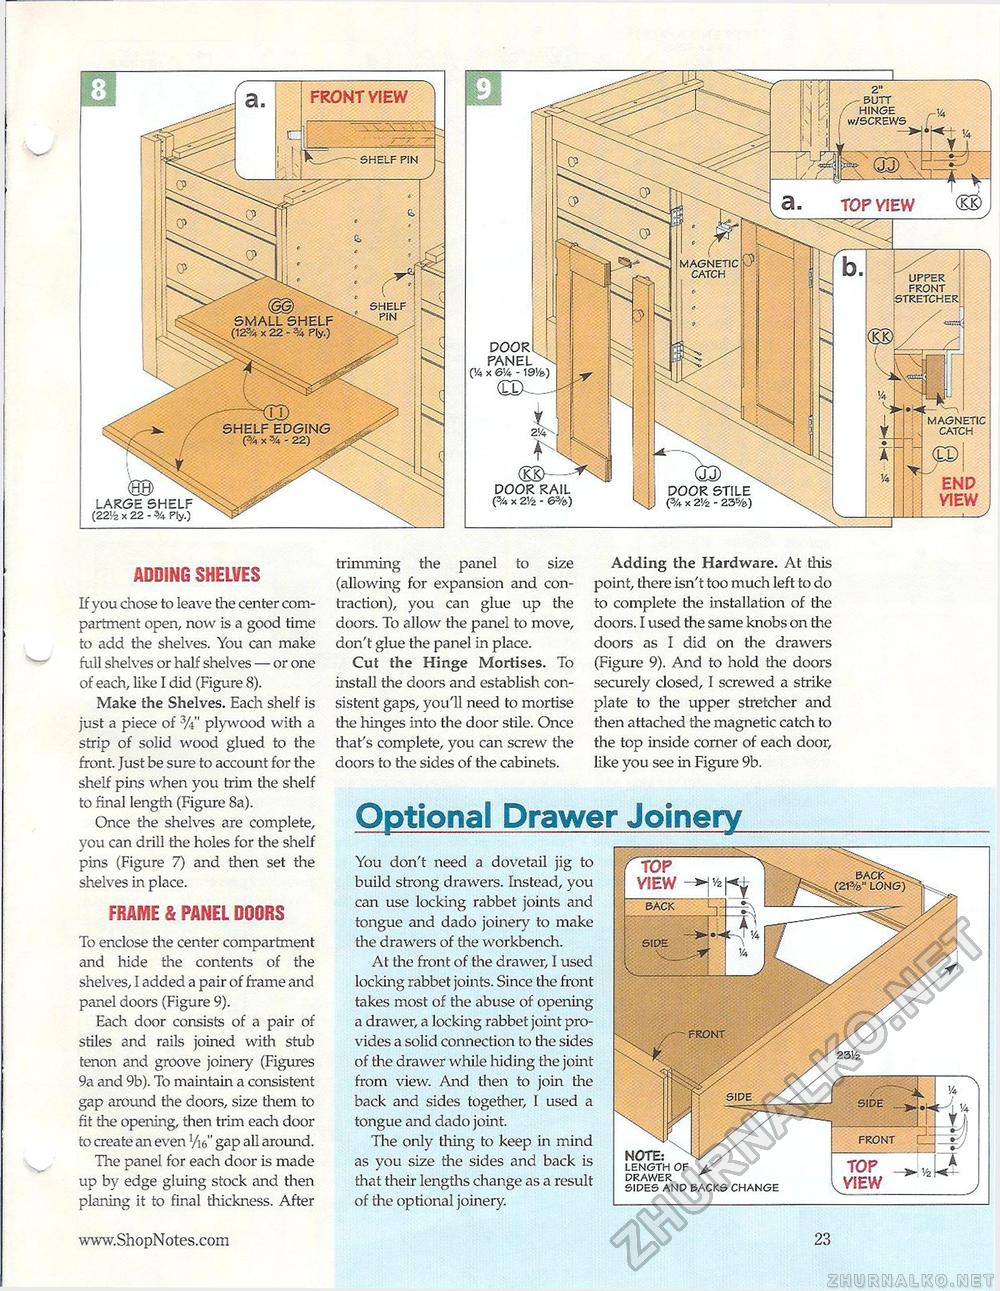
ADDING SHELVES If you chose to leave the center compartment open, now is a good time to add the shelves. You can make full shelves or half shelves — or one of each, like I did (Figure 8). Make the Shelves. Each shelf is just a piece of plywood with a strip of solid wood glued to the front. Just be sure to account for the shelf pins when you trim the shelf to final length (Figure 8a). Once the shelves are complete, you can drill the holes for the shelf pins (Figure 7) and then set the shelves in place. FRAME & PANEL DOORS To enclose the center compartment and hide the contents of the shelves, I added a pair of frame and panel doors (Figure 9). Each door consists of a pair of stiles and rails joined with stub tenon and groove joinery (Figures 9a and 9b). To maintain a consistent gap around the doors, size them to fit the opening, then trim each door to create an even l/ib" gap all around. The panel for each door is made up by edge gluing stock and then planing it to final thickness. After trimming the panel to size (allowing for expansion and contraction), you can glue up the doors. To allow the panel to move, don't glue the panel in place. Cut the Hinge Mortises. To install the doors and establish consistent gaps, you'll need to mortise the hinges into the door stile. Once that's complete, you can screw the doors to the sides of the cabinets. Adding the Hardware. At this point, there isn't too much left to do to complete the installation of the doors. I used the same knobs on the doors as I did on the drawers (Figure 9). And to hold the doors securely closed, I screwed a strike plate to the upper stretcher and then attached the magnetic catch to the top inside corner of each door, like you see in Figure 9b. DOORL : panel - (1/4 x &k -19'/») door rail X ZVz - 6%) MAGNETIC CATCH END VIEW . j 2" BUTT Optional Drawer Joinery You don't need a dovetail jig to build strong drawers. Instead, you can use locking rabbet joints and tongue and dado joinery to make the drawers of the workbench. At the front of the drawer, I used locking rabbet joints. Since the front takes most of the abuse of opening a drawer, a locking rabbet joint provides a solid connection to the sides of the drawer while hiding the joint from view. And then to join the back and sides together, 1 used a tongue and dado joint. The only tiling to keep in mind as vou size the sides and back Ls that their lengths change as a result of the optional joinery. NOTE: LENGTH OF DRAWER SIDES AND BACKS CHANGE 23 |


