84, страница 26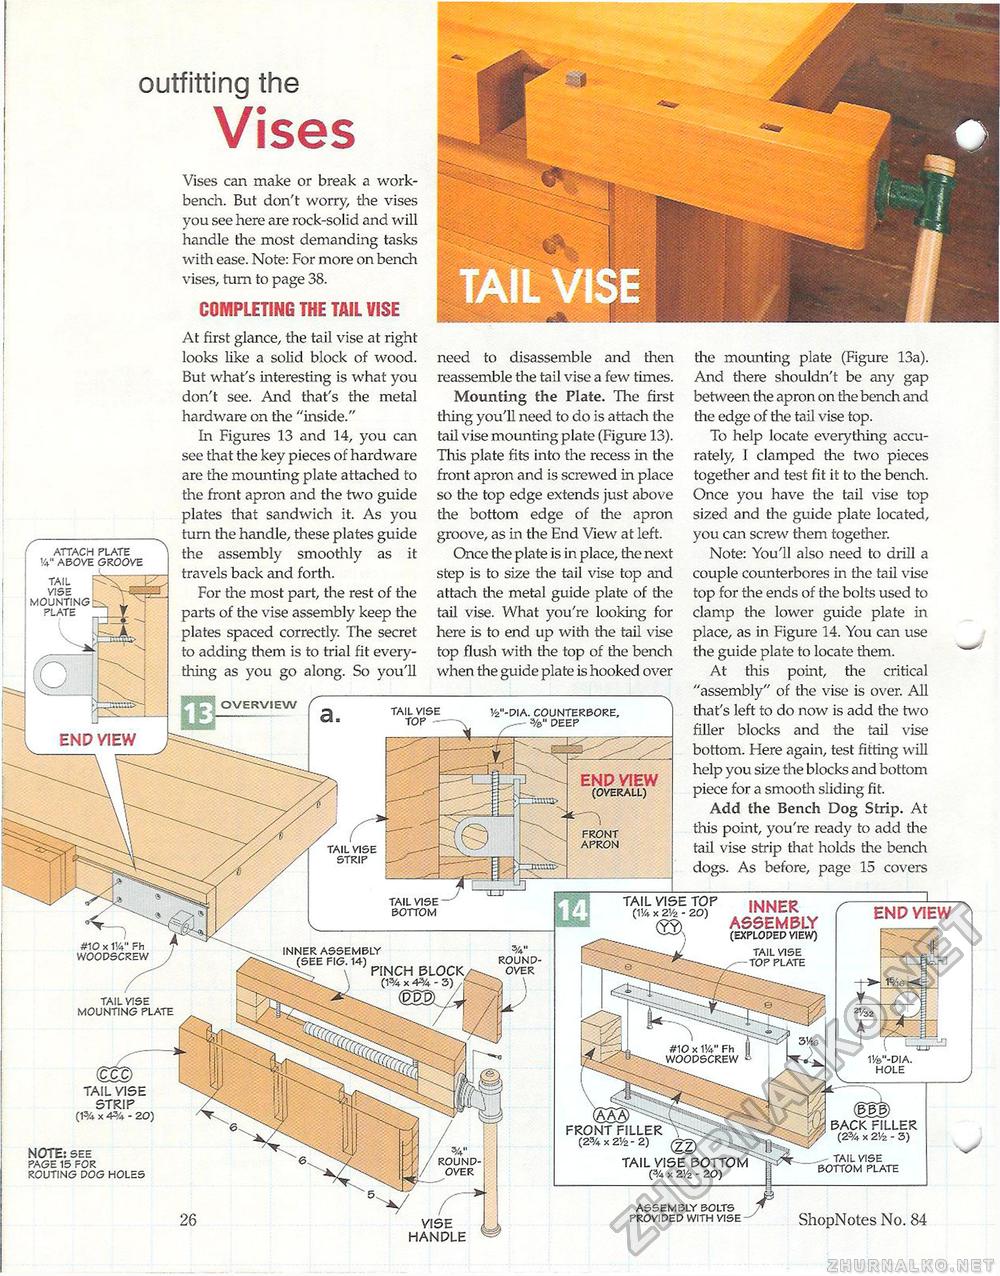
outfitting the Vises f ATTACH PLATE !4" ABOVE GROOVE Vises can make or break a workbench. But don't worry, the vises you see here are rock-solid and will handle the most demanding tasks with ease. Note: For more on bench vises, turn to page 38. COMPLETING THE TAIL VISE At first glance, the tail vise at right looks like a solid block of wood. But what's interesting is what you don't see. And that's the metal hardware on the "inside." In Figures 13 and 14, you can see that the key pieces of hardware are the mounting plate attached to the front apron and the two guide plates that sandwich it. As you turn the handle, these plates guide the assembly smoothly as it travels back and forth. For the most part, the rest of the parts of the vise assembly keep the plates spaced correctly. The secret to adding them is to trial fit everything as you go along. So you'll need to disassemble and then reassemble the tail vise a few times. Mounting the Plate. The first thing you'll need to do is attach the tail vise mounting plate (Figure 13). This plate fits into die recess in the front apron and is screwed in place so the top edge extends just above the bottom edge of the apron groove, as in the End View at left. Once the plate is in place, the next step is to size the tail vise top and attach the metal guide plate of the tail vise. What you're looking for here is to end up with the tail vise top flush with the top of the bench when the guide plate is hooked over the mounting plate (Figure 13a). And there shouldn't be any gap between the apron on the bench and the edge of the tail vise top. To help locate everything accurately, I clamped the two pieces together and test fit it to the bench. Once you have the tail vise top sized and the guide plate located, you can screw them together. Note: You'll also need to drill a couple counterbores in the tail vise top for the ends of the bolts used to clamp the lower guide plate in place, as in Figure 14. You can use the guide plate to locate them. At this point, the critical "assembly" of the vise is over. All that's left to do now is add the two filler blocks and the tail vise bottom. Here again, test fitting will help you size the blocks and bottom piece for a smooth sliding fit. Add the Bench Dog Strip. At this point, you're ready to add the tail vise strip that holds die bench dogs. As before, page 15 covers END VIEW
26 ShopNotes No. 84 |
|||||||||||||||||


