84, страница 29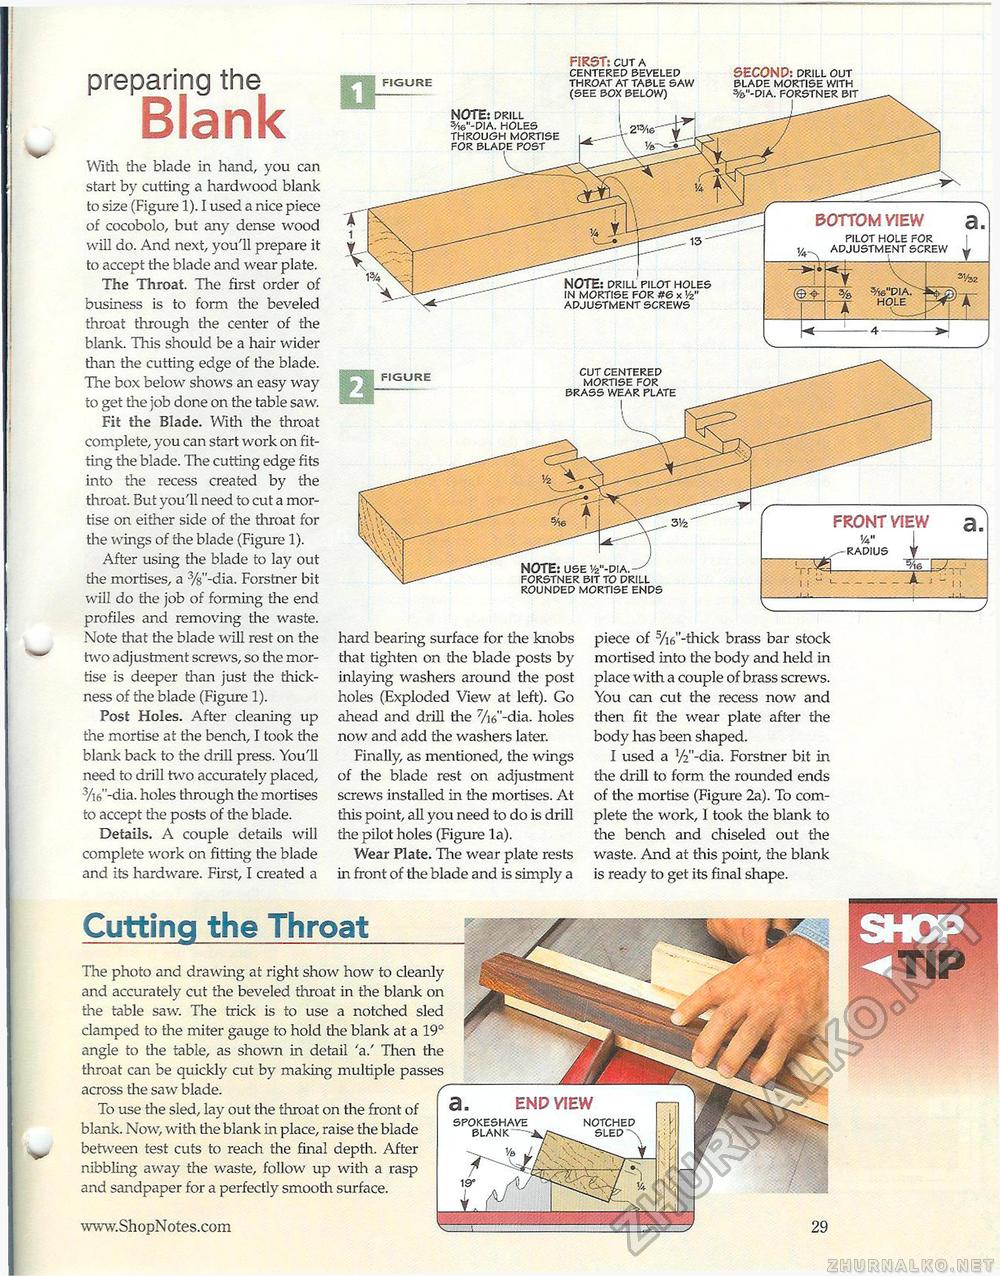
preparing the Blank With the blade in hand, you can start by cutting a hardwood blank to size (Figure 1). I used a nice piece of cocobolo, but any dense wood will do. And next, you'll prepare it to accept the blade and wear plate. The Throat. The first order of business is to form the beveled throat through the center of the blank. This should be a hair wider than the cutting edge of the blade. The box below shows an easy way to get the job done on the table saw. Fit the Blade. With the throat complete, you can start work on fitting the blade. The cutting edge fits into the recess created by the throat. But you'll need to cut a mortise on either side of the throat for the wings of the blade (Figure 1). After using the blade to lay out the mortises, a %"-dia. Forstner bit will do the job of forming the end profiles and removing the waste. Note that the blade will rest on the two adjustment screws, so the mortise is deeper than just the thickness of the blade (Figure 1). Post Holes. After cleaning up the mortise at the bench, I took the blank back to the drill press. You'll need to drill two accurately placed, 3/i6"-dia. holes through the mortises to accept the posts of the blade. Details. A couple details will complete work on fitting the blade and its hardware. First, I created a hard bearing surface for the knobs that tighten on the blade posts by inlaying washers around the post holes (Exploded View at left). Go ahead and drill the 7/i6"-dia. holes now and add the washers later. Finally, as mentioned, the wings of the blade rest on adjustment screws installed in the mortises. At this point, all you need to do is drill the pilot holes (Figure la). Wear Plate. The wear plate rests ill front of the blade and is simply a piece of 5/i6"-thick brass bar stock mortised into the body and held in place with a couple of brass screws. You can cut the recess now and then fit the wear plate after the body has been shaped. I used a '/V'-dia. Forstner bit in the drill to form the rounded ends of the mortise (Figure 2a). To complete the work, 1 took the blank to the bench and chiseled out the waste. And at this point, the blank is ready to get its final shape. KK-.ipK <!®StfiS!«!»G 3? ' '-I'' FRONT VIEW a '/v I ,- RADIUS t _______ _ B/r M-.-J FORSTNER BIT TO DRILL ROUNDED MORTISE ENDS FIRST: CUT A CENTERED BEVELED THROAT AT TABLE SAW (SEE note: DRILL S/16"-DIA. HOLES THROUGH MORTISE FOR SECOND: drill out E2i Ann: i^no-ricc WITH figure CUT CENTERED MORTISE FOR BRASS WEAR PLATE BOTTOM VIEW PILOT HOLE FOR ADJUSTMENT SCREW 3/i6"DIA. HOLE NCH t: DRILL PILOT HOLES IN MORTISE FOR #6 x Vz" ADJUSTMENT SCREWS Cutting the Throat The photo and drawing at right show how to cleanly and accurately cut the beveled throat in the blank on the table saw. The trick is to use a notched sled clamped to the miter gauge to hold the blank at a 19° angle to the table, as shown in detail 'a.' Then the throat can be quickly cut by making multiple passes across the saw blade. To use the sled, lay out the throat on the front of blank. Now, with the blank in place, raise the blade between test cuts to reach the final depth. After nibbling away the waste, follow up with a rasp and sandpaper for a perfectly smooth surface. a. END VIEW NOTCHED SPOKESHAVE BLANK |


