84, страница 31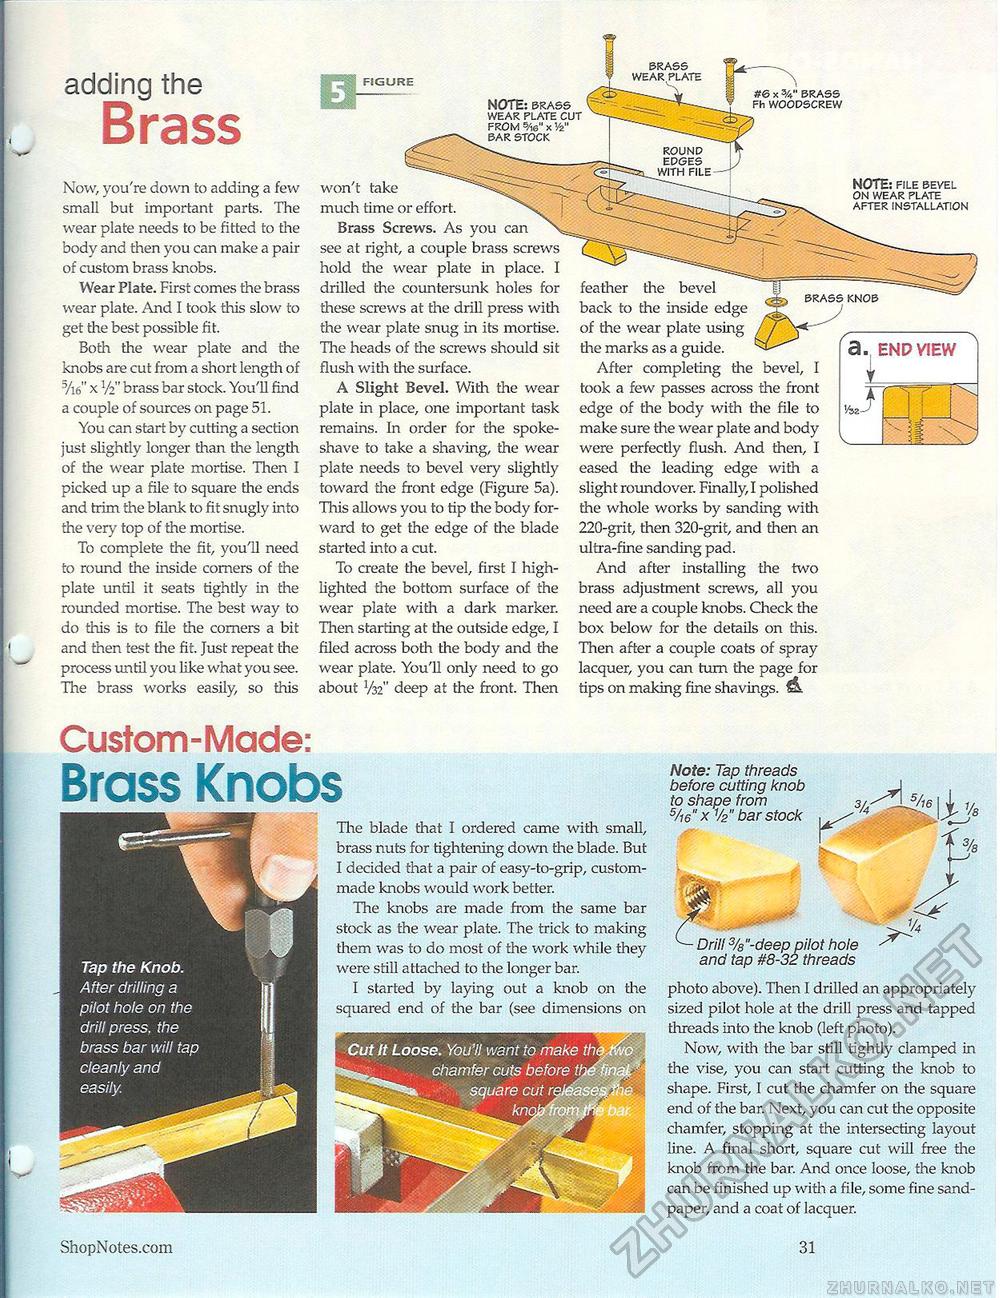
adding the Brass Now, you're down to adding a few small but important parts. The wear plate needs to be fitted to the body and then you can make a pair of custom brass knobs. Wear Plate. First comes the brass wear plate. And I took this slow to get the best possible fit. Both the wear plate and the knobs are cut from a short length of 5/i6" x V2" brass bar stock. You'll find a couple of sources on page 51. You can start by cutting a section just slightly longer than the length of the wear plate mortise. Then I picked up a file to square the ends and trim the blank to fit snugly into the very top of the mortise. To complete the fit, you'll need to round the inside comers of the plate until it seats tightly in the rounded mortise. The best way to do this is to file the comers a bit and then test the fit. Just repeat the process until you like what you see. The brass works easily, so this note: brass wear plate cut from 5/,s" x vn" #6 x BRASS Fh WOODSCREW won't take much time or effort. Brass Screws. As you can see at right, a couple brass screws hold the wear plate in place. I drilled the countersunk holes for these screws at the drill press with the wear plate snug in its mortise. The heads of die screws should sit flush with the surface. A Slight Bevel. With the wear plate in place, one important task remains. In order for the spokeshave to take a shaving, the wear plate needs to bevel very slightly toward the front edge (Figure 5a). This allows you to tip the body forward to get the edge of the blade started into a cut. To create the bevel, first I highlighted the bottom surface of the wear plate with a dark marker. Then starting at the outside edge, I filed across both the body and the wear plate. You'll only need to go about V32" deep at the front. Then note: FILE BEVEL ON WEAR PLATE AFTER INSTALLATION feather the bevel back to the inside edge of the wear plate using / / -<»-the marks as a guide. After completing the bevel, I took a few passes across the front edge of the body with the file to make sure the wear plate and body were perfectly flush. And then, I eased the leading edge with a slight roundover. Finally, I polished the whole works by sanding with 220-grit, then 320-grit, and then an ultra-fine sanding pad. And after installing the two brass adjustment screws, all you need are a couple knobs. Check the box below for the details on this. Then after a couple coats of spray lacquer, you can turn the page for tips on making fine shavings. fL a. END VIEW T Tap the Knob. After drilling a pilot hole on the drill press, the brass bar will tap cleanly and Custom-Made: Brass Knobs Hie blade that I ordered came with small, brass nuts for tightening down the blade. But I decided that a pair of easy-to-grip, custom-made knobs would work better. The knobs are made from the same bar stock as the wear plate. The trick to making them was to do most of the work while they were still attached to the longer bar. I started by laying out a knob on the squared end of the bar (see dimensions on Note: Tap threads before cutting knob to shape from 5/i6"xV2" bar stock oilot hole and tap #8-32 threads photo above). Then I drilled an appropriately sized pilot hole at the drill press and tapped threads into the knob (left photo). Now, with the bar still tightly clamped in the vise, you can start cutting the knob to shape. First, I cut the chamfer on the square end of the bar. Next, you can cut the opposite chamfer, stopping at the intersecting layout line. A final short, square cut will free the knob from the bar. And once loose, the knob can be finished up with a file, some fine sandpaper, and a coat of lacquer. www.ShopNotes.com 31 |


