84, страница 33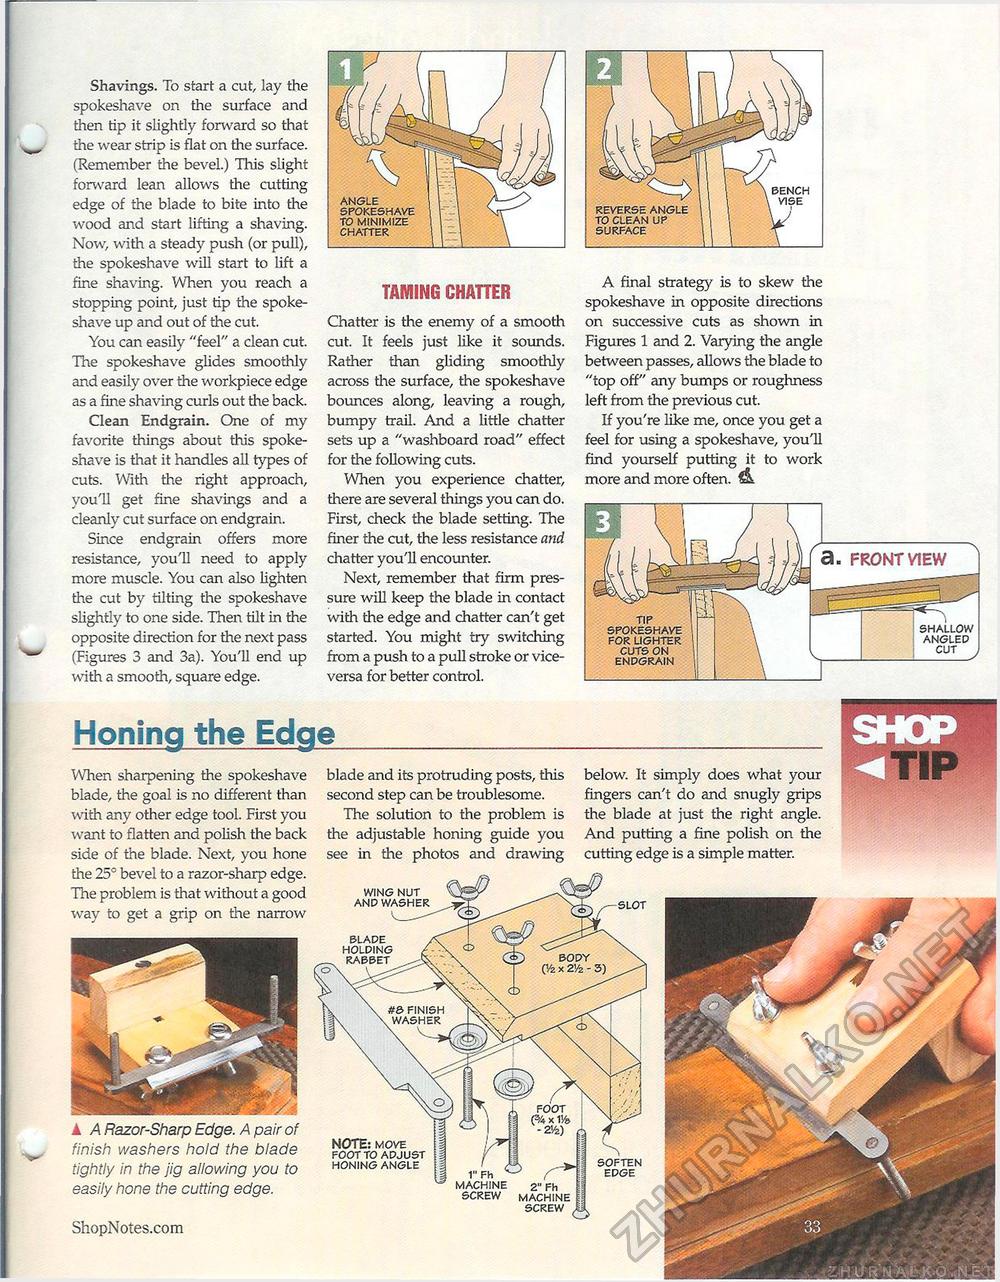
▲ A Razor-Sharp Edge. A pair of finish washers hold the blade tightly in the jig allowing you to easily hone the cutting edge. ShopNotes.com Shavings. To start a cut, lay the spokeshave on the surface and then tip it slightly forward so that the wear strip is flat on the surface. (Remember the bevel.) This slight forward lean allows the cutting edge of the blade to bite into the wood and start lifting a shaving. Now, with a steady push (or pull), the spokeshave will start to lift a fine shaving. When you reach a stopping point, just tip the spokeshave up and out of the cut. You can easily "feel" a clean cut. The spokeshave glides smoothly and easily over the workpiece edge as a fine shaving curls out the back. Clean Endgrain. One of my favorite things about this spokeshave is that it handles all types of cuts. With the right approach, you'll get fine shavings and a cleanly cut surface on endgrain. Since endgrain offers more resistance, you'll need to apply more muscle. You can also lighten the cut by tilting the spokeshave slightly to one side. Then tilt in the opposite direction for the next pass (Figures 3 and 3a). You'll end up with a smooth, square edge. TAMING CHATTER Chatter is the enemy of a smooth cut. It feels just like it sounds. Rather than gliding smoothly across the surface, the spokeshave bounces along, leaving a rough, bumpy trail. And a little chatter sets up a "washboard road" effect for the following cuts. When you experience chatter, there are several things you can do. First, check the blade setting. The finer the cut, the less resistance and chatter you'll encounter. Next, remember that firm pressure will keep the blade in contact with the edge and chatter can't get started. You might try switching from a push to a pull stroke or vice-versa for better control. A final strategy is to skew the spokeshave in opposite directions on successive cuts as shown in Figures 1 and 2. Varying the angle between passes, allows the blade to "top off" any bumps or roughness left from the previous cut. If you're like me, once you get a feel for using a spokeshave, you'll find yourself putting it to work more and more often. & Honing the Edge ANGLE SPOKESHAVE TO MINIMIZE CHATTER REVERSE ANGLE TO CLEAN UP SURFACE BENCH TIP SPOKESHAVE FOR LIGHTER CUTS ON ENDGRAIN When sharpening the spokeshave blade, the goal is no different than with any other edge tool. First you want to flatten and polish the back side of the blade. Next, you hone the 25° bevel to a razor-sharp edge. The problem is that without a good way to get a grip on the narrow blade and its protruding posts, this second step can be troublesome. The solution to the problem is the adjustable honing guide you see in the photos and drawing below. It simply does what your fingers can't do and snugly grips the blade at just the right angle. And putting a fine polish on the cutting edge is a simple matter. a. FRONT VIEW 1 SLOT BODY (Vz x 2Vz - 3) RABBET #& FINISH „ WASHER FOOT (% x V/& - 2</z) 1" Fh H MACHINE WING NUT AND WASHER BLADE HOLDING SOFTEN edge screw MACHINE SCREW NOTE: move FOOT TO ADJUST HONING ANGLE |


