84, страница 30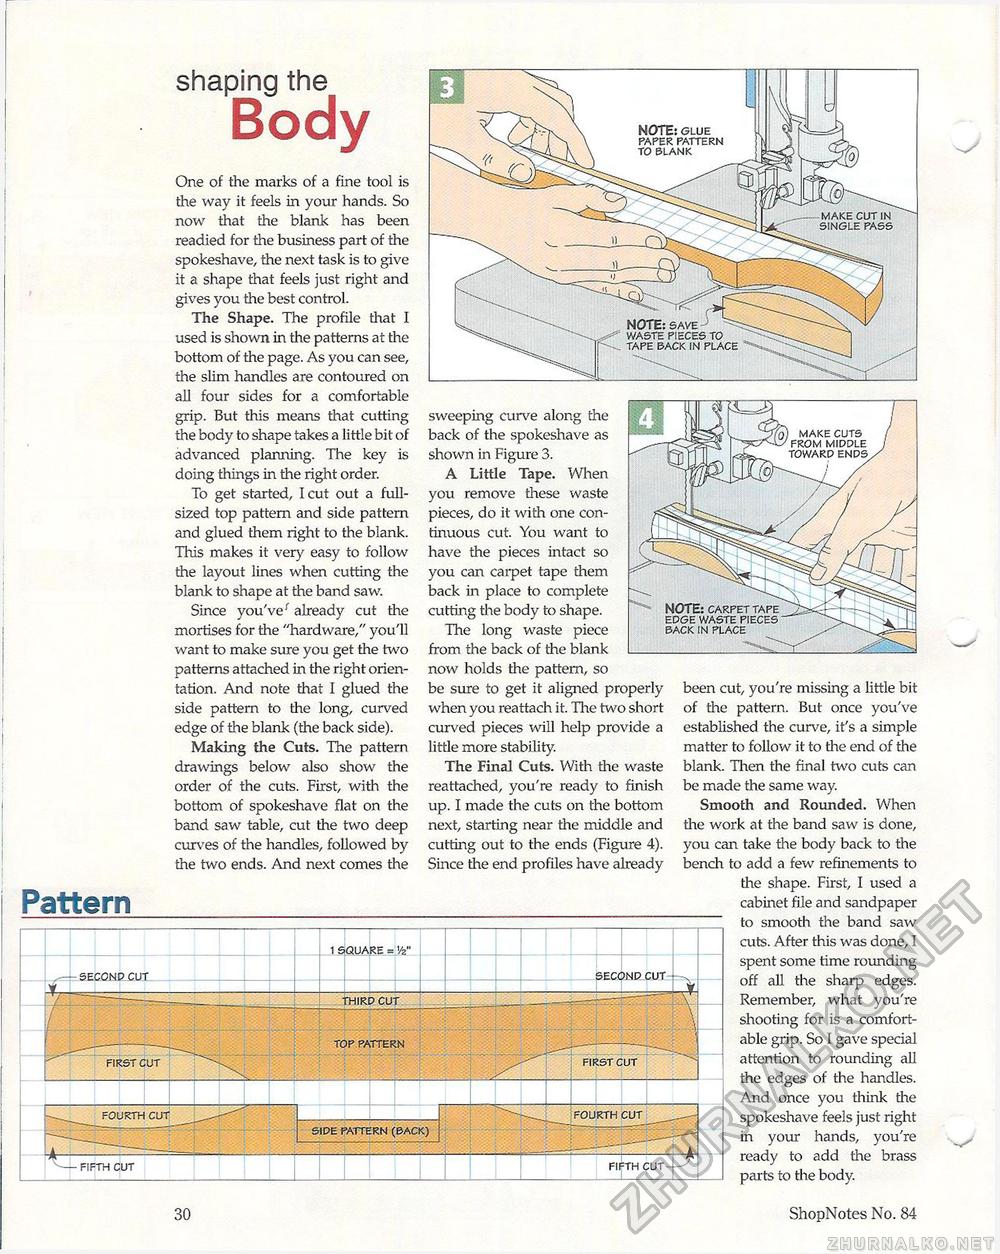
shaping the Body single pass SECOND CUT THIRD CUT TOP PATTERN FIRST CUT FOURTH CUT FOURTH CUT SIDE PATTERN (BACK) FIFTH CUT FIFTH CUT One of the marks of a fine tool is the way it feels in your hands. So now that the blank has been readied for the business part of the spokeshave, the next task is to give it a shape that feels just right and gives you the best control. The Shape. The profile that I used is shown in the patterns at the bottom of the page. As you can see, the slim handles are contoured on all four sides for a comfortable grip. But this means that cutting the body to shape takes a little bit of advanced planning. The key is doing things in the right order. To get started, I cut out a full-sized top pattern and side pattern and glued them right to the blank. This makes it very easy to follow the layout lines when cutting the blank to shape at the band saw. Since you've' already cut the mortises for the "hardware," you'll want to make sure you get the two patterns attached in the right orientation. And note that I glued the side pattern to the long, curved edge of the blank (the back side). Making the Cuts. The pattern drawings below also show the order of the cuts. First, with the bottom of spokeshave flat on the band saw table, cut the two deep curves of the handles, followed by the two ends. And next comes the Pattern sweeping curve along the back of the spokeshave as shown in Figure 3. A Little Tape. When you remove these waste pieces, do it with one continuous cut. You want to have the pieces intact so you can carpet tape them back in place to complete cutting the body to shape. The long waste piece from the back of the blank now holds the pattern, so be sure to get it aligned properly when you reattach it. The two short curved pieces will help provide a little more stability. The Final Cuts. With tire waste reattached, you're ready to finish up. I made the cuts on the bottom next, starting near the middle and cutting out to the ends (Figure 4). Since the end profiles have already been cut, you're missing a little bit of the pattern. But once you've established the curve, it's a simple matter to follow it to the end of the blank. Then the final two cuts can be made the same way. Smooth and Rounded. When the work at the band saw is done, you caii take the body back to the bench to add a few refinements to the shape. First, I used a cabinet file and sandpaper to smooth the band saw cuts. After this was done, I spent some time rounding off all the sharp edges. Remember, what you're shooting for is a comfortable grip. So I gave special attention to rounding all the edges of the handles. And once you think die spokeshave feels just right in your hands, you're ready to add the brass parts to the body. 30 ShopNotes No. 84 |


