84, страница 35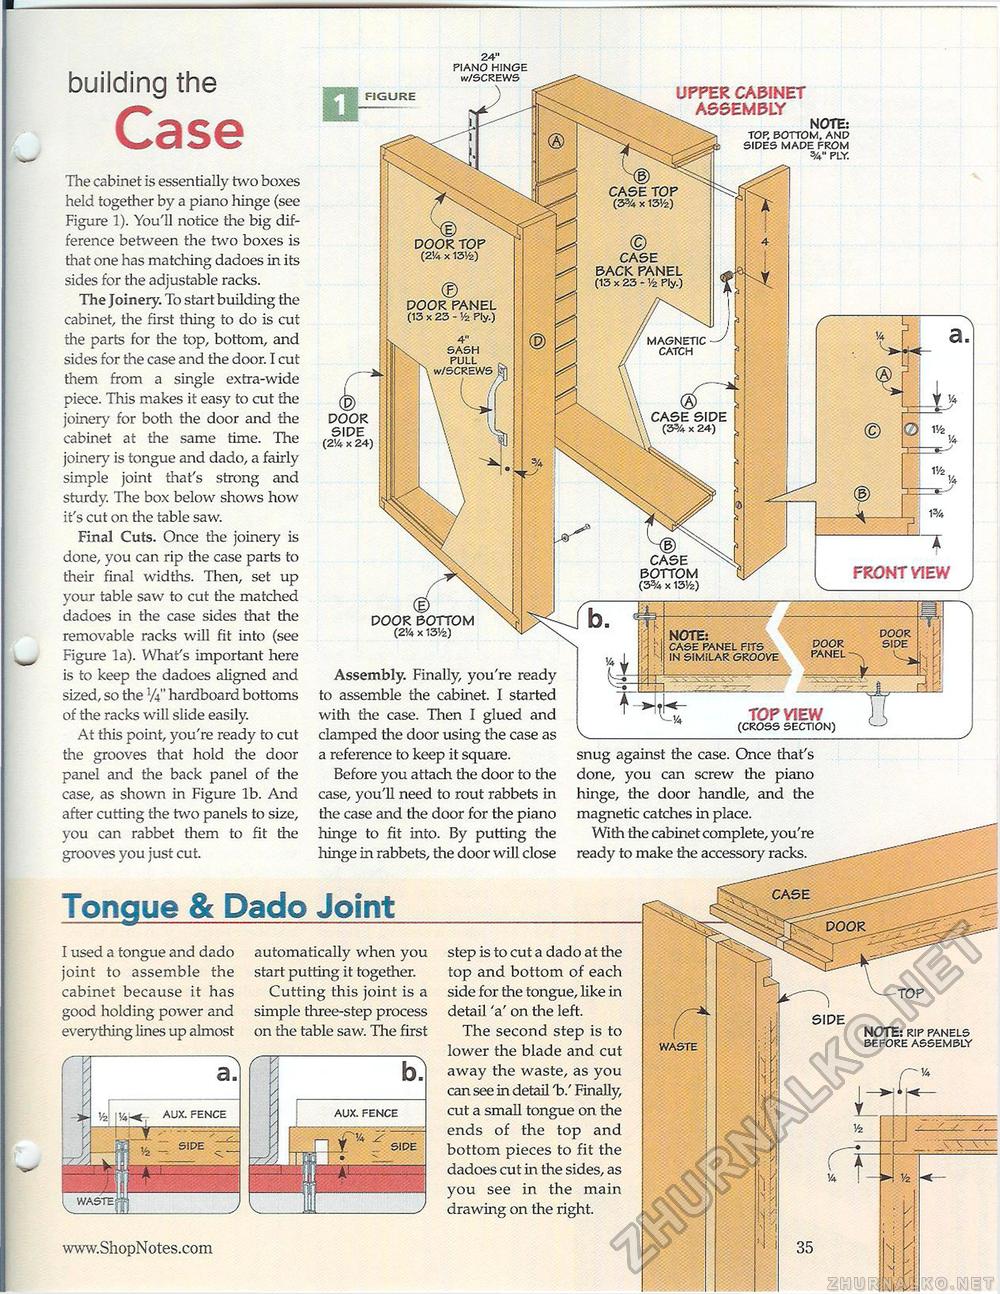
DOOR TOP (2V« x I3V2) DOOR PANEL (13 x 23 - 1/2 Ply.) 4" SASH PULL w/SCREWS DOOR CASE BOTTOM (3% x 131/z) DOOR SIDE NOTE: CASE PANEL FITS IN SIMILAR GROOVE DOOR PANEL 24" PIANO HINGE w/SCREWS UPPER CABINET ASSEMBLY NOTE: TOP, BOTTOM, AND SIDES MADE FROM PLY. FIGURE CASE BACK PANEL (13 x 23 - '/2 Ply.) MAGNETIC CATCH ® \ CASE SIDE \ (3% x 24) SIDE (2!4 x 24) FRONT VIEW DOOR BOTTOM (2<A x 13VZ) Assembly. Finally, you're ready to assemble the cabinet. I started with the case. Then I glued and clamped the door using the case as a reference to keep it square. Before you attach the door to the case, you'll need to rout rabbets in the case and the door for the piano hinge to fit into. By putting the hinge in rabbets, the door will close TOP VIEW (CROSS SECTION) snug against the case. Once that's done, you can screw the piano hinge, the door handle, and the magnetic catches in place. With the cabinet complete, you're ready to make the accessory racks. building the Case The cabinet is essentially two boxes held together by a piano hinge (see Figure 1). You'll notice the big difference between the two boxes is that one has matching dadoes in its sides for the adjustable racks. The Joinery. To start building the cabinet, the first thing to do is cut the parts for the top, bottom, and sides for the case and the door. I cut them from a single extra-wide piece. This makes it easy to cut the joinery for both the door and the cabinet at the same time. The joinery is tongue and dado, a fairly simple joint that's strong and sturdy. The box below shows how it's cut on the table saw. Final Cuts. Once the joinery is done, you can rip the case parts to their final widths. Then, set up your table saw to cut the matched dadoes in the case sides that the removable racks will fit into (see Figure la). What's important here is to keep the dadoes aligned and sized, so the Vi" hardboard bottoms of the racks will slide easily. At this point, you're ready to cut the grooves that hold the door panel and the back panel of the case, as shown in Figure lb. And after cutting the two panels to size, you can rabbet them to fit the grooves you just cut. Tongue & Dado Joint SIDE NOTE: RIP PANELS BEFORE ASSEMBLY step is to cut a dado at the top and bottom of each side for the tongue, like in detail 'a' on the left. The second step is to lower the blade and cut away the waste, as you can see in detail 'b.' Finally, cut a small tongue on the ends of the top and bottom pieces to fit the dadoes cut in the sides, as you see in the main drawing on the right. r WASTE I used a tongue and dado joint to assemble the cabinet because it has good holding power and everything lines up almost AUX. FENCE automatically when you start putting it together. Cutting this joint is a simple three-step process on the table saw. The first |


