86, страница 18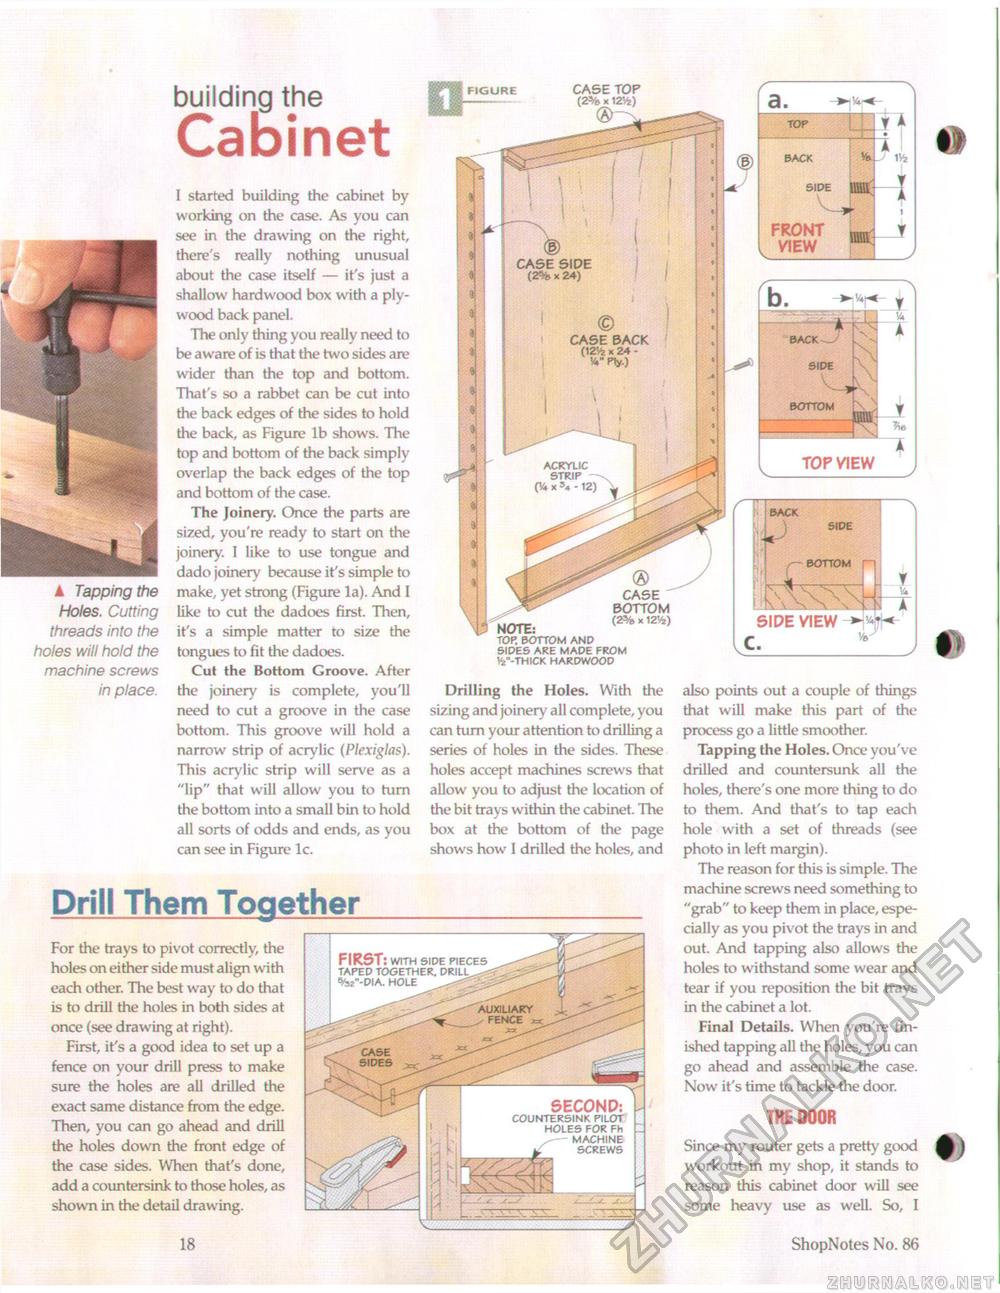
▲ Tapping the Holes. Cutting threads into the holes will hold the machine screws in place. building the CabinetI started building the cabinet by working on the case. As you can see in the drawing on the right, there's really nothing unusual about the case itself — it's just a shallow hardwood box with a plywood back panel. The only thing you really need to be aware of is that the two sides are wider than the top and bottom. That's so a rabbet can be cut into the back edges of the sides to hold the back, as Figure lb shows. The top and bottom of the back simply overlap the back edges of the top and bottom of the case. The Joinery. Once the parts are sized, you're ready to start on the joinery. I like to use tongue and dado joinery because it's simple to make, yet strong (Figure la). And I like to cut the dadoes first. Then, it's a simple matter to size the tongues to fit the dadoes. Cut the Bottom Groove. After the joinery is complete, you'll need to cut a groove in the case bottom. This groove will hold a narrow strip of acrylic (Plexiglas). This acrylic strip will serve as a "lip" that will allow you to turn the bottom into a small bin to hold all sorts of odds and ends, as you can see in Figure lc. Drill Them TogetherCASE TOP x 12Vfe) r © CASE BACK (12Vfe x 24 -v4" Ply.) NOTE: top. bottom and sides are made from h>"-thick hardwood Drilling the Holes. With the sizing and joinery all complete, you can turn your attention to drilling a series of holes in the sides. These holes accept machines screws that allow you to adjust the location of the bit trays within the cabinet. The box at the bottom of the page shows how I drilled the holes, and For the trays to pivot correctly, the holes on either side must align with each other. The best way to do that is to drill the holes in both sides at once (see drawing at right). First, it's a good idea to set up a fence on your drill press to make sure the holes are all drilled the exact same distance from the edge. Then, you can go ahead and drill the holes down the front edge of the case sides. When that's done, add a countersink to those holes, as shown in the detail drawing. > a. TOP LL r BACK Vfe. l4 5IDE vm FRONT mm VIEW ™ b. back side t^F1 —/ . bottom *r*z y t m T m zs TOP VIEW ® CASE BOTTOM (2% x 12Mz) SIDE VIEW c._v»- also points out a couple of things that will make this part of the process go a little smoother. Tapping the Holes. Once you've drilled and countersunk all the holes, there's one more thing to do to them. And that's to tap each hole with a set of threads (see photo in left margin). The reason for this is simple. The machine screws need something to "grab" to keep them in place, especially as you pivot the trays in and out. And tapping also allows the holes to withstand some wear and tear if you reposition the bit trays in the cabinet a lot. Final Details. When you're finished tapping all the holes, you can go ahead and assemble the case. Now it's time to tackle the door. THE DOOR Since my router gets a pretty good workout in my shop, it stands to reason this cabinet door will see some heavy use as well. So, I 18 ShopNotes No. 86 |


