86, страница 19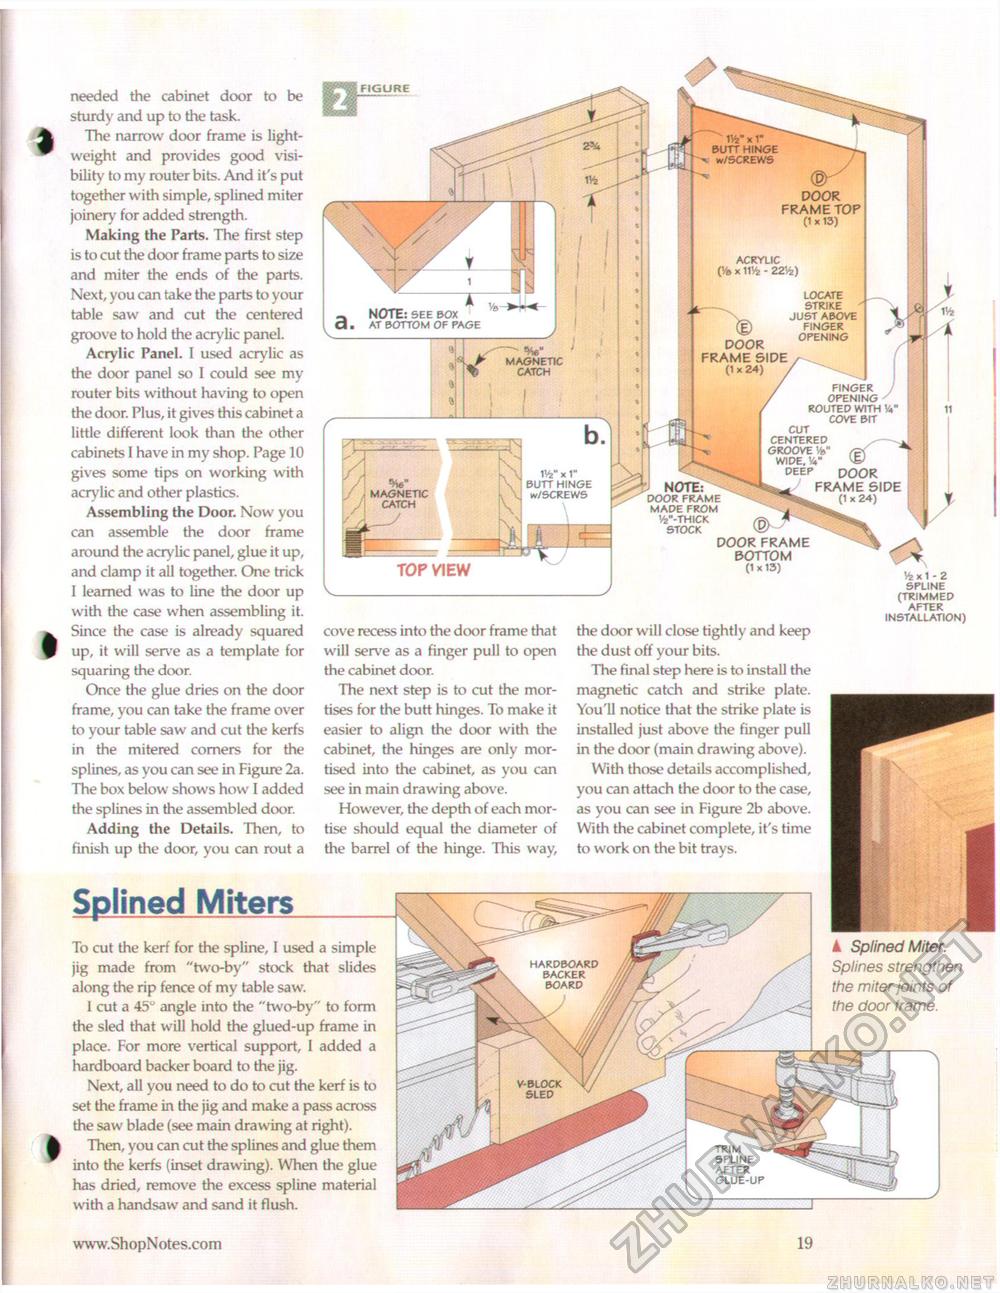
needed the cabinet door to be sturdy and up to the task. The narrow door frame is lightweight and provides good visibility to my router bits. And it's put together with simple, splined miter joinery for added strength. Making the Parts. The first step is to cut the door frame parts to size and miter the ends of the parts. Next, you can take the parts to your table saw and cut the centered groove to hold the acrylic panel. Acrylic Panel. I used acrylic as the door panel so I could see my router bits without having to open the door. Plus, it gives this cabinet a little different look than the other cabinets I have in my shop. Page 10 gives some tips on working with acrylic and other plastics. Assembling the Door. Now you can assemble the door frame around the acrylic panel, glue it up, and clamp it all together. One trick I learned was to line the door up with the case when assembling it. Since the case is already squared up, it will serve as a template for squaring the door. Once the glue dries on the door frame, you can take the frame over to your table saw and cut the kerfs in the mitered corners for the splines, as you can see in Figure 2a. The box below shows how I added the splines in the assembled door. Adding the Details. Then, to finish up the door, you can rout a Splined MitersTo cut the kerf for the spline, I used a simple jig made from "two-by" stock that slides along the rip fence of my table saw. I cut a 45" angle into the "two-by" to form the sled that will hold the glued-up frame in place. For more vertical support, I added a hardboard backer board to the jig. Next, all you need to do to cut the kerf is to set the frame in the jig and make a pass across the saw blade (see main drawing at right). Then, you can cut the splines and glue them into the kerfs (inset drawing). When the glue has dried, remove the excess spline material with a handsaw and sand it flush. cove recess into the door frame that will serve as a finger pull to open the cabinet door. The next step is to cut the mortises for the butt hinges. To make it easier to align the door with the cabinet, the hinges are only mortised into the cabinet, as you can see in main drawing above. However, the depth of each mortise should equal the diameter of the barrel of the hinge. This way, the door will close tightly and keep the dust off your bits. The final step here is to install the magnetic catch and strike plate. You'll notice that the strike plate is installed just above the finger pull in the door (main drawing above). With those details accomplished, you can attach the door to the case, as you can see in Figure 2b above. With the cabinet complete, it's time to work on the bit trays. Vfe x 1 - 2 spline (trimmed after installation) ▲ Splined Miter. Splines strengthen the miter joints of the door frame. 19 |


