86, страница 32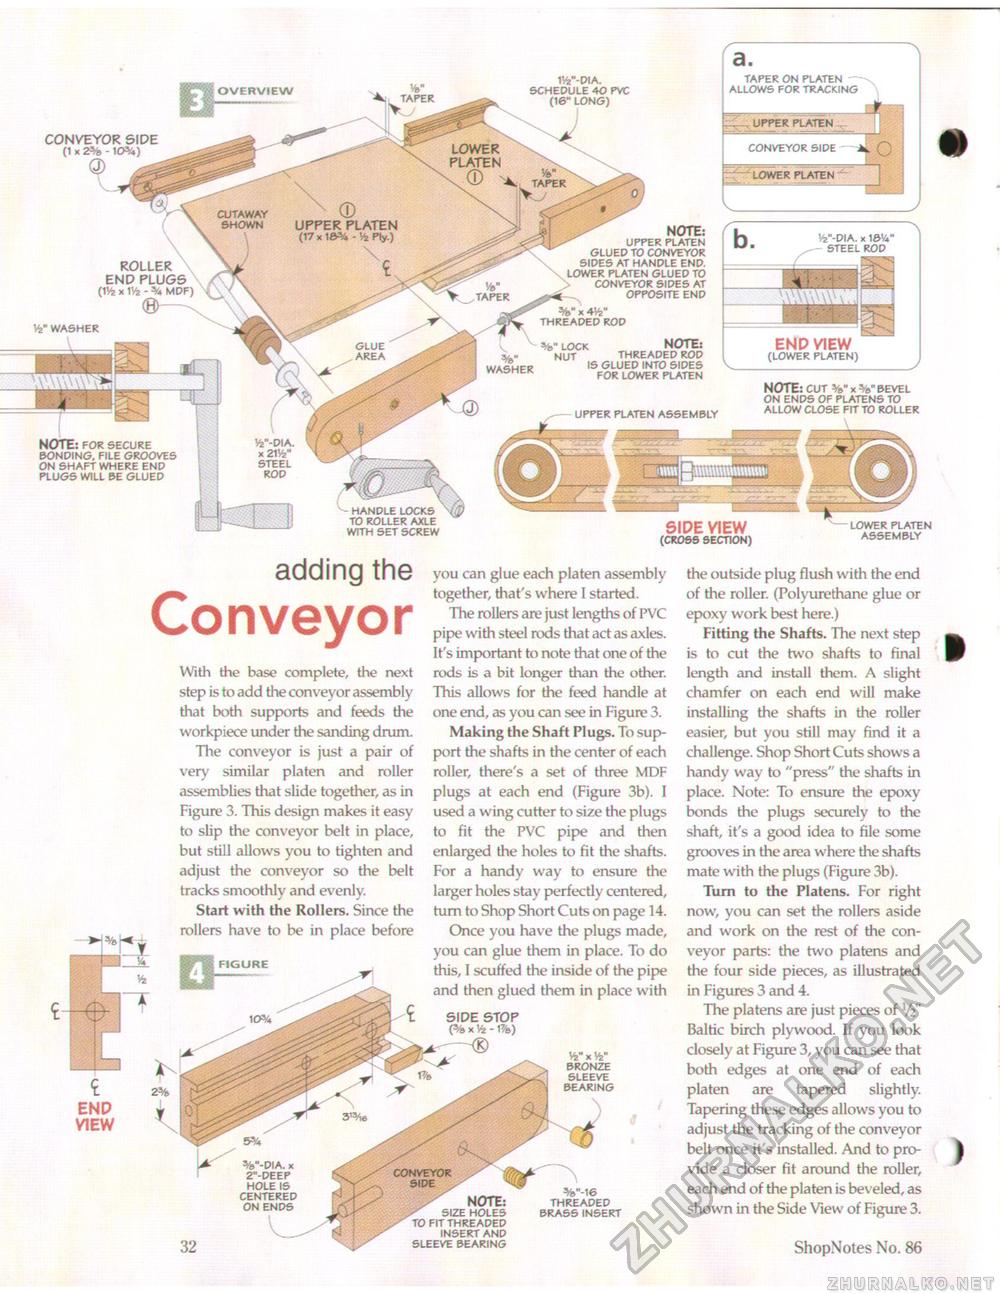
CONVEYOR SIDE (1 X 2% - 10%,) Q) NOTE: FOR SECURE BONDING. FILE GROOVES ON SHAFT WHERE END PLUGS WILL BE GLUED - HANDLE LOCKS TO ROLLER AXLE WITH SET SCREW SIDE VIEW (CROSS SECTION) LOWER PLATEN ASSEMBLY
adding the ConveyorWith the base complete, the next step is to add the conveyor assembly that both supports and feeds the workpiece under the sanding drum. The conveyor is just a pair of very similar platen and roller assemblies that slide together, as in Figure 3. This design makes it easy to slip the conveyor belt in place, but still allows you to tighten and adjust the conveyor so the belt tracks smoothly and evenly. Start with the Rollers. Since the rollers have to be in place before you can glue each platen assembly together, that's where I started. The rollers are just lengths of PVC pipe with steel rods that act as axles. It's important to note that one of the rods is a bit longer than the other. This allows for the feed handle at one end, as you can see in Figure 3. Making the Shaft Plugs. To support the shafts in the center of each roller, there's a set of three MDF plugs at each end (Figure 3b). I used a wing cutter to size the plugs to fit the PVC pipe and then enlarged the holes to fit the shafts. For a handy way to ensure the larger holes stay perfectly centered, turn to Shop Short Cuts on page 14. Once you have the plugs made, you can glue them in place. To do this, I scuffed the inside of the pipe and then glued them in place with NOTE: SIZE HOLES TO FIT THREADED INSERT AND SLEEVE BEARING THREADED BRASS INSERT the outside plug flush with the end of the roller. (Polyurethane glue or epoxy work best here.) Fitting the Shafts. The next step is to cut the two shafts to final length and install them. A slight chamfer on each end will make installing the shafts in the roller easier, but you still may find it a challenge. Shop Shortcuts shows a handy way to "press" the shafts in place. Note: To ensure the epoxy bonds the plugs securely to the shaft, it's a good idea to file some grooves in the area where the shafts mate with the plugs (Figure 3b). Turn to the Platens. For right now, you can set the rollers aside and work on the rest of the conveyor parts: the two platens and the four side pieces, as illustrated in Figures 3 and 4. The platens are just pieces of V2" Baltic birch plywood. If you look closely at Figure 3, you can see that both edges at one end of each platen are tapered slightly. Tapering these edges allows you to adjust the tracking of the conveyor belt once it's installed. And to provide a closer fit around the roller, each end of the platen is beveled, as shown in the Side View of Figure 3. 32 ShopNotes No. 86 |
|||||||||||||||||||


