86, страница 35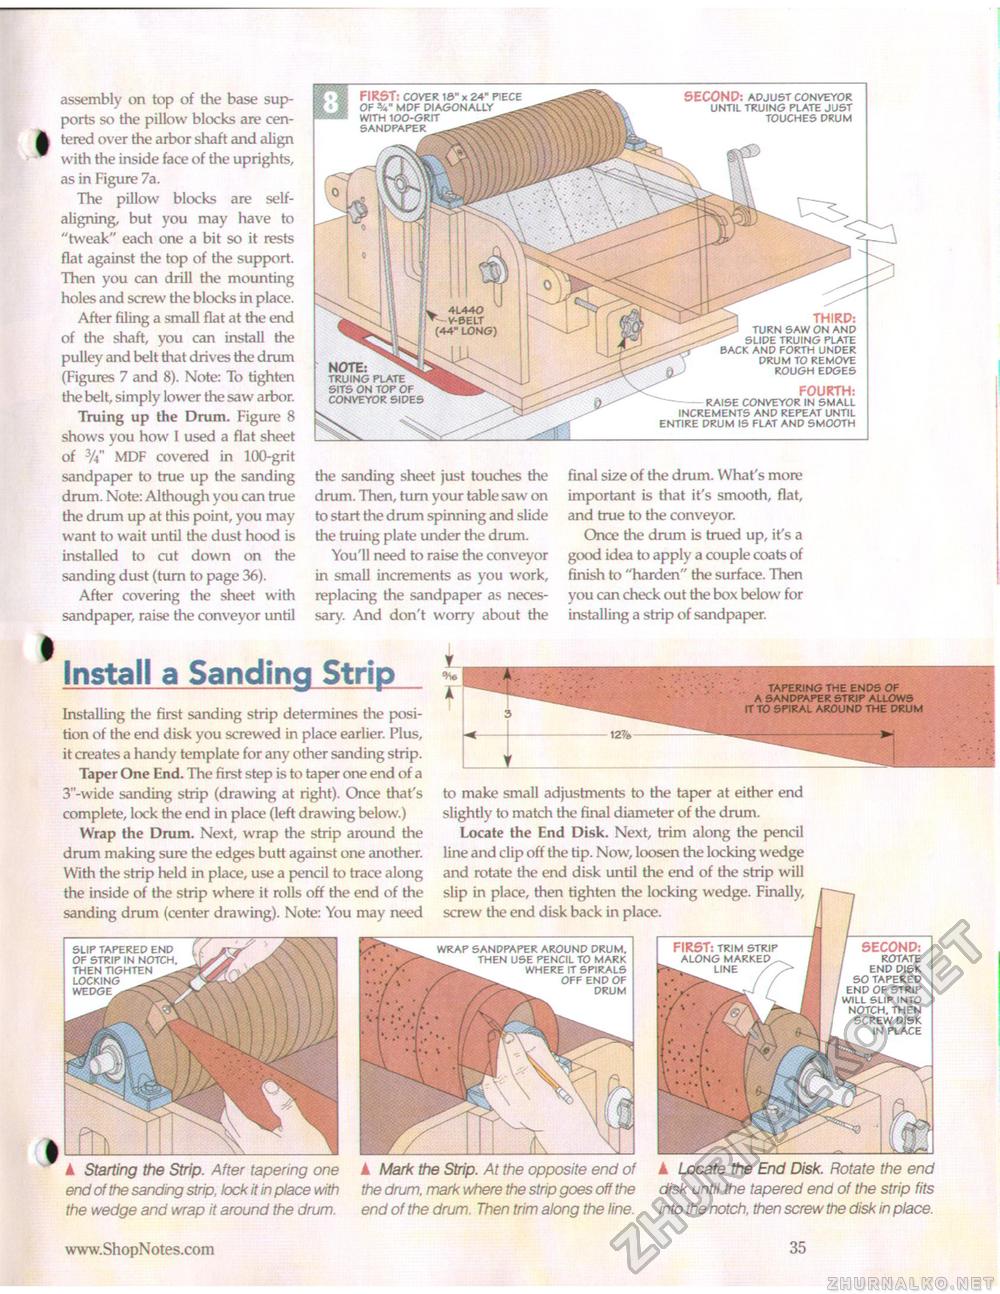
assembly on top of the base supports so the pillow blocks are centered over the arbor shaft and align with the inside face of the uprights, as in Figure 7a. The pillow blocks are self-aligning, but you may have to "tweak" each one a bit so it rests flat against the top of the support. Then you can drill the mounting holes and screw the blocks in place. After filing a small flat at the end of the shaft, you can install the pulley and belt that drives the drum (Figures 7 and 8). Note: To tighten the belt, simply lower the saw arbor. Truing up the Drum. Figure 8 shows you how I used a flat sheet of 3W MDF covered in 100-grit sandpaper to true up the sanding drum. Note: Although you can true the drum up at this point, you may want to wait until the dust hood is installed to cut down on the sanding dust (turn to page 36). After covering the sheet with sandpaper, raise the conveyor until SECONP: ADJUST CONVEYOR UNTIL TRUING PLATE JUST TOUCHES DRUM THIRD: TURN SAW ON AND SLIDE TRUING PLATE BACK AND FORTH UNDER DRUM TO REMOVE ROUGH EDGES FOURTH: RAISE CONVEYOR IN SMALL INCREMENTS AND REPEAT UNTIL ENTIRE DRUM IS FLAT AND SMOOTH the sanding sheet just touches the drum. Then, turn your table saw on to start the drum spinning and slide the truing plate under the drum. You'll need to raise the conveyor in small increments as you work, replacing the sandpaper as necessary. And don't worry about the NOTE TRUING PLATE SITS ON TOP OF CONVEYOR SIDES final size of the drum. What's more important is that it's smooth, flat, and true to the conveyor. Once the drum is trued up, it's a good idea to apply a couple coats of finish to "harden" the surface. Then you can check out the box below for installing a strip of sandpaper. FIRST: COVER 16" x 24" PIECE OF MDF DIAGONALLY WITH 100-GRIT SANDPAPER " TAPERING THE ENDS OF A SANDPAPER STRIP ALLOWS IT TO SPIRAL AROUND THE DRUM to make small adjustments to the taper at either end slightly to match the final diameter of the drum. Locate the End Disk. Next, trim along the pencil line and clip off the tip. Now, loosen the locking wedge and rotate the end disk until the end of the strip will slip in place, then tighten the locking wedge. Finally, screw the end disk back in place. Install a Sanding Strip ▲ Starting the Strip. After tapering one end of the sanding strip, lock it in place with the wedge and wrap it around the drum. k Mark the Strip. At the opposite end of the drum, mark where the strip goes off the end of the drum. Then trim along the line. A Locate the End Disk. Rotate the end disk until the tapered end of the strip fits into the notch, then screw the disk in place. Installing the first sanding strip determines the position of the end disk you screwed in place earlier. Plus, it creates a handy template for any other sanding strip. Taper One End. The first step is to taper one end of a 3"-wide sanding strip (drawing at right). Once that's complete, lock the end in place (left drawing below.) Wrap the Drum. Next, wrap the strip around the drum making sure the edges butt against one another. With the strip held in place, use a pencil to trace along the inside of the strip where it rolls off the end of the sanding drum (center drawing). Note: You may need WRAP SANDPAPER AROUND DRUM. THEN USE PENCIL TO MARK WHERE IT SPIRALS OFF END OF DRUM FIRST: TRIM STRIP SLIP TAPERED END OF STRIP IN NOTCH, THEN TIGHTEN LOCKING WEDGE SECOND: ROTATE END DISK SO TAPERED END OF STRIP WILL SLIP INTO NOTCH. THEN SCREW DISK IN PLACE 35 |


