88, страница 29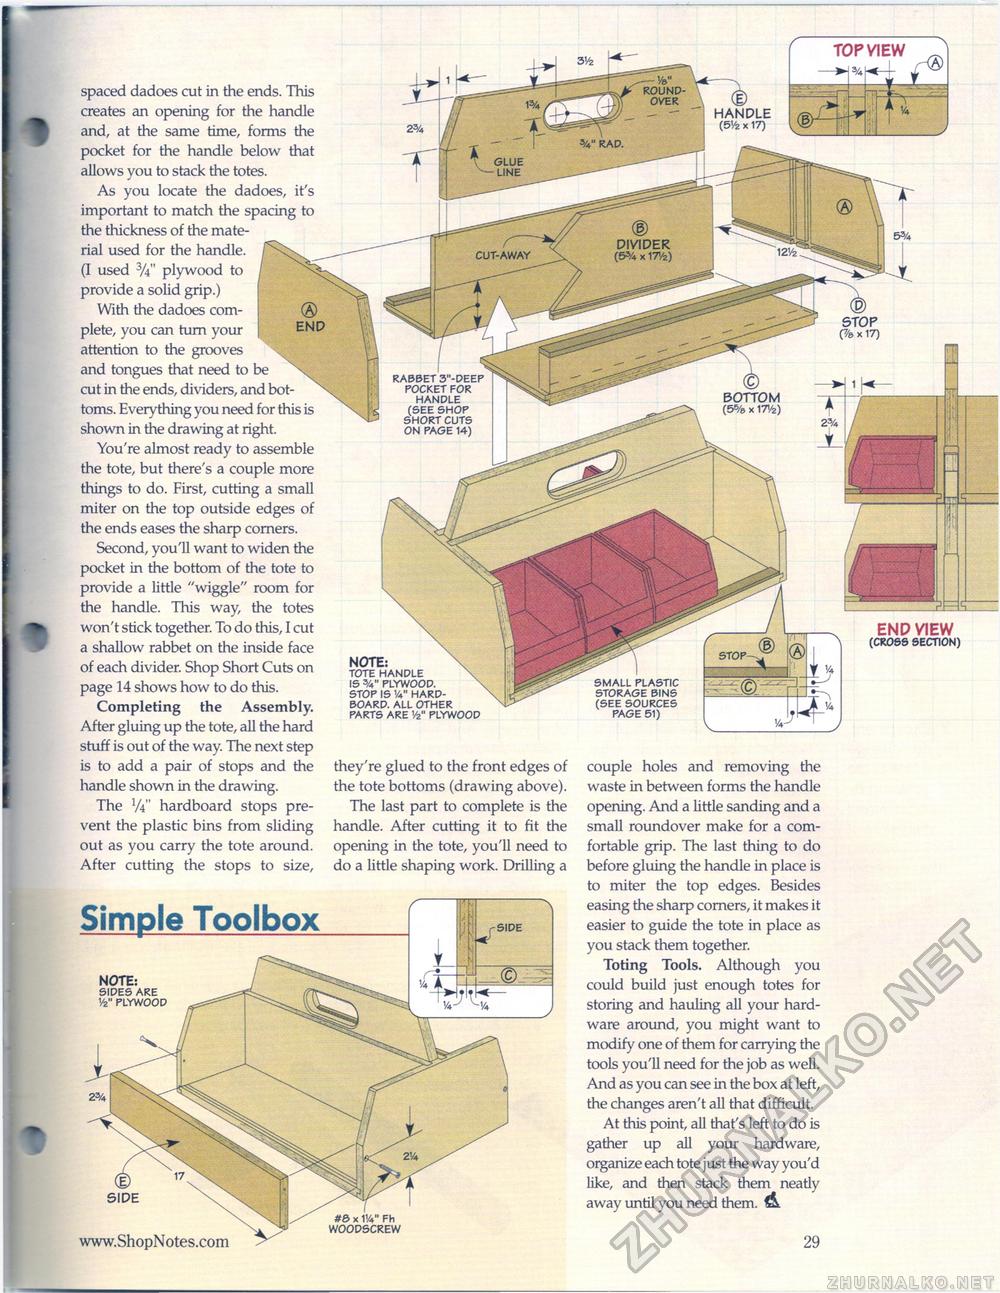
I TOP VIEW —w ROUND-OVER HANDLE (5Vz x 17) DIVIDER (53/4 X \r/z) CUT-AWAY spaced dadoes cut in the ends. This creates an opening for the handle and, at the same time, forms the pocket for the handle below that allows you to stack the totes. As you locate the dadoes, it's important to match the spacing to the thickness of the material used for the handle. (I used 3/4" plywood to provide a solid grip.) With the dadoes complete, you can turn your attention to the grooves and tongues that need to be cut in the ends, dividers, and bottoms. Everything you need for this is shown in the drawing at right. You're almost ready to assemble the tote, but there's a couple more things to do. First, cutting a small miter on the top outside edges of the ends eases the sharp corners. Second, you'll want to widen the pocket in the bottom of the tote to provide a little "wiggle" room for the handle. This way, the totes won't stick together. To do this, I cut a shallow rabbet on the inside face of each divider. Shop Short Cuts on page 14 shows how to do this. Completing the Assembly. After gluing up the tote, all the hard stuff is out of the way. The next step is to add a pair of stops and the handle shown in the drawing. The W' hardboard stops prevent the plastic bins from sliding out as you carry the tote around. After cutting the stops to size, Simple ToolboxNOTE: SIDES ARE Va" PLYWOOD STOP (7/a X17) © BOTTOM (5% x 17V2) RABBET 3"-DEEP POCKET FOR HANDLE (SEE SHOP SHORT CUTS ON PAGE 14) END VIEW (CROSS SECTION) SMALL PLASTIC STORAGE BINS (SEE SOURCES PAGE 51) NOTE: TOTE HANDLE IS 3A" PLYWOOD. STOP IS 14" HARD-BOARD. ALL OTHER PARTS ARE 1/2" PLYWOOD they're glued to the front edges of the tote bottoms (drawing above). The last part to complete is the handle. After cutting it to fit the opening in the tote, you'll need to do a little shaping work. Drilling a DE SIDE #3 x 1!4" Fh WOODSCREW couple holes and removing the waste in between forms the handle opening. And a little sanding and a small roundover make for a comfortable grip. The last thing to do before gluing the handle in place is to miter the top edges. Besides easing the sharp corners, it makes it easier to guide the tote in place as you stack them together. Toting Tools. Although you could build just enough totes for storing and hauling all your hardware around, you might want to modify one of them for carrying the tools you'll need for the job as well. And as you can see in the box at left, the changes aren't all that difficult. At this point, all that's left to do is gather up all your hardware, organize each tote just the way you'd like, and then stack them neatly away until you need them. & 29 |


