88, страница 27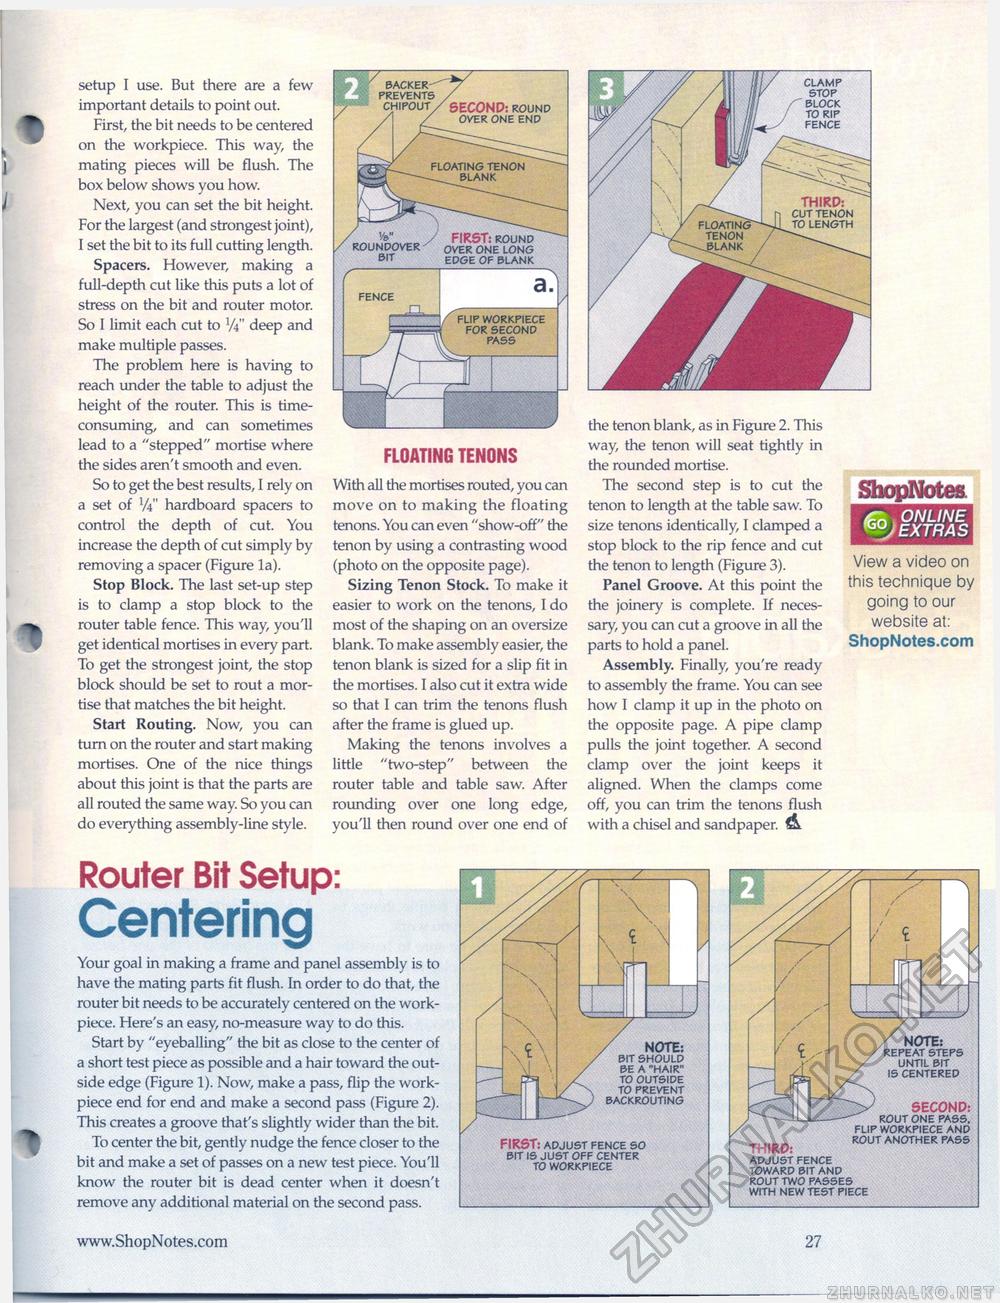
setup I use. But there are a few important details to point out. First, the bit needs to be centered on the workpiece. This way, the mating pieces will be flush. The box below shows you how. Next, you can set the bit height. For the largest (and strongest joint), I set the bit to its full cutting length. Spacers. However, making a full-depth cut like this puts a lot of stress on the bit and router motor. So I limit each cut to V4" deep and make multiple passes. The problem here is having to reach under the table to adjust the height of the router. This is time-consuming, and can sometimes lead to a "stepped" mortise where the sides aren't smooth and even. So to get the best results, I rely on a set of V4" hardboard spacers to control the depth of cut. You increase the depth of cut simply by removing a spacer (Figure la). Stop Block. The last set-up step is to clamp a stop block to the router table fence. This way, you'll get identical mortises in every part. To get the strongest joint, the stop block should be set to rout a mortise that matches the bit height. Start Routing. Now, you can turn on the router and start making mortises. One of the nice things about this joint is that the parts are all routed the same way. So you can do everything assembly-line style. FLOATING TENONS With all the mortises routed, you can move on to making the floating tenons. You can even "show-off" the tenon by using a contrasting wood (photo on the opposite page). Sizing Tenon Stock. To make it easier to work on the tenons, I do most of the shaping on an oversize blank. To make assembly easier, the tenon blank is sized for a slip fit in the mortises. I also cut it extra wide so that I can trim the tenons flush after the frame is glued up. Making the tenons involves a little "two-step" between the router table and table saw. After rounding over one long edge, you'll then round over one end of the tenon blank, as in Figure 2. This way, the tenon will seat tightly in the rounded mortise. The second step is to cut the tenon to length at the table saw. To size tenons identically, I clamped a stop block to the rip fence and cut the tenon to length (Figure 3). Panel Groove. At this point the the joinery is complete. If necessary, you can cut a groove in all the parts to hold a panel. Assembly. Finally, you're ready to assembly the frame. You can see how I clamp it up in the photo on the opposite page. A pipe clamp pulls the joint together. A second clamp over the joint keeps it aligned. When the clamps come off, you can trim the tenons flush with a chisel and sandpaper. A Router Bit Setup:CenteringYour goal in making a frame and panel assembly is to have the mating parts fit flush. In order to do that, the router bit needs to be accurately centered on the work-piece. Here's an easy, no-measure way to do this. Start by "eyeballing" the bit as close to the center of a short test piece as possible and a hair toward the outside edge (Figure 1). Now, make a pass, flip the work-piece end for end and make a second pass (Figure 2). This creates a groove that's slightly wider than the bit. To center the bit, gently nudge the fence closer to the bit and make a set of passes on a new test piece. You'll know the router bit is dead center when it doesn't remove any additional material on the second pass. NOTE: bit should be a "hair" to outside to prevent backrouting ShopNotes. <£rn ONLINE EXTRAS View a video on this technique by going to our website at: ShopNotes.com FIRST: adjust fence so bit is just off center to workpiece THIRD: adjust fence toward bit and rout two passes with new test piece NOTE: repeat steps until bit is centered SECOND: rout one pass, flip workpiece and rout another pass 27 |


