88, страница 36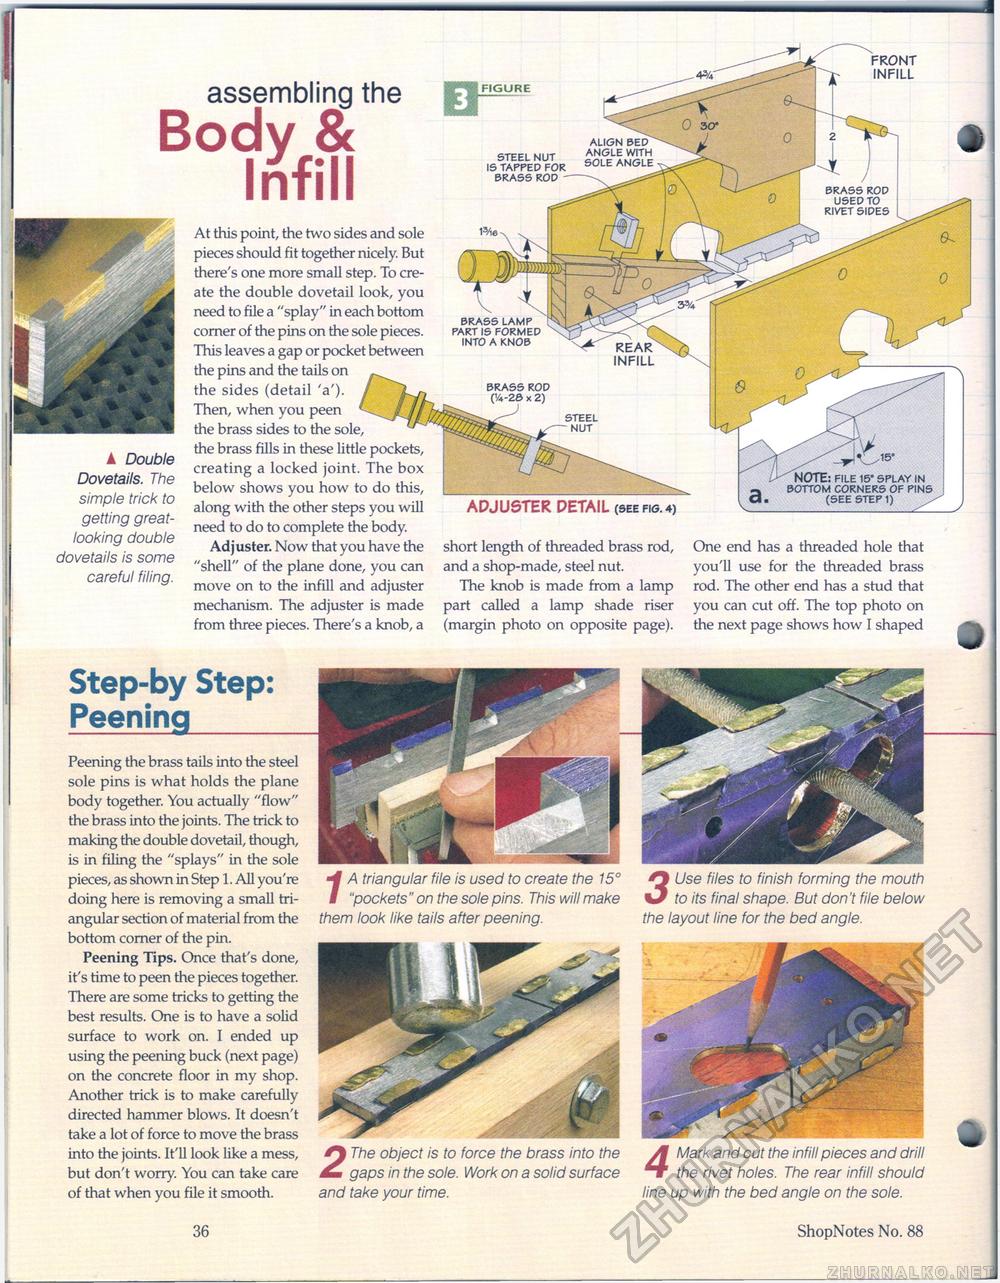
▲ Double Dovetails. The simple trick to getting great-looking double dovetails is some careful filing. assembling the Body & InfillAt this point, the two sides and sole pieces should fit together nicely. But there's one more small step. To create the double dovetail look, you need to file a "splay" in each bottom corner of the pins on the sole pieces. This leaves a gap or pocket between the pins and the tails on the sides (detail 'a'). Then, when you peen the brass sides to the sole, the brass fills in these little pockets, creating a locked joint. The box below shows you how to do this, along with the other steps you will need to do to complete the body. Adjuster. Now that you have the "shell" of the plane done, you can move on to the infill and adjuster mechanism. The adjuster is made from three pieces. There's a knob, a FRONT INFILL FIGURE ALIGN BED ANGLE WITH 50LE ANGLE STEEL NUT IS TAPPED FOR BRASS ROD BRASS LAMP PART IS FORMED INTO A KNOB INFILL BRASS ROD <2) STEEL NUT ADJUSTER DETAIL (see fig. 4) short length of threaded brass rod, and a shop-made, steel nut. The knob is made from a lamp part called a lamp shade riser (margin photo on opposite page). NOTE: FILE 15* SPLAY IN — BOTTOM CORNERS OF PINS d. (SEE STEP 1) One end has a threaded hole that you'll use for the threaded brass rod. The other end has a stud that you can cut off. The top photo on the next page shows how I shaped Step-by Step: Peening_Peening the brass tails into the steel sole pins is what holds the plane body together. You actually "flow" the brass into the joints. The trick to making the double dovetail, though, is in filing the "splays" in the sole pieces, as shown in Step 1. All you're doing here is removing a small triangular section of material from the bottom corner of the pin. Peening Tips. Once that's done, it's time to peen the pieces together. There are some tricks to getting the best results. One is to have a solid surface to work on. I ended up using the peening buck (next page) on the concrete floor in my shop. Another trick is to make carefully directed hammer blows. It doesn't take a lot of force to move the brass into the joints. It'll look like a mess, but don't worry. You can take care of that when you file it smooth. 7 A triangular file is used to create the 15° "pockets" on the sole pins. This will make them look like tails after peening. 2 The object is to force the brass into the gaps in the sole. Work on a solid surface and take your time. 3 Use files to finish forming the mouth to its final shape. But don't file below the layout line for the bed angle. 4 Mark and cut the infill pieces and drill the rivet holes. The rear infill should line up with the bed angle on the sole. 36 ShopNotes No. 88 |


