88, страница 34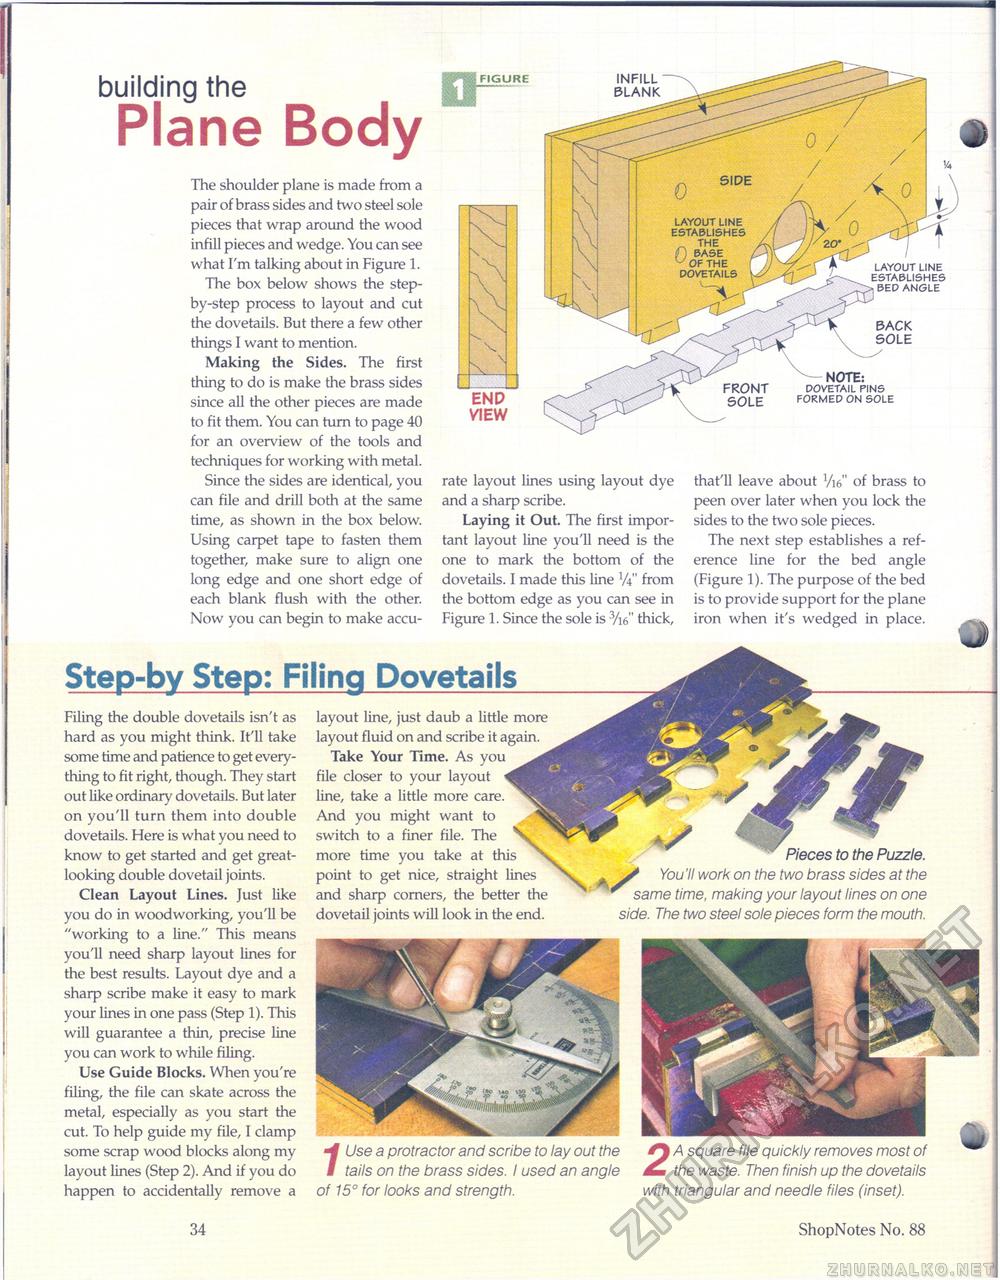
building the Plane BodyThe shoulder plane is made from a pair of brass sides and two steel sole pieces that wrap around the wood infill pieces and wedge. You can see what I'm talking about in Figure 1. The box below shows the step-by-step process to layout and cut the dovetails. But there a few other things I want to mention. Making the Sides. The first thing to do is make the brass sides since all the other pieces are made to fit them. You can turn to page 40 for an overview of the tools and techniques for working with metal. Since the sides are identical, you can file and drill both at the same time, as shown in the box below. Using carpet tape to fasten them together, make sure to align one long edge and one short edge of each blank flush with the other. Now you can begin to make accu- W %nGuRE
ENP VIEW rate layout lines using layout dye that'll leave about VW' of brass to and a sharp scribe. peen over later when you lock the Laying it Out. The first impor- sides to the two sole pieces, tant layout line you'll need is the The next step establishes a ref- one to mark the bottom of the erence line for the bed angle dovetails. I made this line from (Figure 1). The purpose of the bed the bottom edge as you can see in is to provide support for the plane Figure 1. Since the sole is 3/i6" thick, iron when it's wedged in place. INFILL BLANK FRONT SOLE NOTE: DOVETAIL PINS FORMED ON SOLE BACK SOLE 0 SIPE layout line establishes the base of the LAYOUT LINE ESTABLISHES BED ANGLE Step-by Step: Filing Dovetails Filing the double dovetails isn't as hard as you might think. It'll take some time and patience to get everything to fit right, though. They start out like ordinary dovetails. But later on you'll turn them into double dovetails. Here is what you need to know to get started and get great-looking double dovetail joints. Clean Layout Lines. Just like you do in woodworking, you'll be "working to a line." This means you'll need sharp layout lines for the best results. Layout dye and a sharp scribe make it easy to mark your lines in one pass (Step 1). This will guarantee a thin, precise line you can work to while filing. Use Guide Blocks. When you're filing, the file can skate across the metal, especially as you start the cut. To help guide my file, I clamp some scrap wood blocks along my layout lines (Step 2). And if you do happen to accidentally remove a /Use a protractor and scribe to lay out the tails on the brass sides. I used an angle of 15° for looks and strength. 2 A square file quickly removes most of the waste. Then finish up the dovetails with triangular and needle files (inset). layout line, just daub a little more layout fluid on and scribe it again. Take Your Time. As you file closer to your layout line, take a little more care. And you might want to switch to a finer file. The more time you take at this point to get nice, straight lin and sharp corners, the better dovetail joints will look in the end. Pieces to the Puzzle. You 'II work on the two brass sides at the same time, making your layout lines on one side. The two steel sole pieces form the mouth. 34 ShopNotes No. 88 |


