91 - Planer Stand, страница 37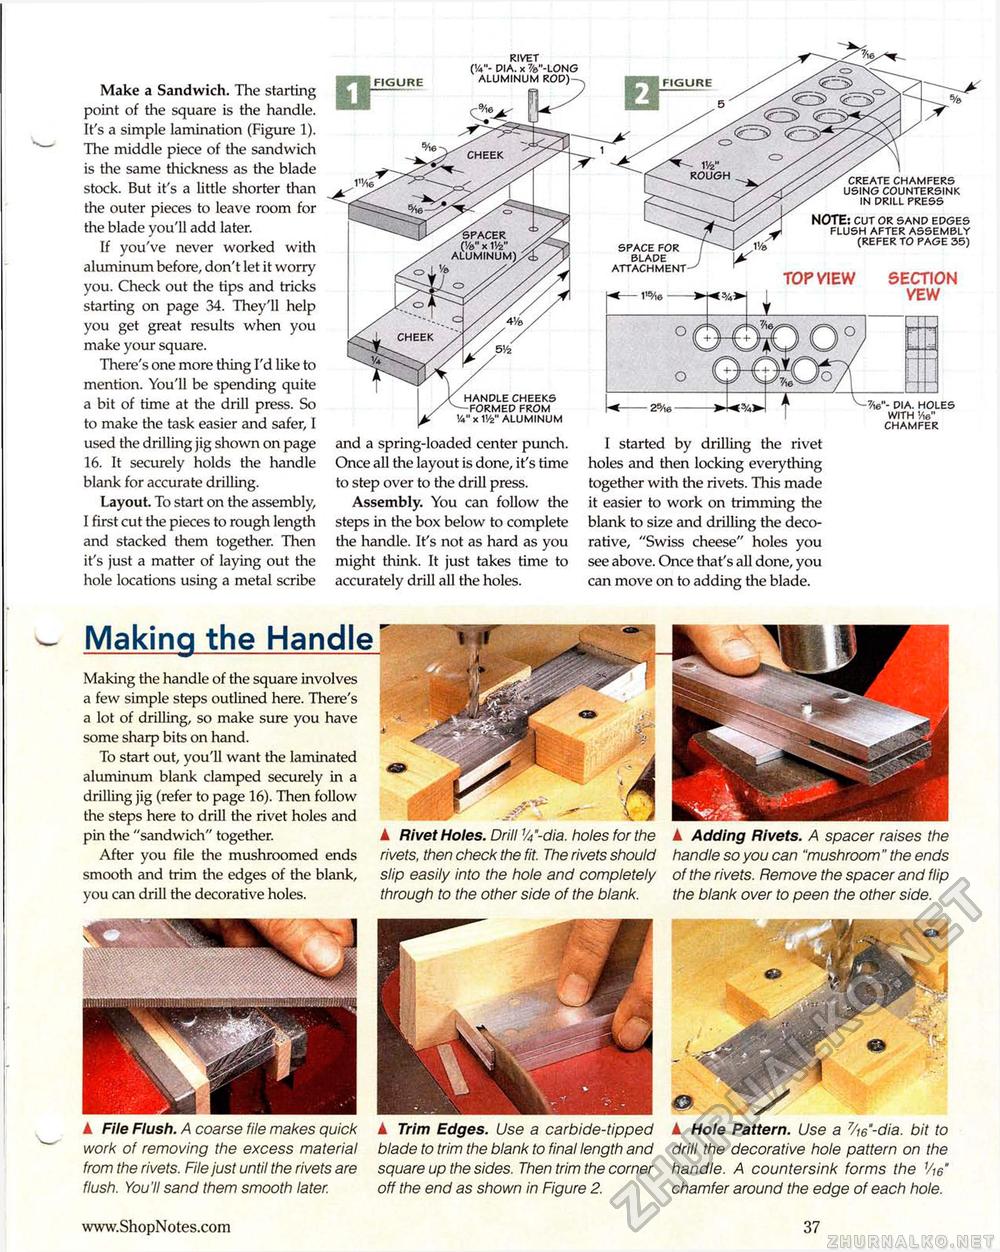
Make a Sandwich. The starting point of the square is the handle. It's a simple lamination (Figure 1). The middle piece of the sandwich is the same thickness as the blade stock. But it's a little shorter than the outer pieces to leave room for the blade you'll add later. If you've never worked with aluminum before, don't let it worry you. Check out the tips and tricks starting on page 34. They'll help you get great results when you make your square. There's one more thing I'd like to mention. You'll be spending quite a bit of time at the drill press. So to make the task easier and safer, I used the drilling jig shown on page 16. It securely holds the handle blank for accurate drilling. Layout. To start on the assembly, I first cut the pieces to rough length and stacked them together. Then it's just a matter of laying out the hole locations using a metal scribe Making the Handle Making the handle of the square involves a few simple steps outlined here. There's a lot of drilling, so make sure you have some sharp bits on hand. To start out, you'll want the laminated aluminum blank clamped securely in a drilling jig (refer to page 16). Then follow the steps here to drill the rivet holes and pin the "sandwich" together. After you file the mushroomed ends smooth and trim the edges of the blank, you can drill the decorative holes. ▲ File Flush. A coarse file makes quick work of removing the excess material from the rivets. File just until the rivets are flush. You'll sand them smooth later. ▲ Rivet Holes. Drill %"-dia. holes for the rivets, then check the fit. The rivets should slip easily into the hole and completely through to the other side of the blank. ▲ Adding Rivets. A spacer raises the handle so you can "mushroom" the ends of the rivets. Remove the spacer and flip the blank over to peen the other side. ▲ Trim Edges. Use a carbide-tipped blade to trim the blank to final length and square up the sides. Then trim the corner off the end as shown in Figure 2. ▲ Hole Pattern. Use a 7/w"-dia. bit to drill the decorative hole pattern on the handle. A countersink forms the Vw" chamfer around the edge of each hole. and a spring-loaded center punch. Once all the layout is done, it's time to step over to the drill press. Assembly. You can follow the steps in the box below to complete the handle. It's not as hard as you might think. It just takes time to accurately drill all the holes. . 25/,0-7 3w- dia. holes « mm | with y,6" chamfer I started by drilling the rivet holes and then locking everything together with the rivets. This made it easier to work on trimming the blank to size and drilling the decorative, "Swiss cheese" holes you see above. Once that's all done, you can move on to adding the blade. FIGURE FIGURE create chamfers using countersink in drill press NOTE: cut or sand edges flush after assembly (refer to page 35) TOP VIEW SECTION VEW space for blade attachment 37 |


