91 - Planer Stand, страница 38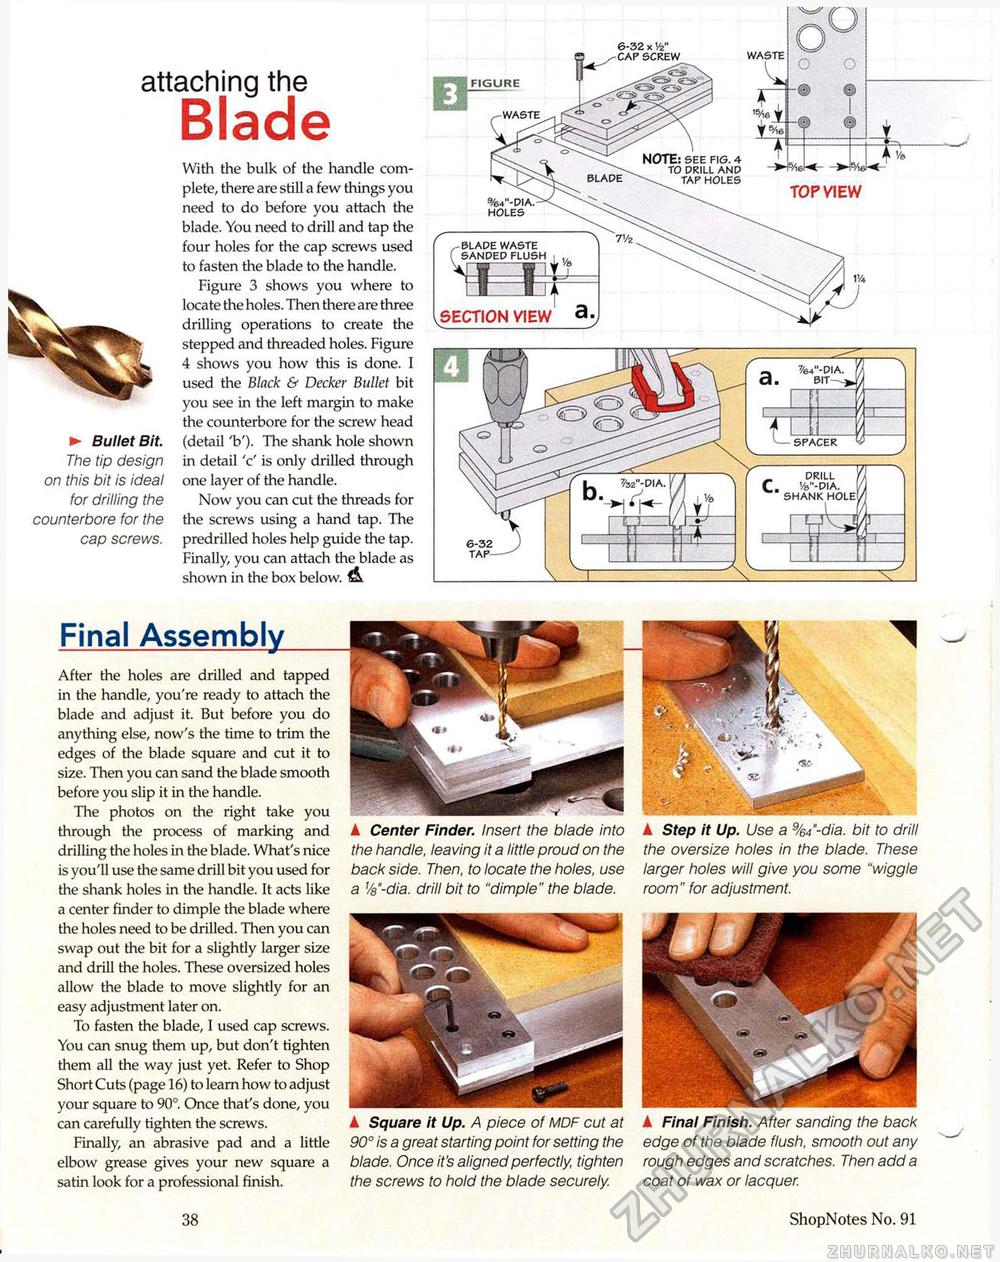
attaching the Blade► Bullet Bit. The tip design on this bit is ideal for drilling the counterbore for the cap screws. With the bulk of the handle complete, there are still a few things you need to do before you attach the blade. You need to drill and tap the four holes for the cap screws used to fasten the blade to the handle. Figure 3 shows you where to locate the holes. Then there are three drilling operations to create the stepped and threaded holes. Figure 4 shows you how this is done. I used the Black & Decker Bullet bit you see in the left margin to make the counterbore for the screw head (detail 'b'). The shank hole shown in detail 'c' is only drilled through one layer of the handle. Now you can cut the threads for the screws using a hand tap. The predrilled holes help guide the tap. Finally, you can attach the blade as shown in the box below. A Final Assembly_ After the holes are drilled and tapped in the handle, you're ready to attach the blade and adjust it. But before you do anything else, now's the time to trim the edges of the blade square and cut it to size. Then you can sand the blade smooth before you slip it in the handle. The photos on the right take you through the process of marking and drilling the holes in the blade. What's nice is you'll use the same drill bit you used for the shank holes in the handle. It acts like a center finder to dimple the blade where the holes need to be drilled. Then you can swap out the bit for a slightly larger size and drill the holes. These oversized holes allow the blade to move slightly for an easy adjustment later on. To fasten the blade, I used cap screws. You can snug them up, but don't tighten them all the way just yet. Refer to Shop Short Cuts (page 16) to learn how to adjust your square to 90°. Once that's done, you can carefully tighten the screws. Finally, an abrasive pad and a little elbow grease gives your new square a satin look for a professional finish. 38 ▲ Center Finder. Insert the blade into the handle, leaving it a little proud on the back side. Then, to locate the holes, use a Ve'-dia. drill bit to "dimple" the blade. A Square it Up. A piece of MDF cut at 90° is a great starting point for setting the blade. Once it's aligned perfectly, tighten the screws to hold the blade securely. A Final Finish. After sanding the back edge of the blade flush, smooth out any rough edges and scratches. Then add a coat of wax or lacquer. ShopNotes No. 91 A Step it Up. Use a %/-dia. bit to drill the oversize holes in the blade. These larger holes will give you some "wiggle room" for adjustment. BLADE WASTE ( SANDED FLUSH , ,, .SECTION VIEW a- %4"-DIA. HOLES FIGURE WASTE NOTE: SEE FIG. 4 TO DRILL AND TAP HOLES TOP VIEW _ DRILL C. '/&"-DIA. SHANK HOLE |


