91 - Planer Stand, страница 47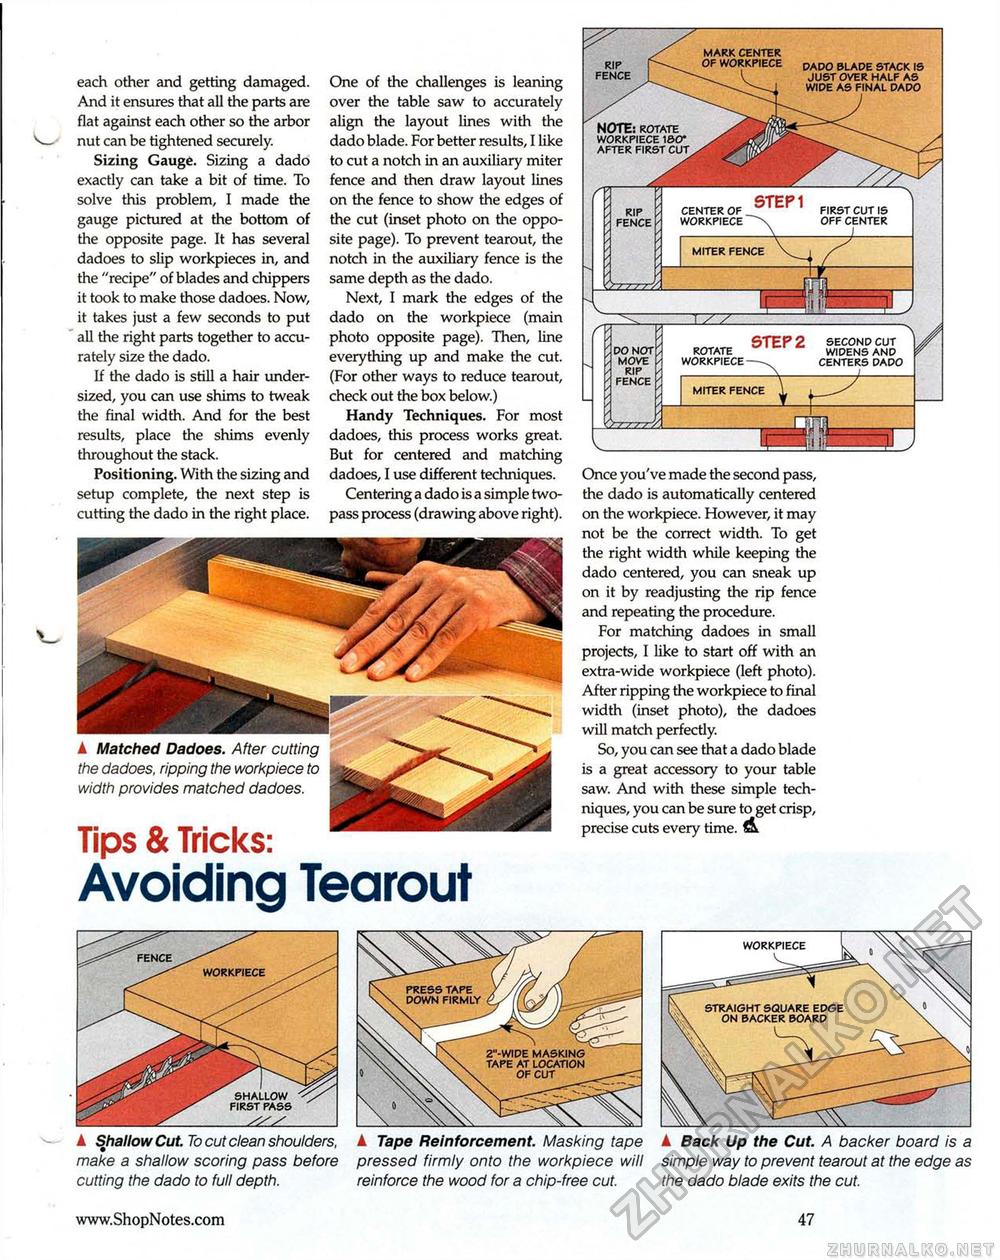
each other and getting damaged. And it ensures that all the parts are flat against each other so the arbor nut can be tightened securely. Sizing Gauge. Sizing a dado exactly can take a bit of time. To solve this problem, I made the gauge pictured at the bottom of the opposite page. It has several dadoes to slip workpieces in, and the "recipe" of blades and chippers it took to make those dadoes. Now, it takes just a few seconds to put all the right parts together to accurately size the dado. If the dado is still a hair undersized, you can use shims to tweak the final width. And for the best results, place the shims evenly throughout the stack. Positioning. With the sizing and setup complete, the next step is cutting the dado in the right place. One of the challenges is leaning over the table saw to accurately align the layout lines with the dado blade. For better results, I like to cut a notch in an auxiliary miter fence and then draw layout lines on the fence to show the edges of the cut (inset photo on the opposite page). To prevent tearout, the notch in the auxiliary fence is the same depth as the dado. Next, I mark the edges of the dado on the workpiece (main photo opposite page). Then, line everything up and make the cut. (For other ways to reduce tearout, check out the box below.) Handy Techniques. For most dadoes, this process works great. But for centered and matching dadoes, I use different techniques. Centering a dado is a simple two-pass process (drawing above right). DADO BLADE STACK IS JUST OVER HALF AS WIDE AS FINAL DADO STEP 2 second cut rotate widens and workpiece--^ centers dado -gfflteaH Once you've made the second pass, the dado is automatically centered on the workpiece. However, it may not be the correct width. To get the right width while keeping the dado centered, you can sneak up on it by readjusting the rip fence and repeating the procedure. For matching dadoes in small projects, I like to start off with an extra-wide workpiece (left photo). After ripping the workpiece to final width (inset photo), the dadoes will match perfectly. So, you can see that a dado blade is a great accessory to your table saw. And with these simple techniques, you can be sure to get crisp, precise cuts every time. A ▲ Shallow Cut. To cut clean shoulders, make a shallow scoring pass before cutting the dado to full depth. ▲ Tape Reinforcement. Masking tape pressed firmly onto the workpiece will reinforce the wood for a chip-free cut. ▲ Back Up the Cut. A backer board is a simple way to prevent tearout at the edge as the dado blade exits the cut. ▲ Matched Dadoes. After cutting the dadoes, ripping the workpiece to width provides matched dadoes. Tips & Tricks: Avoiding Tearout WORKPIECE shallow first pass _ 47 |


