92, страница 21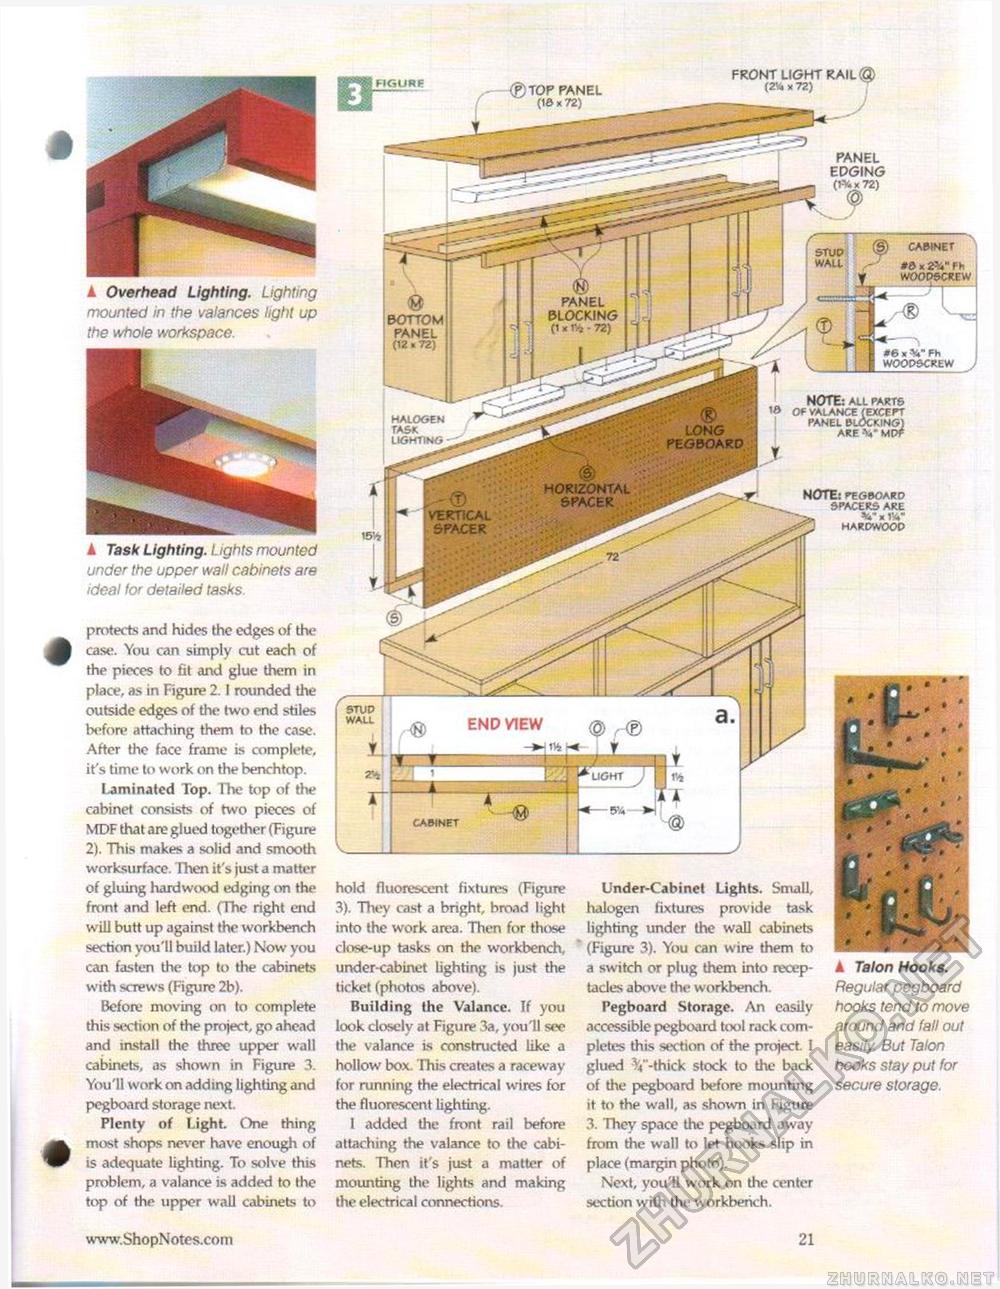
A Overhead Lighting. Lighting mounted in the valances light up the whole workspace. A Task Lighting. Lights mounted under the upper wall cabinets are ideal for detailed tasks. protects and hides the edges of the castr. You can simply cut each of the pieces to fit and glue them in place, as in Figure 2.1 rounded the outside edges of the two end stiles before attaching them to the case. After the face frame is complete, it's time to work on the benchtop. Laminated Top. The top of the cabinet consists of two pieces of MDF that are glued together (Figure 2). This makes a solid and smooth worksurface. Then it's just a matter of gluing hardwood edging on the front and left end. (The right end will butt up against the workbench section you'll build later.) Now you can fasten the top to the cabinets with screws (Figure 2b). Before moving on to complete this section of the project, go ahead and install the three upper wall cabinets, as shown in Figure 3. You'll work on adding lighting and pegboard storage next. Plenty of Light. One thing most shops never have enough of is adequate lighting. To solve this problem, a valance is added to the top of the upper wall cabinets to (g) TOP PANEL (10 x 72) PANEL EDGING (1% x 72) PANEL BLOCKING (1 x r* - 72) BOTTOM PANEL (12 « 72) NOTE: ALL f 10 Of VALANCE (D PANEL BCOCI ARE V halogen task. lighting long pegboard hortzontal spacer A Talon Hooks. Regular pegboard hooks tend to move around and fall out easily But Talon hooks stay put for secure storage. FIGURE FRONT LIGHT RAIL® (2V4 x 72) STOP @ CMmET WALL rJ #0x2V'Fh J't WOOPSCRFW I mr® ^m #e x Fh WOOPBCREW J hold fluorescent fixtures (Figure 3). They cast a bright, broad light into the work area. Then for those close-up tasks on the workbench, under-cabinet lighting is just the ticket (photos above). Building the Valance. If you look closely at Figure 3a, youH see the valance is constructed like a hollow box. This creates a raceway for running the electrical wires for the fluorescent lighting. I added the front rail before attaching the valance to the cabinets. Then it's just a matter of mounting the lights and making the electrical connections. Under-Cabinet Lights. Small, halogen fixtures provide task lighting under the wall cabinets (Figure 3). You can wire them to a switch or plug them into receptacles above the workbench. Pegboard Storage. An easily accessible pegboard tool rack completes this section of the project. I glued %"-thick stock to the back of the pegboard before mounting it to the wall, as shown in Figure 3. They space the pegboard away from the wall to let hooks slip in place (margin photo). Next, you'll work on the center section with the workbench. r. STUD WALL END VIEW @)r<g) . i mm — _i 11_ CABINET |


