92, страница 24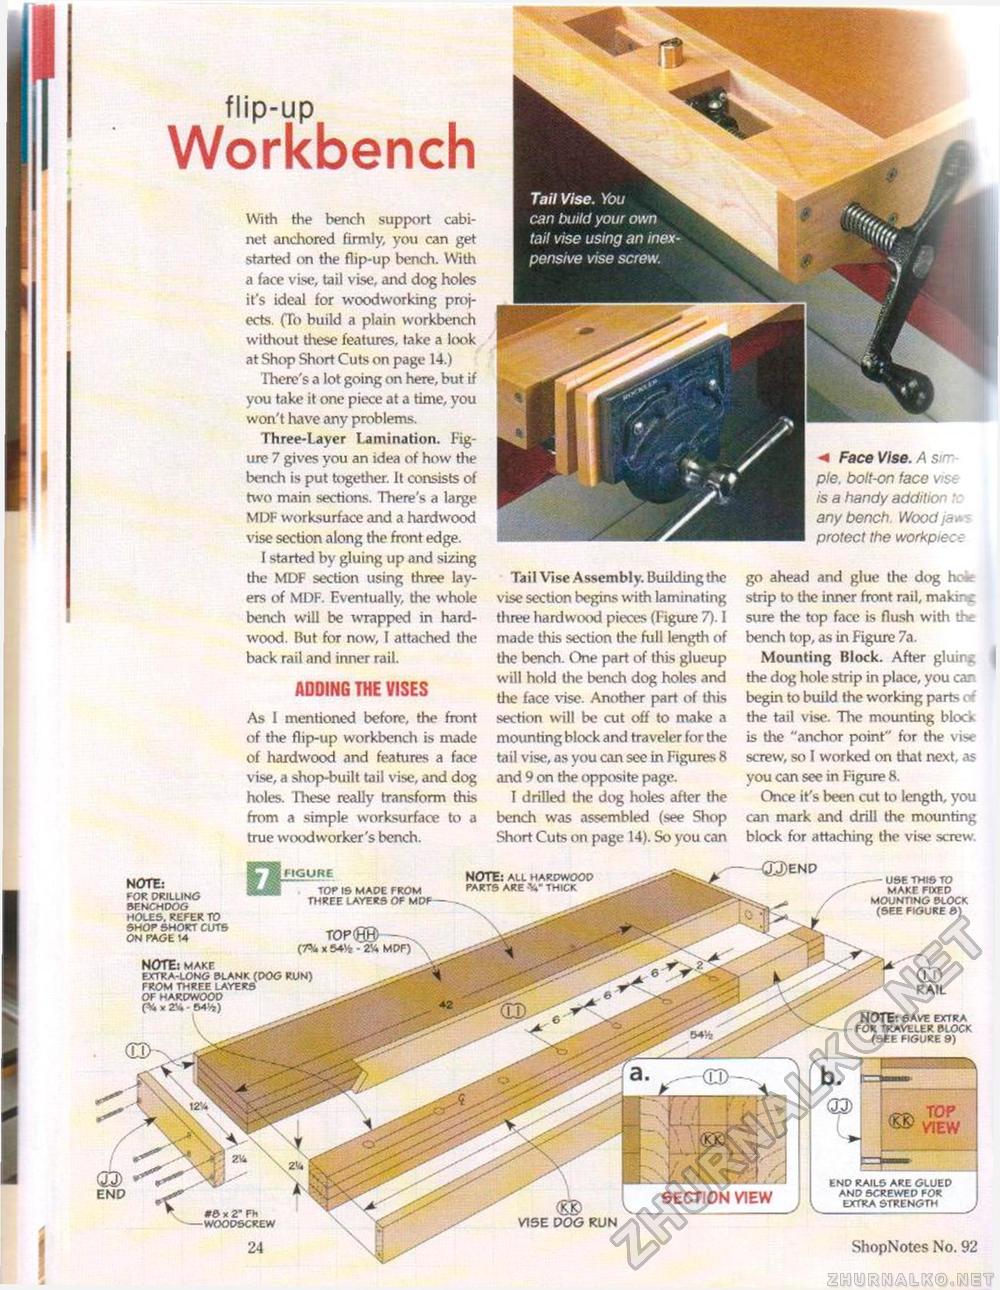
flip-up Workbench With the bench support cabinet anchored firmly, you can get started on the flip-up bench. With a face vise, tail vise, and dog holes it's ideal for woodworking projects. (To build a plain workbench without these features, take a look at Shop Short Cuts on page 14.) There's a lot going on here, but if you take it one piece at a time, you won't have any problems. Three-Layer Lamination. Figure 7 gives you an idea of how the bench is put together. It consists of two main sections. There's a large MDF worksurface and a hardwood vise section along the front edge. I started by gluing up and sizing the MDF section using three layers of MDF. Eventually, the whole bench will be wrapped in hardwood. But for now, I attached the back rail and inner rail. ADDING THE VISES As 1 mentioned before, the front of the flip-up workbench is made of hardwood and features a face vise, a shop-built tail vise, and dog holes. These really transform this from a simple worksurface to a true woodworker's bench. Tail Vise. You can build your own tail vise using an inex pensive vise screw. Tail Vise Assembly. Building the vise section begins with laminating three hardwood pieces (Figure 7). I made this section the full length of the bench. One part of this glueup will hold the bench dog holes and the face vise. Another part of this section will be cut off to make a mounting block and traveler for the tail vise, as you can see in Figures 8 and 9 on the opposite page. I drilled the dog holes after the bench was assembled (see Shop Short Cuts on page 14). So you can < Face Vise. A sirr- ple. bolt-on face vise is a handy addition ■ any bench Wood ja y-protect the workpiea go ahead and glue the dog h -strip to the inner front rail, makir _ sure the top face is flush with th-_ bench top, as in Figure 7a. Mounting Block. After gluir.; the dog hole strip in place, you car begin to build the working parts of the tail vise. The mounting block is the "anchor point" for the vise screw, so I worked on that next, as you can see in Figure 8. Once it's been cut to length, you can mark and drill the mounting block for attaching the vise screw. NOTE: for drilling benchdog holes. refer to shop short cuts on page 14 figure top is made from three layers of mdf NOTE: all hardwood parts are y*" thick —-Q3>eho TOP (7><4 X 54V*r NOTE: make extra-long plank (dog run) from three layers of hardwood pi x - . - — use this to make fixed mounting block (see figure s) (0) rail NOTE: save extra - - for traveler slock (see figure 9) © VISE DOG RUN
end rails are glued and 6crewed for extra strength 24 ShopNotes No. 1)2 |
||||||||||||


