92, страница 25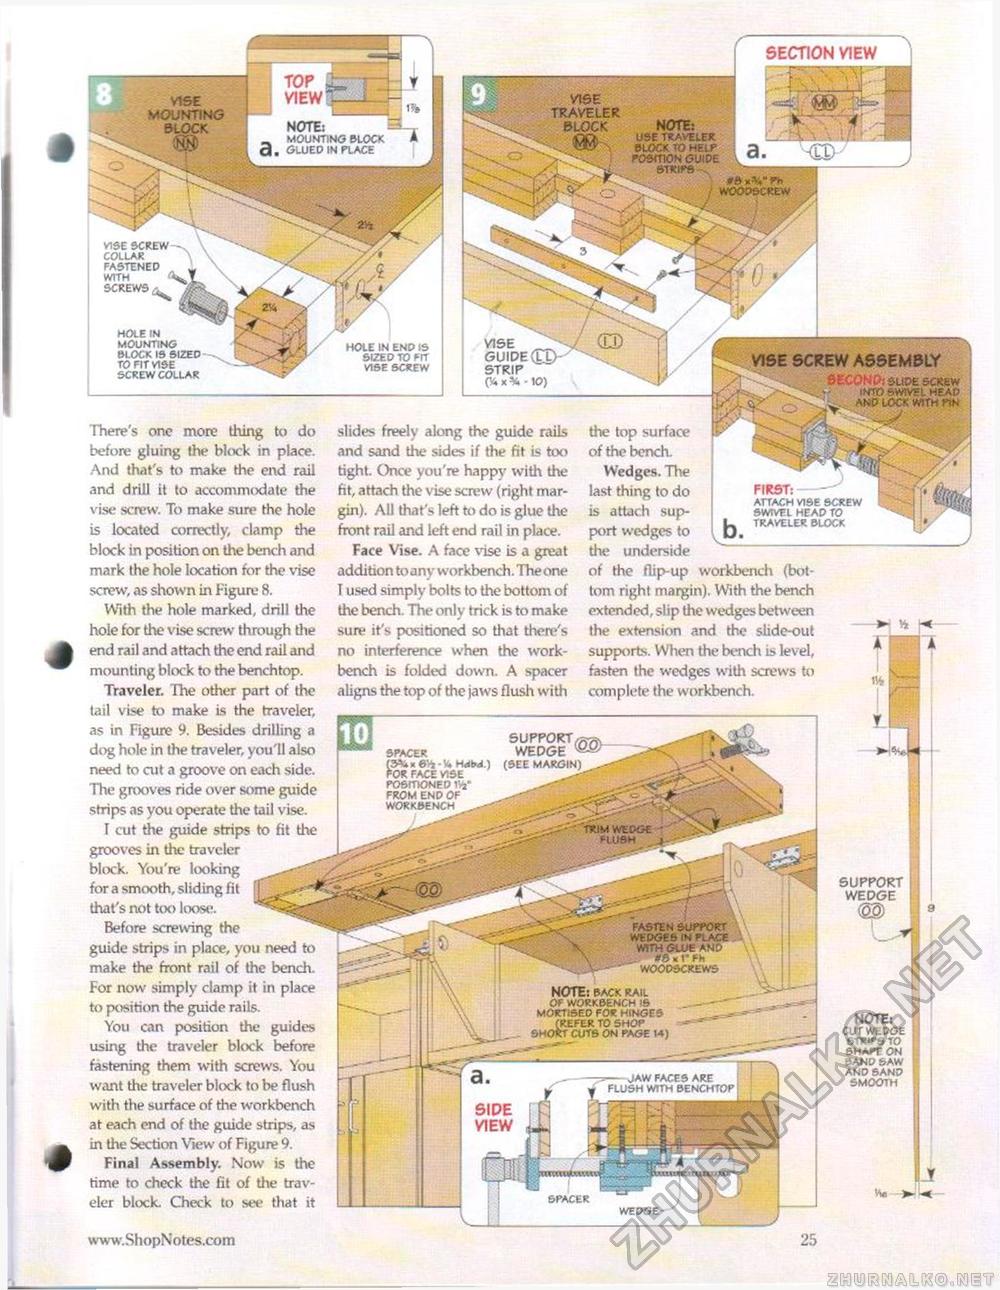
SECTION VIEW vise traveler block note: OTX USE TRAVELER . ©LOCK TO HELP POSITION GUIDE •i ^cfk- strips-., VISE MOUNTING BLOCK NOTE: _ mounting block d. glued in place vise screw collar fastened with < screws ^ hole in mounting block is sized to fit vise screw collar vise guide (£T> strip ~ x % -10) hole in end is sized to fit vise screw VISE SCREW ASSEMBLY six-'mpisude screw v/ into swivel heap ^ and lock with pis There's one more tiling to do before gluing the block in place. And that's to make die end rail and drill it to accommodate the vise screw. To make sure the hole is located correctly, clamp the block in position on the bench and mark the hole location for the vise screw, as shown in Figure 8. With the hole marked, drill the hole for the vise screw through the end rail and attach the end rail and mounting block to the benchtop. Traveler. The other part of the tail vise to make is the traveler, as in Figure 9. Besides drilling a dog hole in the traveler, you'll also need to ait a groove on each side. The grooves ride over some guide strips as you operate the tail vise. I cut the guide strips to fit the grooves in the traveler block. You're looking for a smooth, sliding fit [I ., ^ that's not too loose. "" ' - ^ ^ Before screwing the guide strips in place, you need to make the front rail of the bench. For now simply clamp it in place to position the guide rails. You can position the guides using the traveler block before fastening them with screws. You want the traveler block to be flush with the surface of the workbench at each end of the guide strips, as in the Section View of Figure 9. Final Assembly. Now is the time to check the lit of the traveler block. Check to see that it slides freely along the guide rails and sand the sides if the fit is too tight. Once you're happy with the fit, attach the vise screw (right margin). All that's left to do is glue the front rail and left end rail in place. Face Vise. A face vise is a great addition to any workbench. The one 1 used simply bolts to the bottom of tlie bench. The only trick is to make sure it's positioned so diat there's no interference when the workbench is folded down. A spacer aligns the top of the jaws flush with the top surface r of the bcnch. Wedges. The last thing to do is attach support wedges to b the underside of the flip-up workbench (bottom right margin). With the bench extended, slip die wedges between the extension and the slide-out supports. When the bench is level, fasten the wedges with screws to complete the wi>rkbench. first:--^ attach vise screw swivel head to traveler block support,; spacer wedge * CMix 6'rs ■ hdbd.) (see margin) for face vise posmonedlvfc" ^^j from end of hsge workbench ■ . - : • TRIM WEDGE -T' FLUSH J support wedge fasten support wedges in place with glue AND tfSxI'FH WOODSCREWS note: BACK RAIL OF WORKBENCH IS MORTISED FOR HINGES (REFER TO SHOP SHORT CUTS ON PAGE 14) NOTE: cut wedge strips to shape on band saw and sand smooth — jaw faces are flush with benchtop wvk-w.ShopNotes.com _ |


