92, страница 23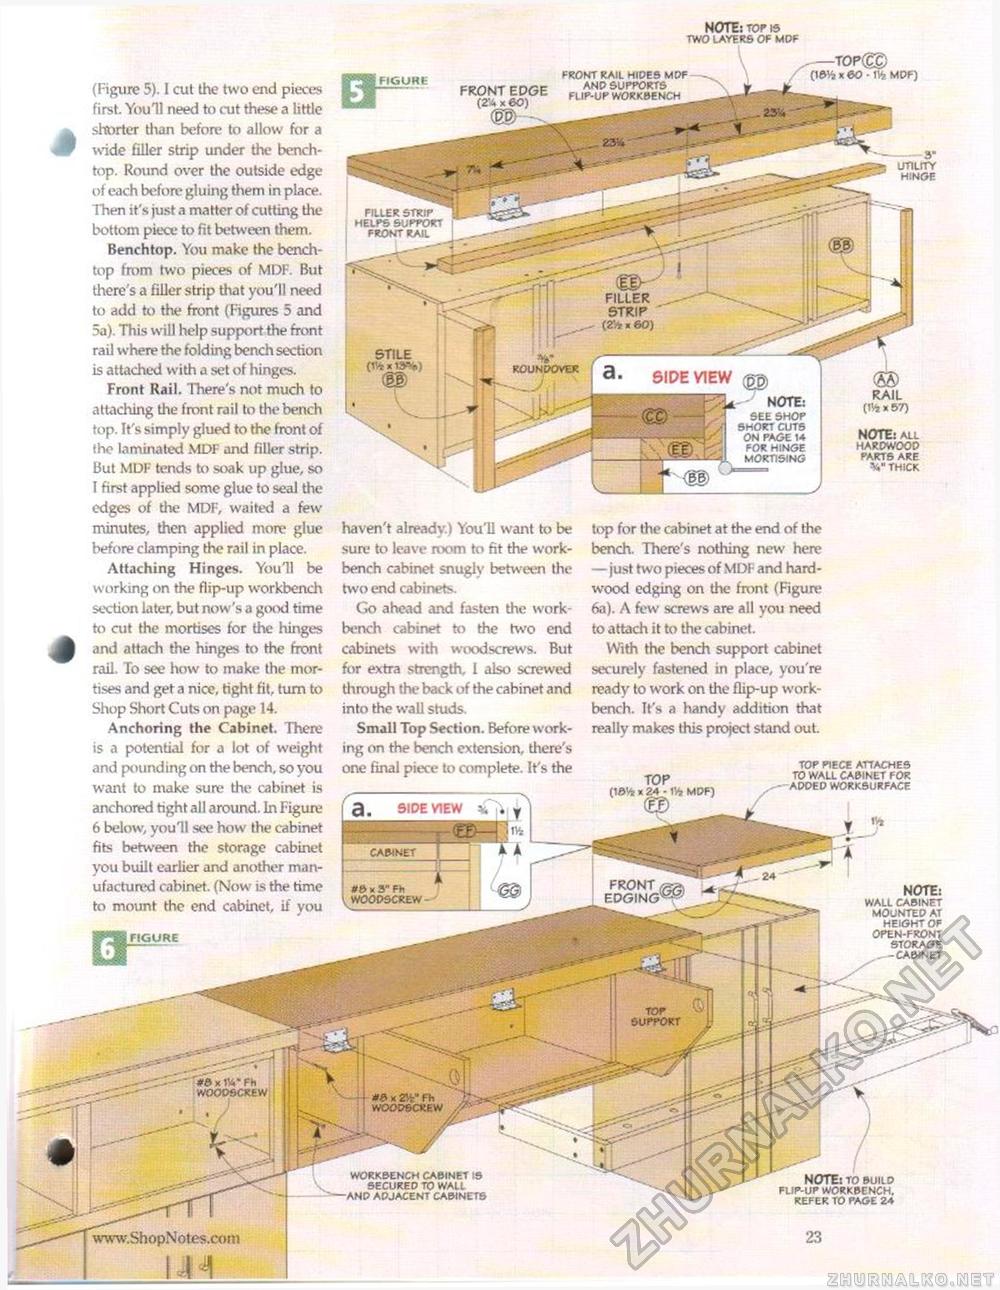
NOTE: top is two layers of mdf FRONT EDGE (2'A x 60) filler strip helps support front rail filler strip (2V? x 60) V roundover top piece attaches to wall cabinet for added worksurface FRONT , EDGING note: wall cabinet mounted at height of open-front storage .--cabinet SUPPORT #0 x w fh woodscrew k W Fh WOODSCRF.W workbench cabinet is secured to wall and adjacent cabinets (Figure 5). I cut the two end pieces first. You'll need to cut these a little shorter than before to allow for a wide filler strip under the bench-top. Round over the outside edge of each before gluing them in place. Then it's just a matter of cutting the bottom piece to fit between them. Benchtop. You make the bench-top from two pieces of MDF. But there's a filler strip that you'll need to add to the front (Figures 5 and 5a). This will help support the front rail where the folding bench section is attached with a set of hinges. Front Rail. There's not much to attaching the front rail to the bench top. It's simply glued to the front of the laminated MDF and filler strip. But MDF tends to soak up glue, so 1 first applied some glue to seal the edges of the MDF, waited a few minutes, then applied more glue before clamping the rail in place. Attaching Hinges. Youll be working on the flip-up workbench section later, but now's a good time to cut the mortises for the hinges and attach the hinges to the front rail. To see how to make the mortises and get a nice, tight fit, turn to Shop Short Cuts on page 14. Anchoring the Cabinet. There is a potential for a lot of weight and pounding on the bench, so you want to make sure the cabinet is anchored tight all around. In Figure 6 below, you'll see how the cabinet fits between the storage cabinet you built earlier and another manufactured cabinet. (Now is the time to mount the end cabinet, if you | figure front rail hides mdf and supports flip-up workbench FIGURE imuty hinge note: see shop short cuts on page 1* for hinge mortising RAIL (n*x57) note: all hardwood parts are v thick haven't already.) You'll want to be sure to leave room to fit the workbench cabinet snugly between the two end cabinets. Go ahead and fasten the workbench cabinet to the two end cabinets with woodscrews. But for extra strength. 1 also screwed through the back of the cabinet and into the wall studs. Small Top Section. Before working on the bench extension, there's one final piece to complete. It's the top for the cabinet at the end of the bench. There's nothing new here — just two pieces of MDF and hardwood edging on the front (Figure 6a). A few screws are all you need to attach it to the cabinet. With the bench support cabinet securely fastened in place, you're ready to work on the flip-up workbench. It's a handy addition that really makes this project stand out.
TOP (IftVi x 24 - MDF) note: to build flip-up workbench. refer to page 2* |
|||||||||||||||||


