93, страница 19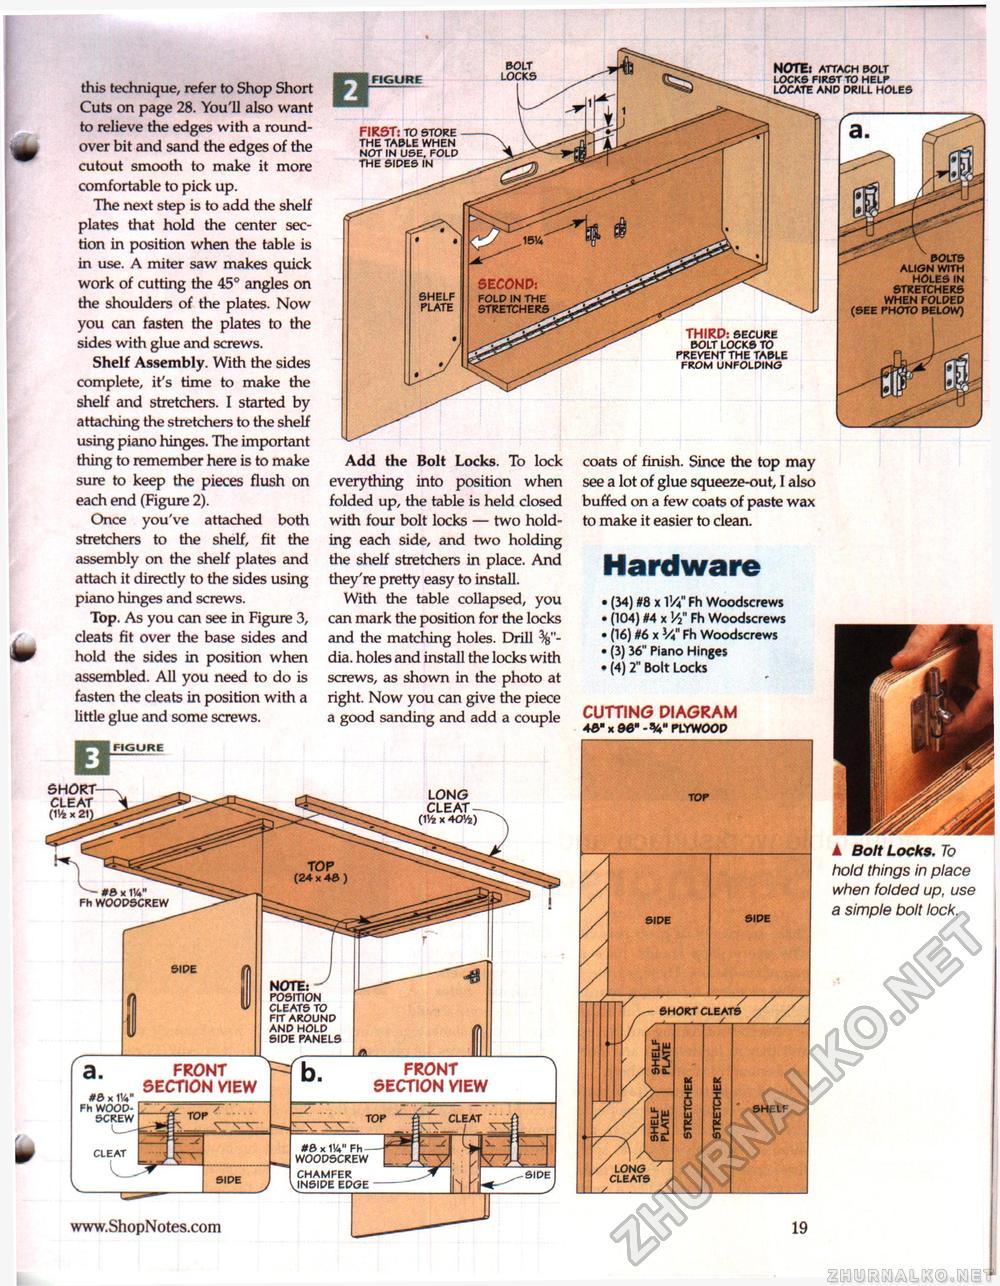
BOLT L0CK5 note! ATTACHBOLT LOCKS FIRST TO HELP LOCATE AND DRILL HOLES this technique, refer to Shop Short Cuts on page 28. You'll also want to relieve the edges with a round-over bit and sand the edges of the cutout smooth to make it more comfortable to pick up. The next step is to add the shelf plates that hold the center section in position when the table is in use. A miter saw makes quick work of cutting the 45° angles on the shoulders of the plates. Now you can fasten the plates to the sides with glue and screws. Shelf Assembly. With the sides complete, it's time to make the shelf and stretchers. I started by attaching the stretchers to the shelf using piano hinges. The important thing to remember here is to make sure to keep the pieces flush on each end (Figure 2). Once you've attached both stretchers to the shelf, fit the assembly on the shelf plates and attach it directly to the sides using piano hinges and screws. Top. As you can see in Figure 3, cleats fit over the base sides and hold the sides in position when assembled. All you need to do is fasten the cleats in position with a little glue and some screws. FIRST: TO STORE THE TABLE WHEN NOT IN USE. FOLD THE SIDES IN ^ BOLTS ALIGN WITH HOLES IN STRETCHERS WHEN FOLDED (SEE PHOTO BELOW) SECOND: FOLD IN THE STRETCHERS SHELF PLATE THIRD: SECURE BOLT LOCKS TO PREVENT THE TABLE FROM UNFOLDING Add the Bolt Locks. To lock everything into position when folded up, the table is held closed with four bolt locks — two holding each side, and two holding the shelf stretchers in place. And they're pretty easy to install. With the table collapsed, you can mark the position for the locks and the matching holes. Drill dia. holes and install the locks with screws, as shown in the photo at right. Now you can give the piece a good sanding and add a couple coats of finish. Since the top may see a lot of glue squeeze-out, I also buffed on a few coats of paste wax to make it easier to clean. (34) #8 x 1 Va Fh Woodscrews (104) U x V2" Fh Woodscrews (16) H6 x Va Fh Woodscrews (3) 36" Piano Hinges (4) 2" Bolt Locks cutting diagram 43" x 96" - PLYWOOD SHORT-CLEAT (1V4 x 21) LONG CLEAT- (1V4 x 4OK) A Bolt Locks. To hold things in place when folded up, use a simple bolt lock. ^#8* W Fh WOODSCREW SIDE NOTE: ^ POSITION CLEATS TO FIT AROUND AND HOLD SIDE PANELS SHORT CLEATS front section view front section view x w Fh WOOD-SCREW CLEAT *&xW Fh-W00DSCREW CHAMFER VjNSIDE EDGE CLEAT LONG CLEATS |


