93, страница 21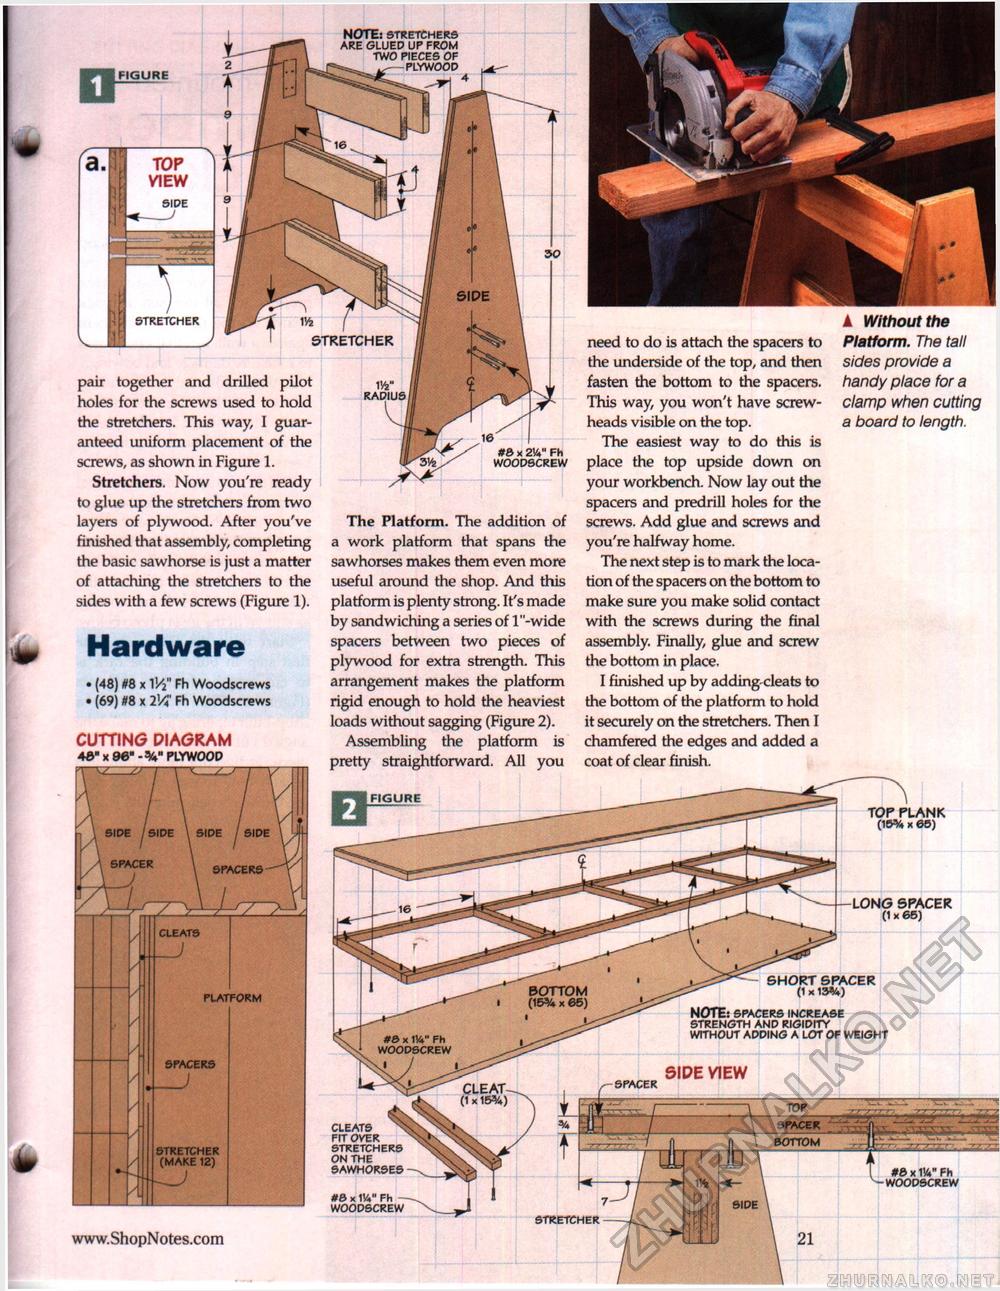
'4* 51 TOP PLANK (10% x 65) LONG SPACER (1 x 65) SHORT SPACER (1 X 13%) note: SPACERS INCREASE STRENGTH AND RIGIDITY WITHOUT ADDING A LOT OF WEIGHT BOTTOM (15% x 65) #& x W Fh WOODSCREW CLEAT-(1 X15%) CLEATS N FIT OVER STRETCHERS ON THE SAWHORSES BOTTOM #0 x 1V Fh -WOODSCREW FIGURE 'a J top view SIDE ▲ Without the Platform. The tall sides provide a handy place for a clamp when cutting a board to length. pair together and drilled pilot holes for the screws used to hold the stretchers. This way, I guaranteed uniform placement of the screws, as shown in Figure 1. Stretchers. Now you're ready to glue up the stretchers from two layers of plywood. After you've finished that assembly, completing the basic sawhorse is just a matter of attaching the stretchers to the sides with a few screws (Figure 1). Hardware • (48) #8 x V/2" Fh Woodscrews • (69) #8 x 2W Fh Woodscrews cutting diagram 46" x 96"-%" PLYWOOD The Platform. The addition of a work platform that spans the sawhorses makes them even more useful around the shop. And this platform is plenty strong. It's made by sandwiching a series of l"-wide spacers between two pieces of plywood for extra strength. This arrangement makes the platform rigid enough to hold the heaviest loads without sagging (Figure 2). Assembling the platform is pretty straightforward. All you need to do is attach the spacers to the underside of the top, and then fasten the bottom to the spacers. This way, you won't have screw-heads visible on the top. The easiest way to do this is place the top upside down on your workbench. Now lay out the spacers and predrill holes for the screws. Add glue and screws and you're halfway home. The next step is to mark the location of the spacers on the bottom to make sure you make solid contact with the screws during the final assembly. Finally, glue and screw the bottom in place, I finished up by adding cleats to the bottom of the platform to hold it securely on the stretchers. Then I chamfered the edges and added a coat of clear finish. FIGURE STRETCHER STRETCHER (MAKE 12) PLATFORM |


