94, страница 35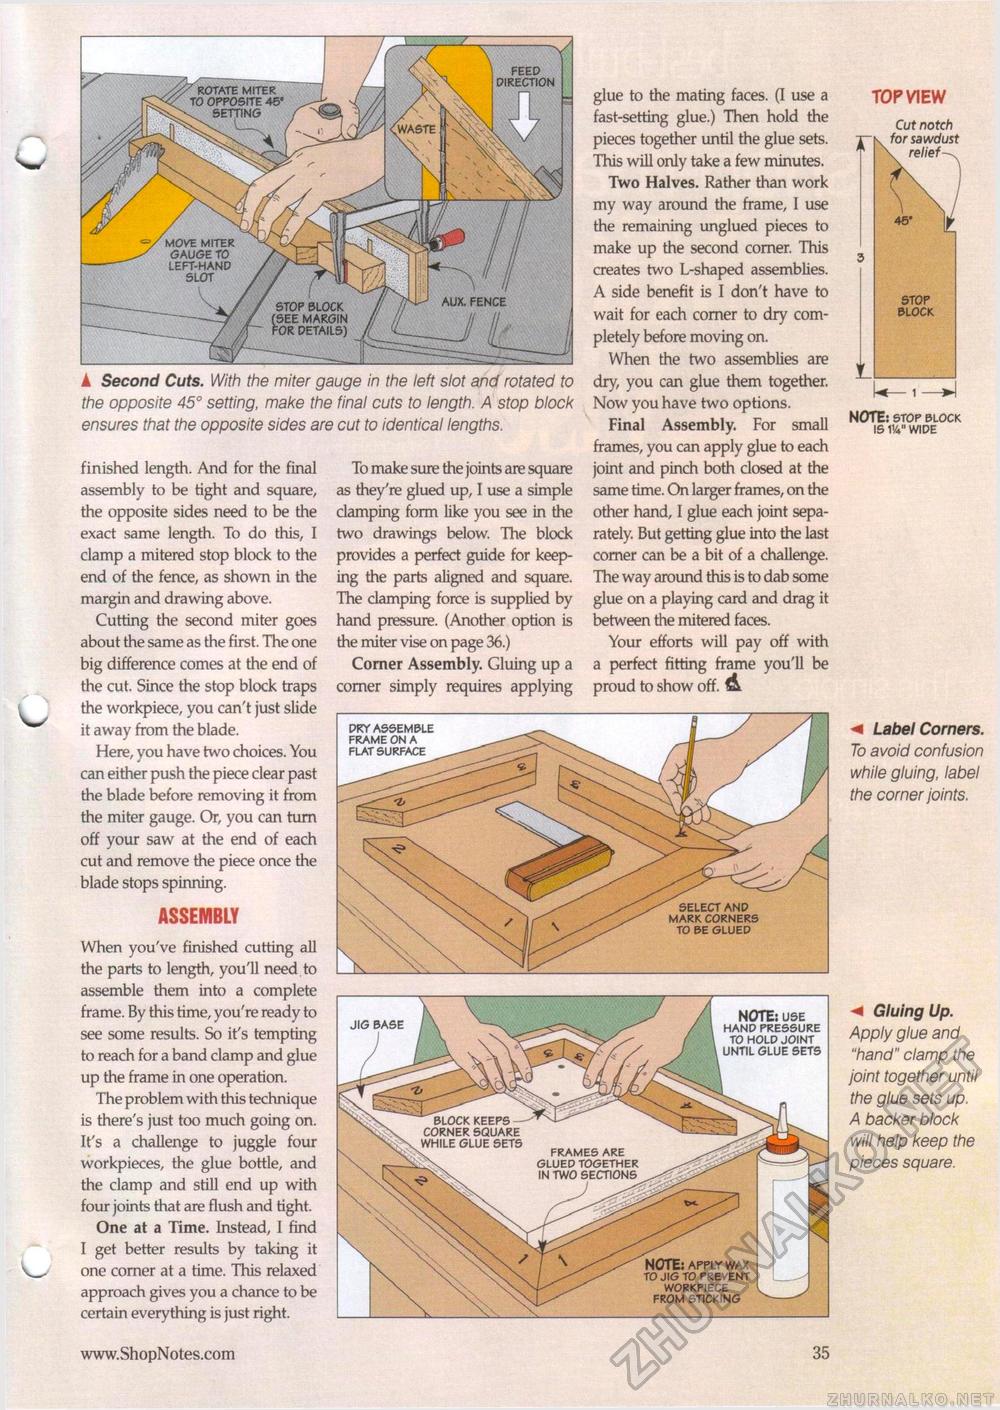
feed direction rotate miter to opposite 45' . setting .waste AUX. FENCE stop block 'see margin tor details) ▲ Second Cuts. With the miter gauge in the left slot and rotated to the opposite 45° setting, make the final cuts to length. A stop block ensures that the opposite sides are cut to identical lengths. move miter gauge to left-hand slot finished length. And for the final assembly to be tight and square, the opposite sides need to be the exact same length. To do this, I clamp a mitered stop block to the end of the fence, as shown in the margin and drawing above. Cutting the second miter goes about the same as the first. The one big difference comes at the end of the cut. Since the stop block traps the workpiece, you can't just slide it away from the blade. Here, you have two choices. You can either push the piece clear past the blade before removing it from the miter gauge. Or, you can turn off your saw at the end of each cut and remove the piece once the blade stops spinning. ASSEMBLY When you've finished cutting all the parts to length, you'll need to assemble them into a complete frame. By this time, you're ready to see some results. So it's tempting to reach for a band clamp and glue up the frame in one operation. The problem with this technique is there's just too much going on. It's a challenge to juggle four workpieces, the glue bottle, and the clamp and still end up with four joints that are flush and tight. One at a Time. Instead, I find I get better results by taking it one corner at a time. This relaxed approach gives you a chance to be certain everything is just right. To make sure the joints are square as they're glued up, I use a simple clamping form like you see in the two drawings below. The block provides a perfect guide for keeping the parts aligned and square. The clamping force is supplied by hand pressure. (Another option is the miter vise on page 36.) Corner Assembly. Gluing up a corner simply requires applying glue to the mating faces. (I use a fast-setting glue.) Then hold the pieces together until the glue sets. This will only take a few minutes. Two Halves. Rather than work my way around the frame, I use the remaining unglued pieces to make up the second corner. This creates two L-shaped assemblies. A side benefit is I don't have to wait for each corner to dry completely before moving on. When the two assemblies are dry, you can glue them together. Now you have two options. Final Assembly. For small frames, you can apply glue to each joint and pinch both closed at the same time. On larger frames, on the other hand, I glue each joint separately. But getting glue into the last corner can be a bit of a challenge. The way around this is to dab some glue on a playing card and drag it between the mitered faces. Your efforts will pay off with a perfect fitting frame you'll be proud to show off. ^ TOP VIEW Cut notch TOP VIEW Cut notch
NOTE: stop block is 114" wide NOTE: stop block is 114" wide < Label Corners. To avoid confusion while gluing, label the corner joints. M Gluing Up. Apply glue and "hand" clamp the joint together until the glue sets up. A backer block will help keep the pieces square. dry assemble frame on a flat surface select and mark corners to be glued block keeps — corner square while glue sets frames are glued together in two sections NOTE: use hand pressure to hold joint until glue sets jig base I / NOTE: apply wax to jig to prevent workpiece from sticking • 35 |


