94, страница 38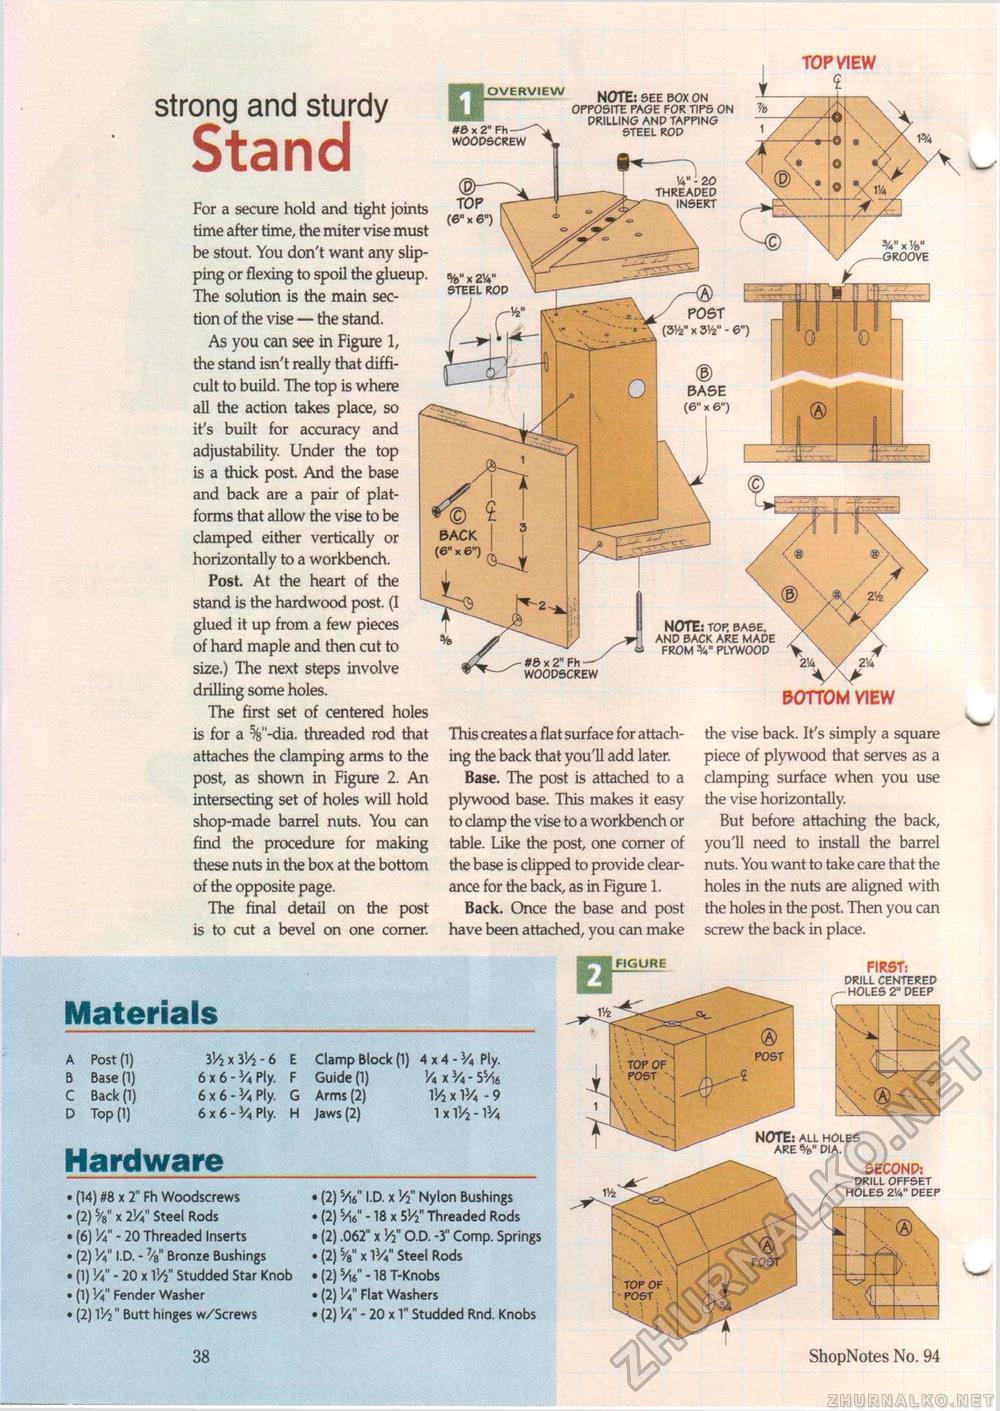
strong and sturdy StandFor a secure hold and tight joints time after time, the miter vise must be stout. You don't want any slipping or flexing to spoil the glueup. The solution is the main section of the vise — the stand. As you can see in Figure 1, the stand isn't really that difficult to build. The top is where all the action takes place, so it's built for accuracy and adjustability. Under the top is a thick post. And the base and back are a pair of platforms that allow the vise to be clamped either vertically or horizontally to a workbench. Post. At the heart of the stand is the hardwood post. (I glued it up from a few pieces of hard maple and then cut to size.) The next steps involve drilling some holes. The first set of centered holes is for a %"-dia. threaded rod that attaches the clamping arms to the post, as shown in Figure 2. An intersecting set of holes will hold shop-made barrel nuts. You can find the procedure for making these nuts in the box at the bottom of the opposite page. The final detail on the post is to cut a bevel on one comer. TOP VIEW 2 *& X 2" Fh WOODSCREW This creates a flat surface for attaching the back that you'll add later. Base. The post is attached to a plywood base. This makes it easy to clamp the vise to a workbench or table. Like the post, one corner of the base is clipped to provide clearance for the back, as in Figure 1. Back. Once the base and post have been attached, you can make FIGURE MaterialsA Post (1) B Base (1) C Back (1) D Top (1) iVi x 3Vi - 6 6 x 6 - J/4 Ply. 6x6 - 3/4 Ply. 6 x 6 - J/4 Ply. E Clamp Block (1) 4x4- J/4 Ply. F Guide (1) V4 x }/4 - 55/16 G Arms (2) 1K x l3/4 - 9 H Jaws (2) 1 x V/2 - 1V4 Hardware(14) #8 x 2" Fh Woodscrews (2) V x 2Va" Steel Rods (6) Va" - 20 Threaded Inserts (2) V* I.D. - V Bronze Bushings (1) Va - 20 x V/7" Studded Star Knob (1) Va" Fender Washer (2) V/2" Butt hinges w/Screws • (2) Vfe" I.D. x Vi Nylon Bushings • (2) s/i6" -18 x 5H" Threaded Rods • (2) .062" x V2" O.D. -3" Comp. Springs • (2) V x 1J/4" Steel Rods • (2) 5/i6" -18 T-Knobs • (2) Va" Flat Washers • (2) V4" - 20 x 1" Studded Rnd. Knobs 2Va V 214 w BOTTOM VIEW the vise back. It's simply a square piece of plywood that serves as a clamping surface when you use the vise horizontally. But before attaching the back, you'll need to install the barrel nuts. You want to take care that the holes in the nuts are aligned with the holes in the post. Then you can screw the back in place. FIRST: DRILL CENTERED -HOLES 2" DEEP \ r ® -...... NOTE: ALL HOLES ARE %" DIA. SECONP: — DRILL OFFSET HOLES 2V4" DEEP 0 ® < 38 ShopNotes No. 94 |


