95, страница 31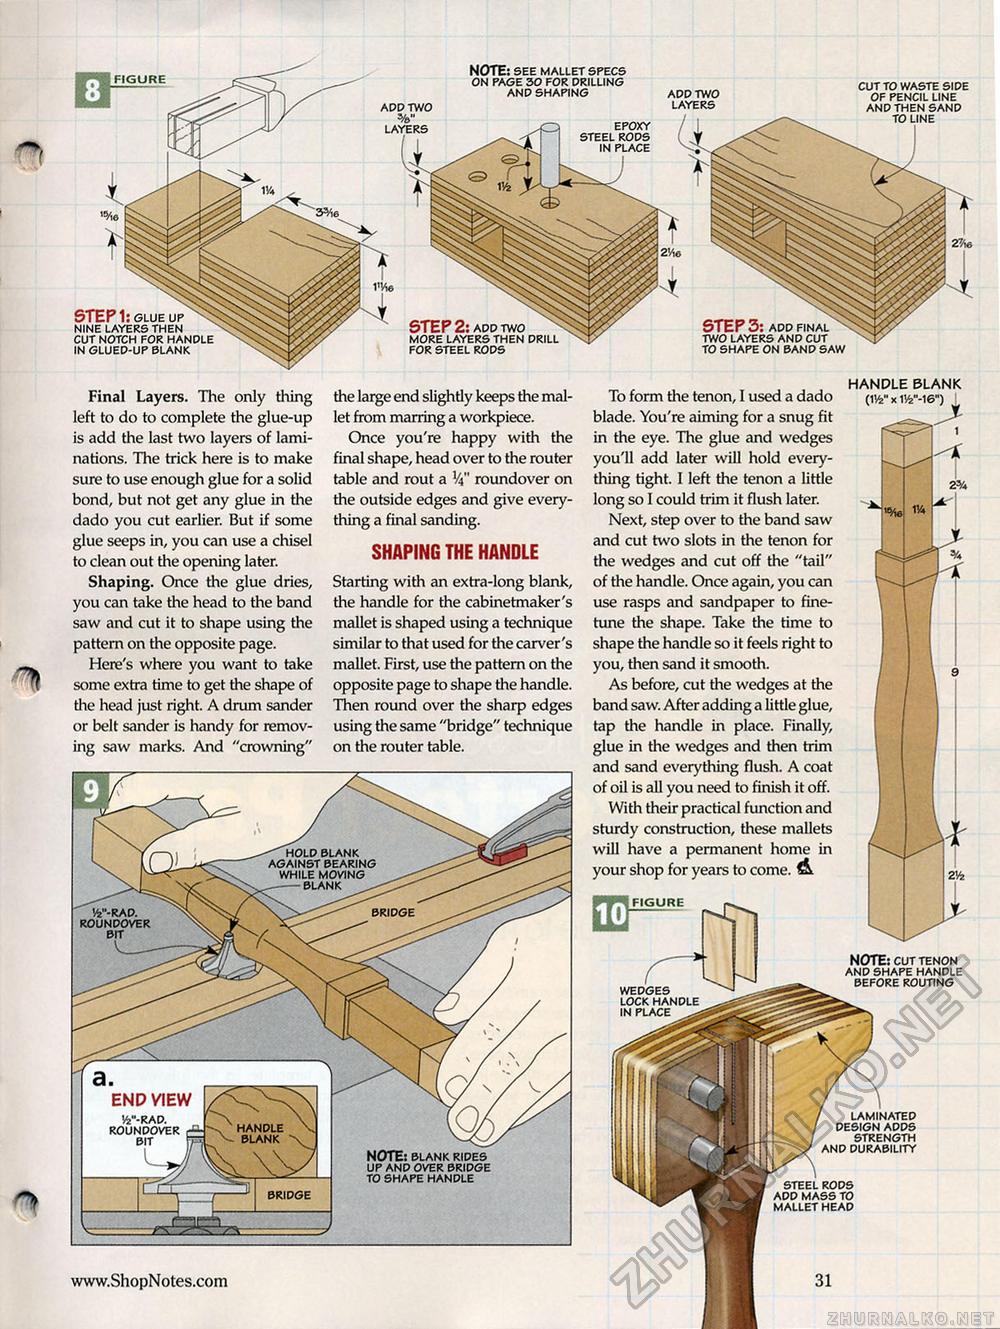
0> NOTE: see mallet specs on page 30 for drilling and shaping figure cut to waste side of pencil line and then sand to line STEP 1: glue up nine layers then cut notch for handle in glued-up blank STEP 3: add final two layers and cut to shape on band saw STEP 2: add two ^ more layers then drill for steel rods HANDLE BLANK (1V4" x 1H>"-16") I the large end slightly keeps the mallet from marring a workpiece. Once you're happy with the final shape, head over to the router table and rout a V roundover on the outside edges and give everything a final sanding. To form the tenon, I used a dado blade. You're aiming for a snug fit in the eye. The glue and wedges you'll add later will hold everything tight. I left the tenon a little long so I could trim it flush later. Next, step over to the band saw and cut two slots in the tenon for the wedges and cut off the "tail" of the handle. Once again, you can use rasps and sandpaper to fine-tune the shape. Take the time to shape the handle so it feels right to you, then sand it smooth. As before, cut the wedges at the band saw. After adding a little glue, tap the handle in place. Finally, glue in the wedges and then trim and sand everything flush. A coat of oil is all you need to finish it off. With their practical function and sturdy construction, these mallets will have a permanent home in your shop for years to come. & figure ^ Final Layers. The only thing left to do to complete the glue-up is add the last two layers of laminations. The trick here is to make sure to use enough glue for a solid bond, but not get any glue in the dado you cut earlier. But if some glue seeps in, you can use a chisel to clean out the opening later. Shaping. Once the glue dries, you can take the head to the band saw and cut it to shape using the pattern on the opposite page. Here's where you want to take some extra time to get the shape of the head just right. A drum sander or belt sander is handy for removing saw marks. And "crowning" Starting with an extra-long blank, the handle for the cabinetmaker's mallet is shaped using a technique similar to that used for the carver's mallet. First, use the pattern on the opposite page to shape the handle. Then round over the sharp edges using the same "bridge" technique on the router table. ''hold blank against bearing while moving --blank 14"-rad. roundover bit NOTE: cut tenon and shape handle before routing wedges lock handle in place END VIEW !4"-rad. roundover r bit n ' laminated design adds strength and durability handle blank NOTE: blank rides up and over bridge to shape handle steel rods add mass to mallet head bridge |


