Woodworker's Journal 1984-8-1, страница 39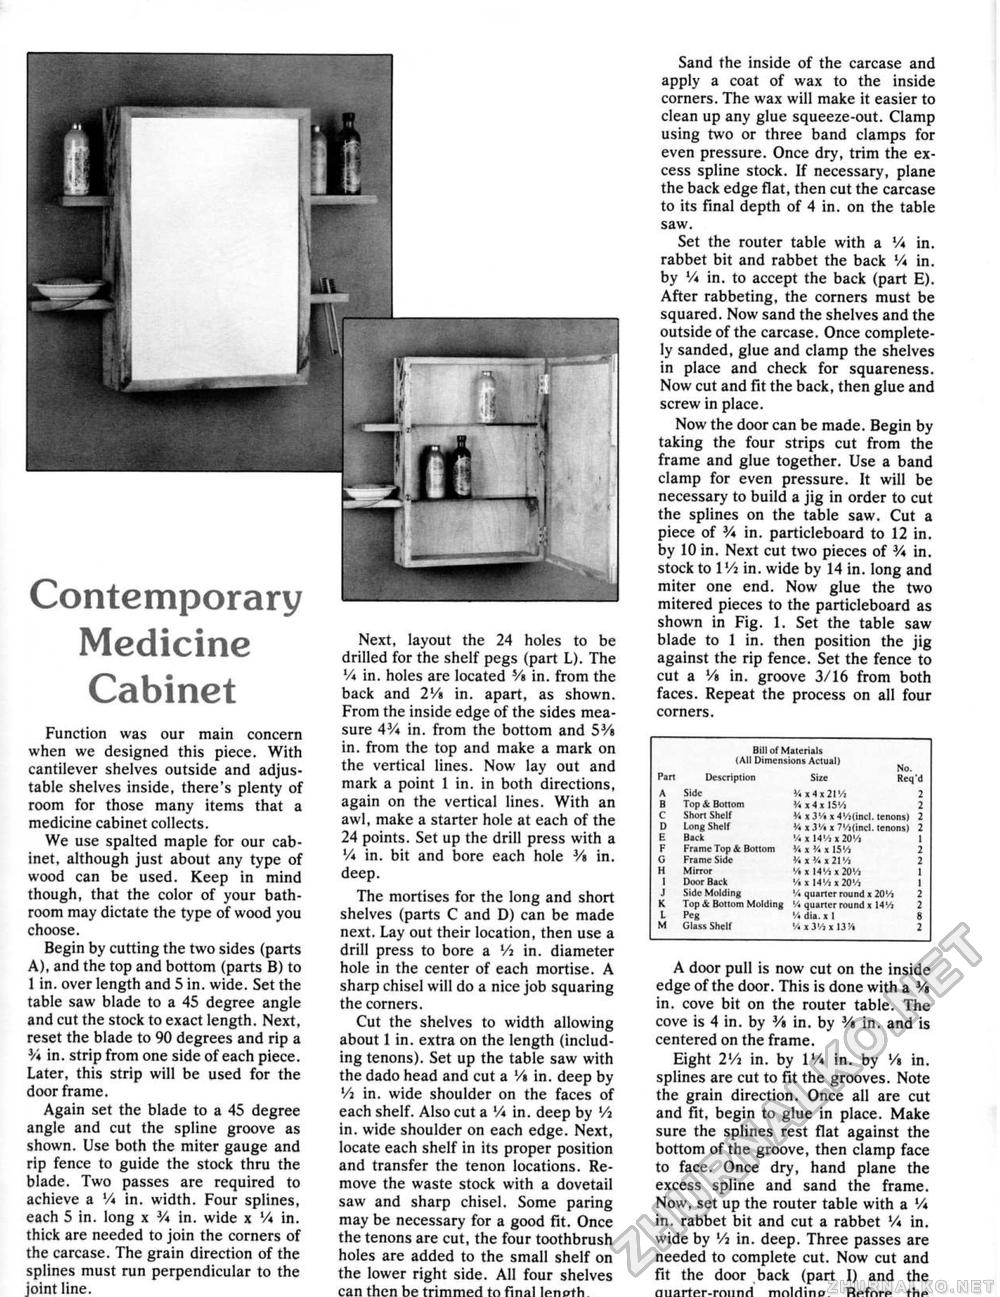
Contemporary Medicine Cabinet Function was our main concern when we designed this piece. With cantilever shelves outside and adjustable shelves inside, there's plenty of room for those many items that a medicine cabinet collects. We use spalted maple for our cabinet, although just about any type of wood can be used. Keep in mind though, that the color of your bathroom may dictate the type of wood you choose. Begin by cutting the two sides (parts A), and the top and bottom (parts B) to 1 in. over length and 5 in. wide. Set the table saw blade to a 45 degree angle and cut the stock to exact length. Next, reset the blade to 90 degrees and rip a V* in, strip from one side of each piece. Later, this strip will be used for the doorframe. Again set the blade to a 45 degree angle and cut the spline groove as shown. Use both the miter gauge and rip fence to guide the stock thru the blade. Two passes are required to achieve a V* in. width. Four splines, each 5 in. long x V* in. wide x V* in. thick are needed to join the corners of the carcase. The grain direction of the splines must run perpendicular to the joint line. Next, layout the 24 holes to be drilled for the shelf pegs (part L). The V* in. holes are located Vt in. from the back and 2Vt in. apart, as shown. From the inside edge of the sides measure 4V* in. from the bottom and 5J/< in. from the top and make a mark on the vertical lines. Now lay out and mark a point 1 in. in both directions, again on the vertical lines. With an awl, make a starter hole at each of the 24 points. Set up the drill press with a V* in. bit and bore each hole Vt in. deep. The mortises for the long and short shelves (parts C and D) can be made next. Lay out their location, then use a drill press to bore a Vi in. diameter hole in the center of each mortise. A sharp chisel will do a nice job squaring the corners. Cut the shelves to width allowing about 1 in. extra on the length (including tenons). Set up the table saw with the dado head and cut a Vt in. deep by Vi in. wide shoulder on the faces of each shelf. Also cut a V* in. deep by Vi in. wide shoulder on each edge. Next, locate each shelf in its proper position and transfer the tenon locations. Remove the waste stock with a dovetail saw and sharp chisel. Some paring may be necessary for a good fit. Once the tenons are cut, the four toothbrush holes are added to the small shelf on the lower right side. All four shelves can then be trimmed to final lenoth Sand the inside of the carcase and apply a coat of wax to the inside corners. The wax will make it easier to clean up any glue squeeze-out. Clamp using two or three band clamps for even pressure. Once dry, trim the excess spline stock. If necessary, plane the back edge flat, then cut the carcase to its final depth of 4 in. on the table saw. Set the router table with a V* in, rabbet bit and rabbet the back V* in, by V* in, to accept the back (part E). After rabbeting, the corners must be squared. Now sand the shelves and the outside of the carcase. Once completely sanded, glue and clamp the sheives in place and check for squareness. Now cut and fit the back, then glue and screw in place. Now the door can be made. Begin by taking the four strips cut from the frame and glue together. Use a band clamp for even pressure. It will be necessary to build a jig in order to cut the splines on the table saw. Cut a piece of V* in. particleboard to 12 in. by 10 in. Next cut two pieces of V* in. stock to V/i in. wide by 14 in, long and miter one end. Now glue the two mitered pieces to the particleboard as shown in Fig. 1. Set the table saw blade to 1 in. then position the jig against the rip fence. Set the fence to cut a Vt in. groove 3/16 from both faces. Repeat the process on all four corners. Bill of Materials lAil Dimensions Actual) Bill of Materials lAil Dimensions Actual)
A door pull is now cut on the inside edge of the door. This is done with a Vt in. cove bit on the router table. The cove is 4 in. by Vt in. by Vt in. and is centered on the frame. Eight 2Vi in. by IV* in. by Vt in. splines are cut to fit the grooves. Note the grain direction. Once all are cut and fit, begin to glue in place. Make sure the splines rest flat against the bottom of the groove, then clamp face to face. Once dry, hand plane the excess spline and sand the frame. Now, set up the router table with a Va in. rabbet bit and cut a rabbet V* in. wide by Vi in. deep. Three passes are needed to complete cut. Now cut and fit the door back (part I) and the Quarter-round mnlrlino. Rpfnrp thp |
||||||||||||||||||||||||||||||||||||||||||||||||||||||||


