Woodworker's Journal 1984-8-1, страница 45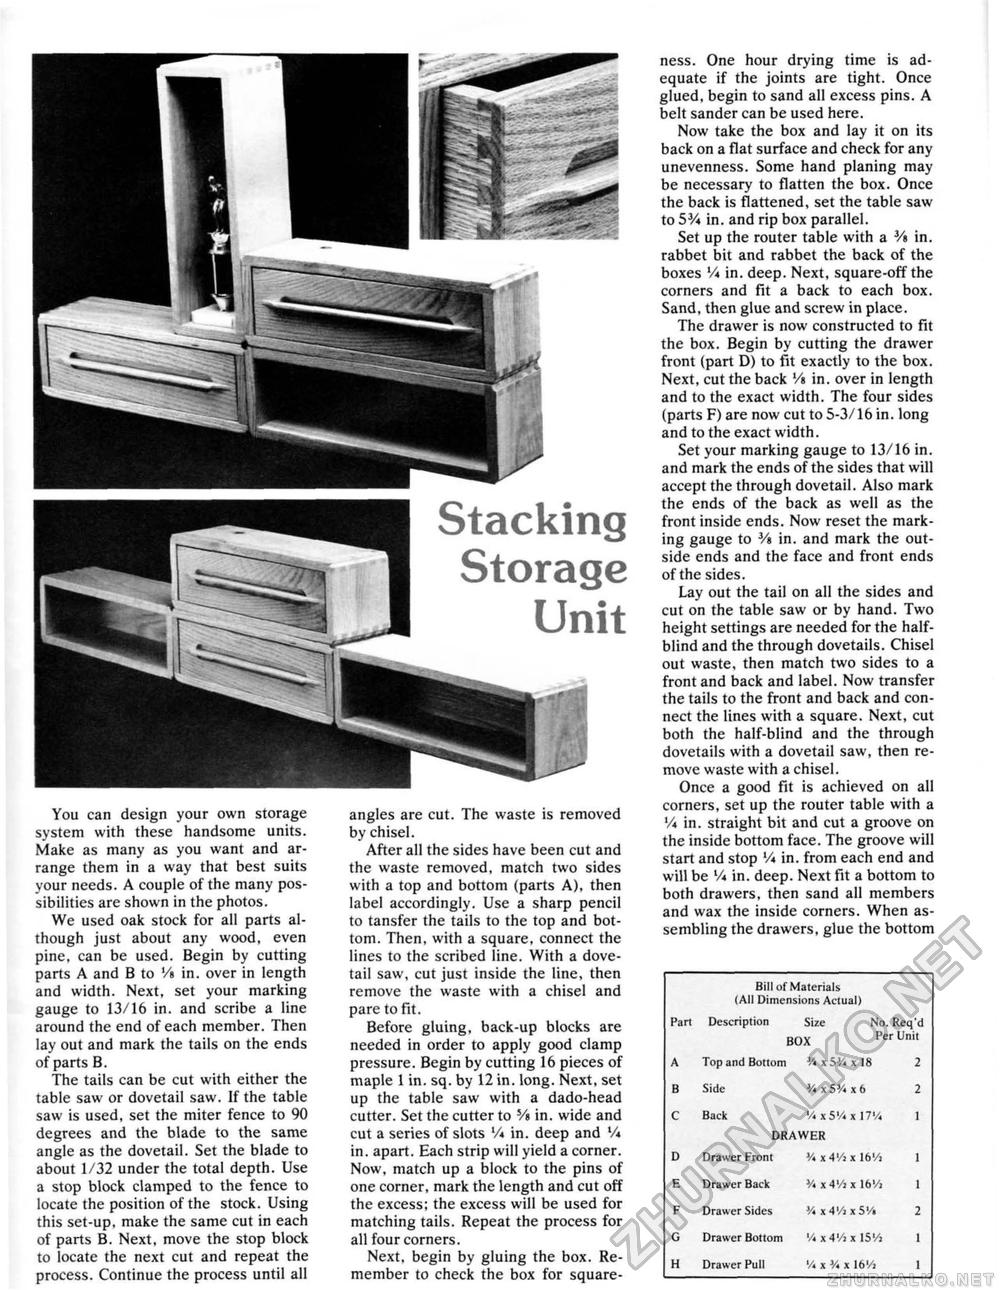
Stacking Storage Unit You can design your own storage system with these handsome units. Make as many as you want and arrange them in a way that best suits your needs. A couple of the many possibilities are shown in the photos. We used oak stock for all parts although just about any wood, even pine, can be used. Begin by cutting parts A and B to '/s in. over in length and width. Next, set your marking gauge to 13/16 in. and scribe a line around the end of each member. Then lay out and mark the tails on the ends of parts B. The tails can be cut with either the table saw or dovetail saw. If the table saw is used, set the miter fence to 90 degrees and the blade to the same angle as the dovetail. Set the blade to about 1/32 under the total depth. Use a stop block clamped to the fence to locate the position of the stock. Using this set-up, make the same cut in each of parts B, Next, move the stop block to locate the next cut and repeat the process. Continue the process until all angles are cut. The waste is removed by chisel. After all the sides have been cut and the waste removed, match two sides with a top and bottom (parts A), then label accordingly. Use a sharp pencil to tansfer the tails to the top and bottom. Then, with a square, connect the fines to the scribed iine. With a dovetail saw, cut just inside the line, then remove the waste with a chisel and pare to fit. Before gluing, back-up blocks are needed in order to apply good clamp pressure. Begin by cutting 16 pieces of maple 1 in. sq. by 12 in. long. Next, set up the table saw with a dado-head cutter. Set the cutter to V% in, wide and cut a series of slots '/* in. deep and Vi in. apart. Each strip will yield a corner. Now, match up a block to the pins of one corner, mark the length and cut off the excess; the excess will be used for matching tails. Repeat the process for all four corners. Next, begin by gluing the box. Remember to check the box for square ness. One hour drying time is adequate if the joints are tight. Once glued, begin to sand all excess pins. A belt sander can be used here. Now take the box and lay it on its back on a flat surface and check for any unevenness. Some hand planing may be necessary to flatten the box. Once the back is flattened, set the table saw to 53A in. and rip box parallel. Set up the router table with a 3/» in, rabbet bit and rabbet the back of the boxes Vi in. deep. Next, square-off the corners and Fit a back to each box. Sand, then glue and screw in place. The drawer is now constructed to fit the box. Begin by cutting the drawer front (part D) to fit exactly to the box. Next, cut the back '/« in. over in length and to the exact width. The four sides (parts F) are now cut to 5-3/16 in. long and to the exact width. Set your marking gauge to 13/16 in. and mark the ends of the sides that will accept the through dovetail. Also mark the ends of the back as well as the front inside ends. Now reset the marking gauge to Vi in, and mark the outside ends and the face and front ends of the sides. Lay out the tail on all the sides and cut on the table saw or by hand. Two height settings are needed for the haif-blind and the through dovetails. Chisel out waste, then match two sides to a front and back and label. Now transfer the tails to the front and back and connect the lines with a square. Next, cut both the half-blind and the through dovetails with a dovetail saw, then remove waste with a chisel. Once a good fit is achieved on all corners, set up the router table with a Vi in, straight bit and cut a groove on the inside bottom face. The groove will start and stop V* in. from each end and will be Vt in. deep. Next fit a bottom to both drawers, then sand all members and wax the inside corners. When assembling the drawers, glue the bottom
|
|||||||||||||||||||||||||||||||||||||||


