Woodworker's Journal 1984-8-1, страница 56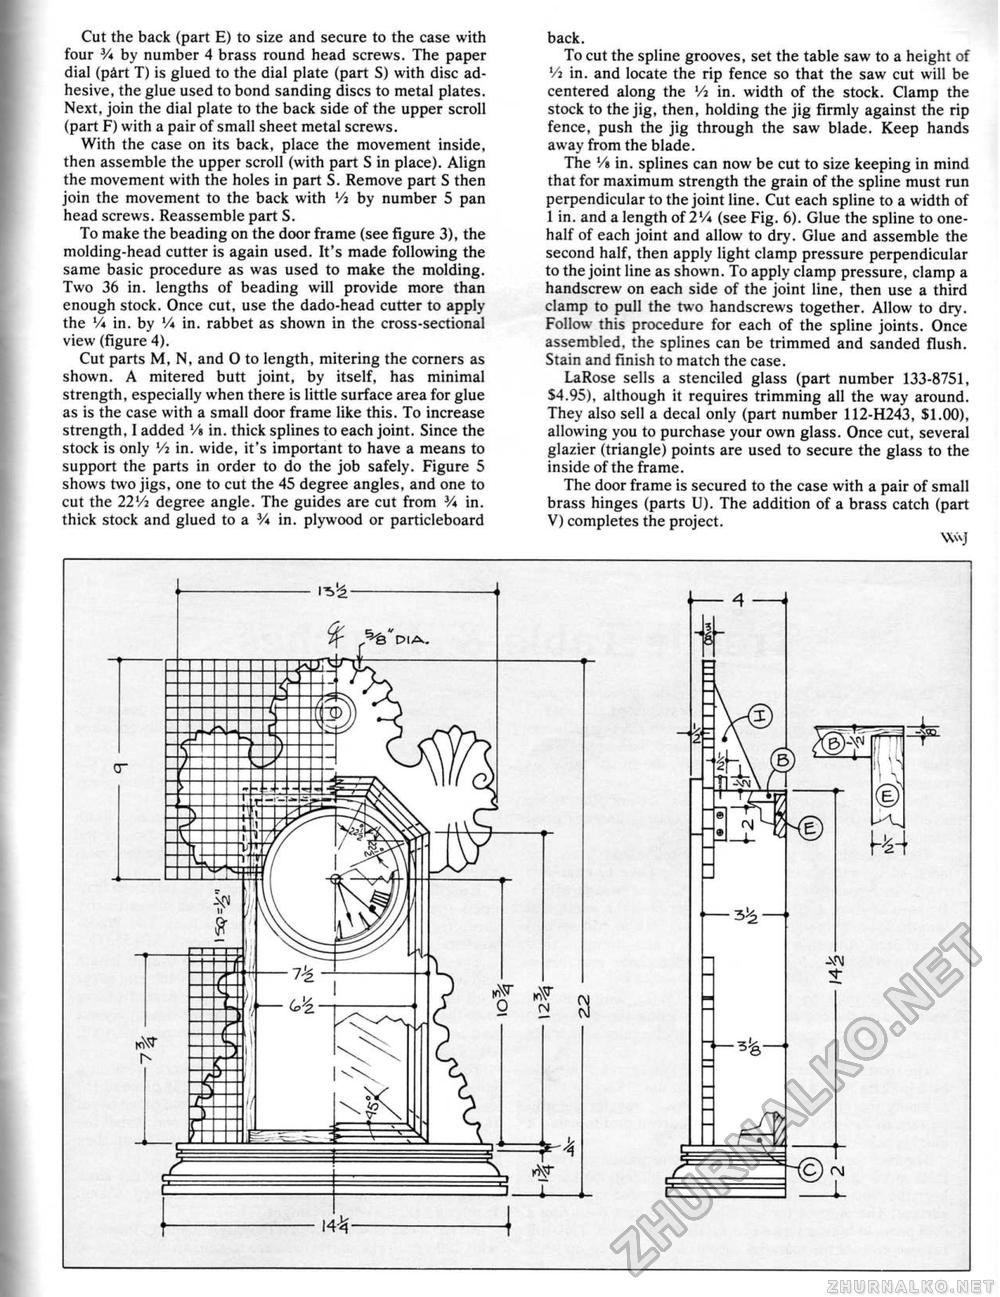
Cut the back (part E) to size and secure to the case with four 3/* by number 4 brass round head screws. The paper dial (p&rt T) is glued to the dial plate (part S) with disc adhesive, the glue used to bond sanding discs to metal plates. Next, join the dial plate to the back side of the upper scroll (part F) with a pair of small sheet metal screws. With the case on its back, place the movement inside, then assemble the upper scroll (with part S in place). Align the movement with the holes in part S. Remove part S then join the movement to the back with Vi by number 5 pan head screws. Reassemble part S. To make the beading on the door frame (see figure 3), the molding-head cutter is again used. It's made following the same basic procedure as was used to make the molding. Two 36 in. lengths of beading will provide more than enough stock. Once cut, use the dado-head cutter to apply the Vi in. by V* in. rabbet as shown in the cross-sectional view (figure 4). Cut parts M, N, and 0 to length, mitering the corners as shown. A mitered butt joint, by itself, has minimal strength, especially when there is little surface area for glue as is the case with a small door frame iike this. To increase strength. I added '/«in. thick splines to each joint. Since the stock is only Vj in. wide, it's important to have a means to support the parts in order to do the job safeiy. Figure 5 shows two jigs, one to cut the 45 degree angles, and one to cut the 22'/a degree angle. The guides are cut from V« in. thick stock and glued to a V* in. plywood or particleboard back. To cut the spline grooves, set the table saw to a height of '/a in. and locate the rip fence so that the saw cut will be centered along the Va in. width of the stock. Clamp the stock to the jig, then, holding the jig firmly against the rip fence, push the jig through the saw blade. Keep hands away from the blade. The '/a in. splines can now be cut to size keeping in mind that for maximum strength the grain of the spline must run perpendicular to the joint line. Cut each spline to a width of 1 in. and a length of 2V* (see Fig. 6). Glue the spline to one-haif of each joint and allow to dry. Glue and assemble the second half, then apply light clamp pressure perpendicular to the joint line as shown. To apply clamp pressure, clamp a handscrew on each side of the joint line, then use a third clamp to pull the two handscrews together. Allow to dry. Follow this procedure for each of the spline joints. Once assembled, the splines can be trimmed and sanded flush. Stain and finish to match the case. LaRose sells a stenciled glass (part number 133-8751, S4.95). although it requires trimming all the way around. They also sell a decal only (part number 112-H243, $1.00), allowing you to purchase your own glass. Once cut, several glazier (triangle) points are used to secure the glass to the inside of the frame. The door frame is secured to the case with a pair of small brass hinges (parts U), The addition of a brass catch (part V) completes the project. WvJ |


