Woodworker's Journal 1984-8-3, страница 21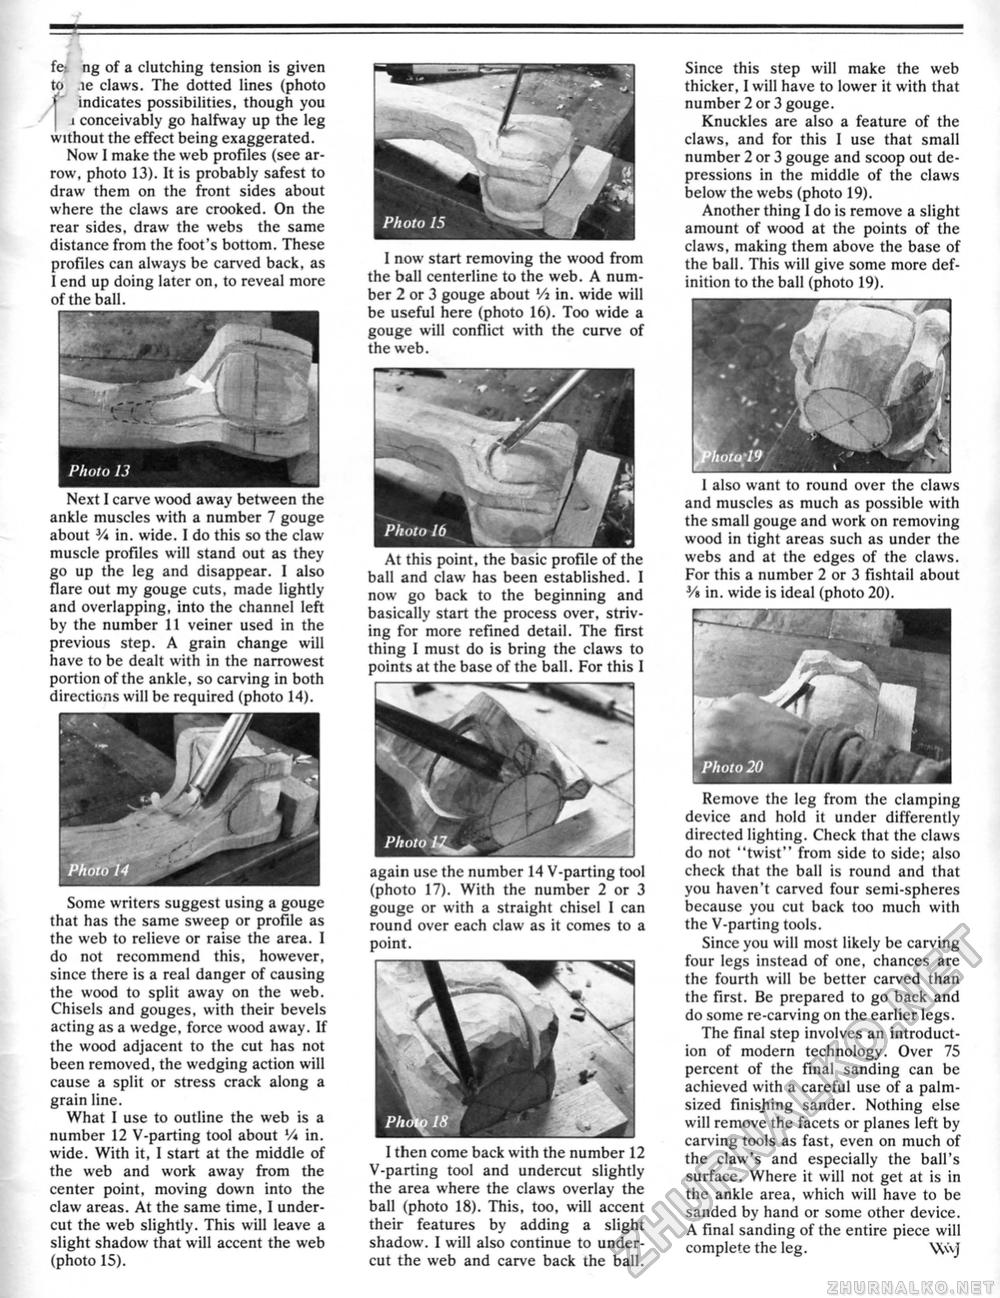
fe> ng of a clutching tension is given to ie claws. The dotted lines (photo | indicates possibilities, though you ! i conceivably go halfway up the leg without the effect being exaggerated. Now I make the web profiles (see arrow, photo 13). It is probably safest to draw them on the front sides about where the claws are crooked. On the rear sides, draw the webs the same distance from the foot's bottom. These profiles can always be carved back, as I end up doing later on, to reveal more of the ball. I now start removing the wood from the ball centerline to the web. A number 2 or 3 gouge about Vi in. wide will be useful here (photo 16). Too wide a gouge will conflict with the curve of the web. Since this step will make the web thicker, I will have to lower it with that number 2 or 3 gouge. Knuckles are also a feature of the claws, and for this I use that small number 2 or 3 gouge and scoop out depressions in the middle of the claws below the webs (photo 19). Another thing 1 do is remove a slight amount of wood at the points of the claws, making them above the base of the ball. This will give some more definition to the ball (photo 19). I also want to round over the claws and muscles as much as possible with the small gouge and work on removing wood in tight areas such as under the webs and at the edges of the claws. For this a number 2 or 3 fishtail about V> in. wide is ideal (photo 20), Remove the leg from the clamping device and hold it under differently directed lighting. Check that the claws do not "twist" from side to side; also check that the ball is round and that you haven't carved four semi-spheres because you cut back too much with the V-parting tools. Since you will most likely be carving four legs instead of one, chances are the fourth will be better carved than the first. Be prepared to go back and do some re-carving on the earlier legs. The final step involves an introduction of modern technology. Over 75 percent of the final sanding can be achieved with a careful use of a palm-sized finishing sander. Nothing else will remove the facets or planes left by carving tools as fast, even on much of the claw's and especially the ball's surface. Where it will not get at is in the ankle area, which will have to be sanded by hand or some other device. A final sanding of the entire piece will complete the leg. Wvj Next I carve wood away between the ankle muscles with a number 7 gouge about V* in. wide. I do this so the claw muscle profiles will stand out as they go up the leg and disappear. I also flare out my gouge cuts, made lightly and overlapping, into the channel left by the number 11 veiner used in the previous step. A grain change will have to be dealt with in the narrowest portion of the ankle, so carving in both directions will be required (photo 14). Some writers suggest using a gouge that has the same sweep or profile as the web to relieve or raise the area. I do not recommend this, however, since there is a real danger of causing the wood to split away on the web. Chisels and gouges, with their bevels acting as a wedge, force wood away. If the wood adjacent to the cut has not been removed, the wedging action will cause a split or stress crack along a grain line. What I use to outline the web is a number 12 V-parting tool about V« in. wide. With it, I start at the middle of the web and work away from the center point, moving down into the claw areas. At the same time, I undercut the web slightly. This will leave a slight shadow that will accent the web (photo 15). again use the number 14 V-parting tool (photo 17). With the number 2 or 3 gouge or with a straight chisel 1 can round over each claw as it comes to a point. I then come back with the number 12 V-parting tool and undercut slightly the area where the claws overlay the ball (photo 18). This, too, will accent their features bv adding a slight shadow. I will also continue to undercut the web and carve back the ball. At this point, the basic profile of the ball and claw has been established, I now go back to the beginning and basically start the process over, striving for more refined detail. The first thing I must do is bring the claws to points at the base of the ball. For this I |


