Woodworker's Journal 1984-8-3, страница 22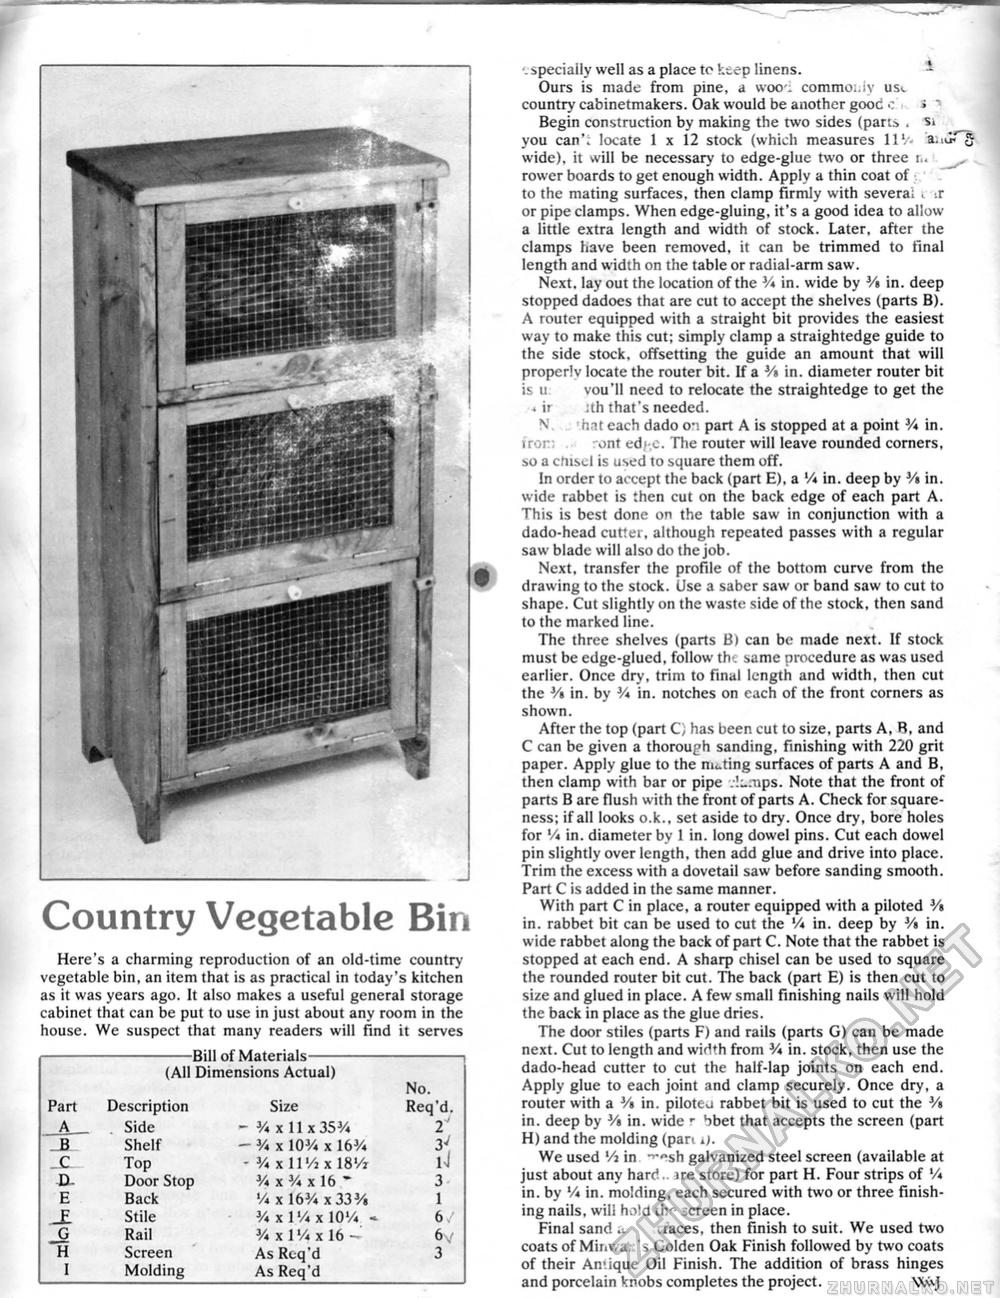
Country Vegetable Bin Here's a charming reproduction of an old-time country vegetable bin, an item that is as practical in today's kitchen as it was years ago. It also makes a useful general storage cabinet that can be put to use in jusl about any room in the house. We suspect that many readers will find it serves -.specially well as a place to ktep linens. Ours is made from pine, a woo-, commoi.ly ust country cabinetmakers. Oak would be another good c > * Begin construction by making the two sides (pans , Si you can': locate 1 x 12 stock (which measures 11V< a. »uf wide), it will be necessary to edge-glue two or three r,. rower boards to get enough width. Apply a thin coat of to the mating surfaces, then clamp firmly with several i ir or pipe clamps. When edge-gluing, it's a good idea to allow a little extra length and width of stock. Later, after the clamps have been removed, it can be trimmed to final length and width on the table or radial-arm saw. Next, lay out the location of the V* in. wide by 3/» in. deep stopped dadoes that are cut to accept the shelves (parts B). A router equipped with a straight bit provides the easiest way to make this cut; simply clamp a straightedge guide to the side stock, offsetting the guide an amount that will properlv locate the router bit. If a V> in. diameter router bit is u vou'll need to relocate the straightedge to get the 4 ir :th that's needed. hat each dado 0". part A is stopped at a point V* in. iron -ont edf .c. The router will leave rounded corners, so a chisel is used to square them off. In order to accept the back (part E), a Vi in. deep by Vt in. wide rabbet is then cut on the back edge of each part A. This is best done on the table saw in conjunction with a dado-head cutter, although repeated passes with a regular saw blade will also do the job. Next, transfer the profile of the bottom curve from the drawing to the stock. Use a saber saw or band saw to cut to shape. Cut slightly on the waste side of the stock, then sand to the marked line. The three shelves (parts Bt can be made next. If stock must be edge-glued, follow th-. same procedure as was used earlier. Once dry, trim to final length and width, then cut the V% in. by V* in. notches on each of the front corners as shown. After the top (part Cj has been cut to size, parts A, R, and C can be given a thorough sanding, finishing with 220 grit paper. Apply glue to the mating surfaces of parts A and B, then clamp with bar or pipe .-lumps. Note that the front of parts B are flush with the front of parts A. Check for squareness; if all looks o.k., set aside to dry. Once dry, bore holes for V* in. diameter by 1 in. long dowel pins. Cut each dowel pin slightly over length, then add glue and drive into place. Trim the excess with a dovetail saw before sanding smooth. Part C is added in the same manner. With part C in place, a router equipped with a piloted 3/> in. rabbet bit can be used to cut the V* in. deep by Vt in. wide rabbet along the back of part C. Note that the rabbet is stopped at each end. A sharp chisel can be used to square the rounded router bit cut. The back (part E) is then cut to size and glued in place. A few small finishing nails will hold the back in place as the glue dries. The door stiles (parts F) and rails (parts G) can be made next. Cut to length and width from 3A in. stock, then use the dado-head cutter to cut the half-lap joints on each end. Apply glue to each joint and clamp securely. Once dry, a router with a V» in. piloted rabbet bit is used to cut the Vt in. deep by 3/i in. wide r bbet that accepts the screen (part H) and the molding (pan We used Vj in ^"sh galvanized steel screen (available at just about any hard., ire store) for part H. Four strips of '/« in. by V* in. molding, each secured with two or three finishing nails, will hold Ur screen in place. Final sand u rfaces, then finish to suit. We used two coats of Miriwa; i Golden Oak Finish followed by two coats of their Amique Oil Finish. The addition of brass hinges and porcelain knobs completes the project, \Xvj -Bill of Materials- (All Dimensions Actual) No. No.
|


