Woodworker's Journal 1984-8-3, страница 19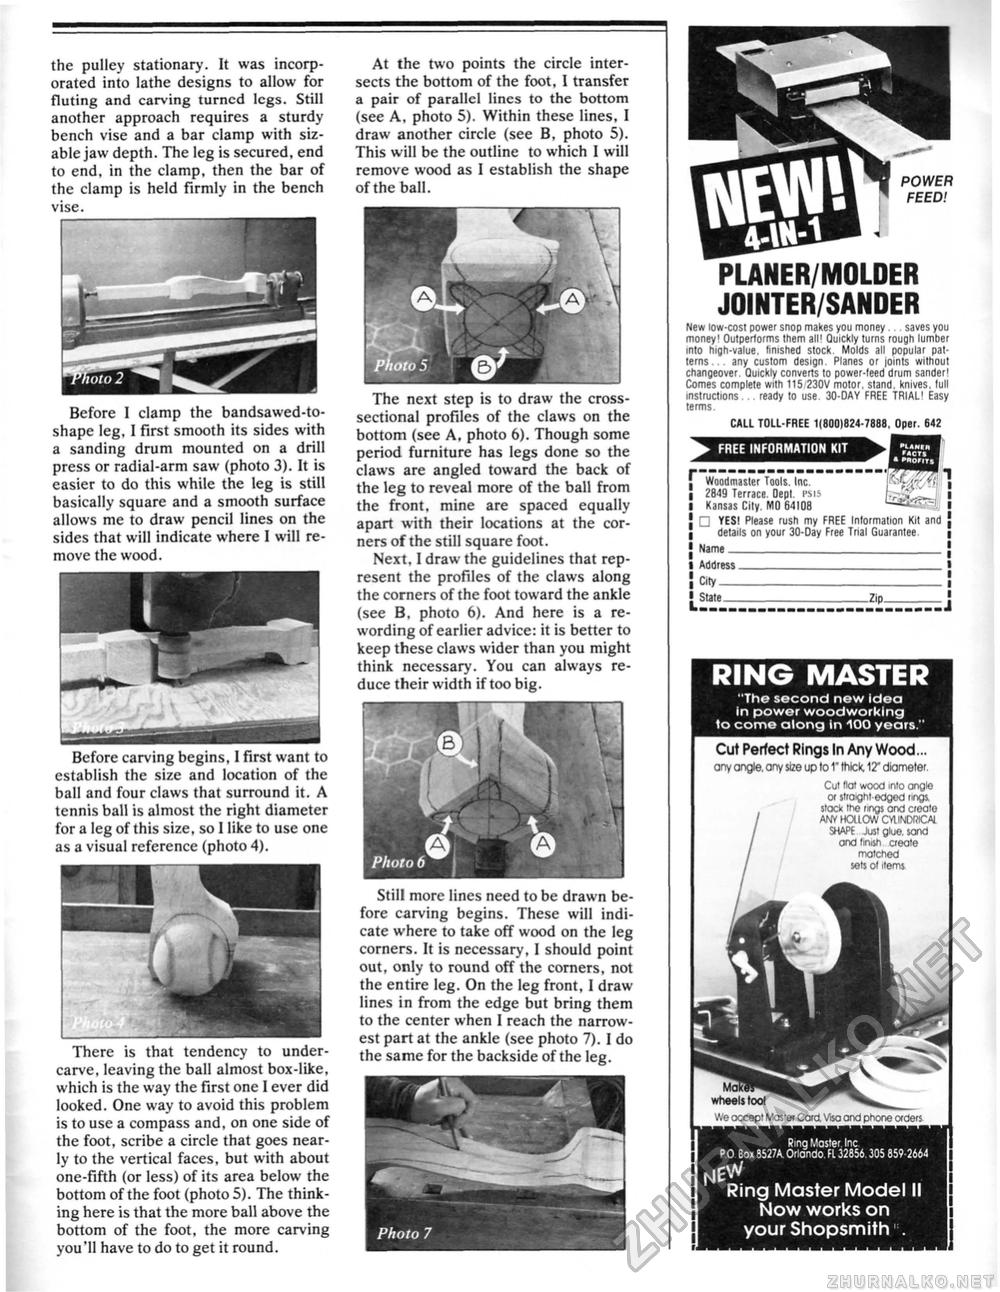
the pulley stationary. It was incorporated into lathe designs to allow for fluting and carving turned legs. Still another approach requires a sturdy bench vise and a bar clamp with sizable jaw depth. The leg is secured, end to end, in the clamp, then the bar of the clamp is held firmly in the bench vise. At the two points the circle intersects the bottom of the foot, I transfer a pair of parallel lines to the bottom (see A, photo 5). Within these lines, I draw another circle (see B, photo 5). This will be the outline to which 1 will remove wood as I establish the shape of the ball. Before 1 clamp the bandsawed-to-shape leg, 1 First smooth its sides with a sanding drum mounted on a drill press or radial-arm saw (photo 3). It is easier to do this while the leg is still basically square and a smooth surface allows me to draw pencil lines on the sides that will indicate where I will remove the wood. There is that tendency to under-carve, leaving the ball almost box-like, which is the way the first one I ever did looked. One way to avoid this problem is to use a compass and, on one side of the foot, scribe a circle that goes nearly to the vertical faces, but with about one-fifth (or less) of its area below the bottom of the foot (photo 5). The thinking here is that the more ball above the bottom of the foot, the more carving you'll have to do to get it round. The next step is to draw the cross-sectional profiles of the claws on the bottom (see A, photo 6). Though some period furniture has legs done so the claws are angled toward the back of the leg to reveal more of the ball from the front, mine are spaced equally apart with their locations at the corners of the still square foot. Next, I draw the guidelines that represent the profiles of the claws along the corners of the foot toward the ankle (see B. photo 6). And here is a rewording of earlier advice: it is better to keep these claws wider than you might think necessary. You can always reduce their width if too big. Before carving begins, I first want to establish the size and location of the ball and four claws that surround it. A tennis ball is almost the right diameter for a leg of this size, so I like to use one as a visual reference (photo 4), Still more lines need to be drawn before carving begins. These will indicate where to take off wood on the leg corners. It is necessary, I should point out, only to round off the corners, not the entire leg. On the leg front, I draw lines in from the edge but bring them to the center when I reach the narrowest part at the ankle (see photo 7). 1 do the same for the backside of the leg. PLANER/MOLDER JOINTER/SANDER New low-cost power snop makes you money. saves you money' Outperforms Ihem all1 Quickly turns rough lumber into high-value, finished stock Molds all popular patterns . any custom design Planes or joints withoul changeover Quickly converts to power-teed drum sander' Comes complete with 115 230V motor, stand, knives, lull instructions ready to use. 30-DAY FREE TRIAL! Easy terms CALL TOLL-FREE 1(6001824-7888. Oper. 642 m Woodraasler Tools, Inc. 2843 Terrace. Depl. csis Kansas City. MO G410B □ YES! Please rush my FREE Information Kit and details on your 30- Day Free Trial Guarantee. Name___ Address _ City____ Sta:e . POWER FEED! RING MASTER "The second new Idea In power woodworking to come along In 100 years." Cut Perfect Rings In Any Wood ... any angle, any size up lo 1" thick, 12" diameter. Cut flat wood mlo angle or straight-edged rings, jlack itid rings and create ANY HOtLOW CYIINDRICAI SHAPt Just glue, sand and firush create matched seis ol items We accept Master Card Visa and phone orders Ring Master. Inc. PO Box 6527A Orlando. Fl 32854 305 859-2464 Ring Master Model II Now works on your Shopsmith . |


