Woodworker's Journal 1984-8-4, страница 33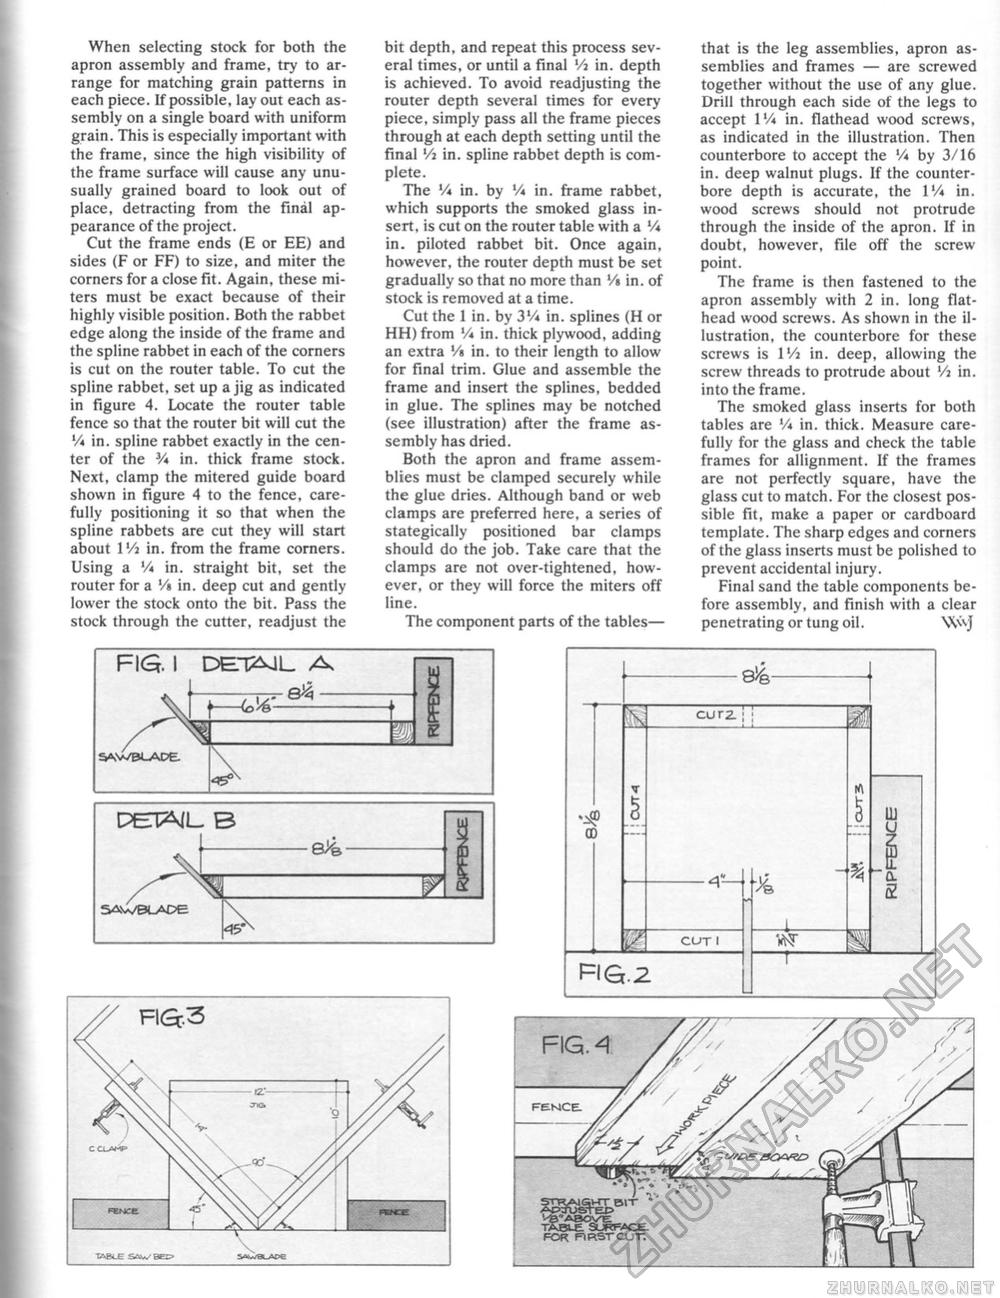
When selecting stock for both the apron assembly and frame, try to arrange for matching grain patterns in each piece. If possible, lay out each assembly on a single board with uniform grain. This is especially important with the frame, since the high visibility of the frame surface will cause any unusually grained board to look out of place, detracting from the final appearance of the project. Cut the frame ends (E or EE) and sides (F or FF) to size, and miter the corners for a close fit. Again, these miters must be exact because of their highly visible position. Both the rabbet edge along the inside of the frame and the spline rabbet in each of the corners is cut on the router table. To cut the spline rabbet, set up a jig as indicated in figure 4. Locate the router table fence so that the router bit will cut the V* in, spline rabbet exactly in the center of the V* in. thick frame stock. Next, clamp the mitered guide board shown in figure 4 to the fence, carefully positioning it so that when the spline rabbets are cut they will start about 1 '/j in. from the frame corners. Using a V* in. straight bit, set the router for a V» in. deep cut and gently lower the stock onto the bit. Pass the stock through the cutter, readjust the bit depth, and repeat this process several times, or until a final Vi in. depth is achieved. To avoid readjusting the router depth several times for every piece, simply pass all the frame pieces through at each depth setting until the final 'A in. spline rabbet depth is complete. The '/* in. by Vi in. frame rabbet, which supports the smoked glass insert, is cut on the router table with a V* in. piloted rabbet bit. Once again, however, the router depth must be set gradually so that no more than Vi in. of stock is removed at a time. Cut the 1 in. by 3V* in. splines (H or HH) from V* in. thick plywood, adding an extra '/» in. to their length to allow for final trim. Glue and assemble the frame and insert the splines, bedded in glue. The splines may be notched (see illustration) after the frame assembly has dried. Both the apron and frame assemblies must be clamped securely while the glue dries. Although band or web clamps are preferred here, a series of stategically positioned bar clamps should do the job. Take care that the clamps are not over-tightened, however, or they will force the miters off line. The component parts of the tables— that is the leg assemblies, apron assemblies and frames — are screwed together without the use of any glue. Drill through each side of the legs to accept IV* in. flathead wood screws, as indicated in the illustration. Then counterbore to accept the Vi by 3/16 in. deep walnut plugs. If the counter-bore depth is accurate, the IV* in. wood screws should not protrude through the inside of the apron. If in doubt, however, file off the screw point. The frame is then fastened to the apron assembly with 2 in. long fiat-head wood screws. As shown in the illustration. the counterbore for these screws is IVj in. deep, allowing the screw threads to protrude about Vi in. into the frame. The smoked glass inserts for both tables are V* in. thick. Measure carefully for the glass and check the table frames for allignment. If the frames are not perfectly square, have the glass cut to match. For the closest possible fit, make a paper or cardboard template. The sharp edges and corners of the glass inserts must be polished to prevent accidental injury. Final sand the table components before assembly, and finish with a clear penetrating or tung oil. W\J FIG. I DE.T2ML. A —(o{4> DETAIL. B ey& 45* E
00 Q'/e- curz!: cut t RG.2 •a B 4- 111 U for rr5tojt, |
|||||||||||||||


