Woodworker's Journal 1984-8-6, страница 55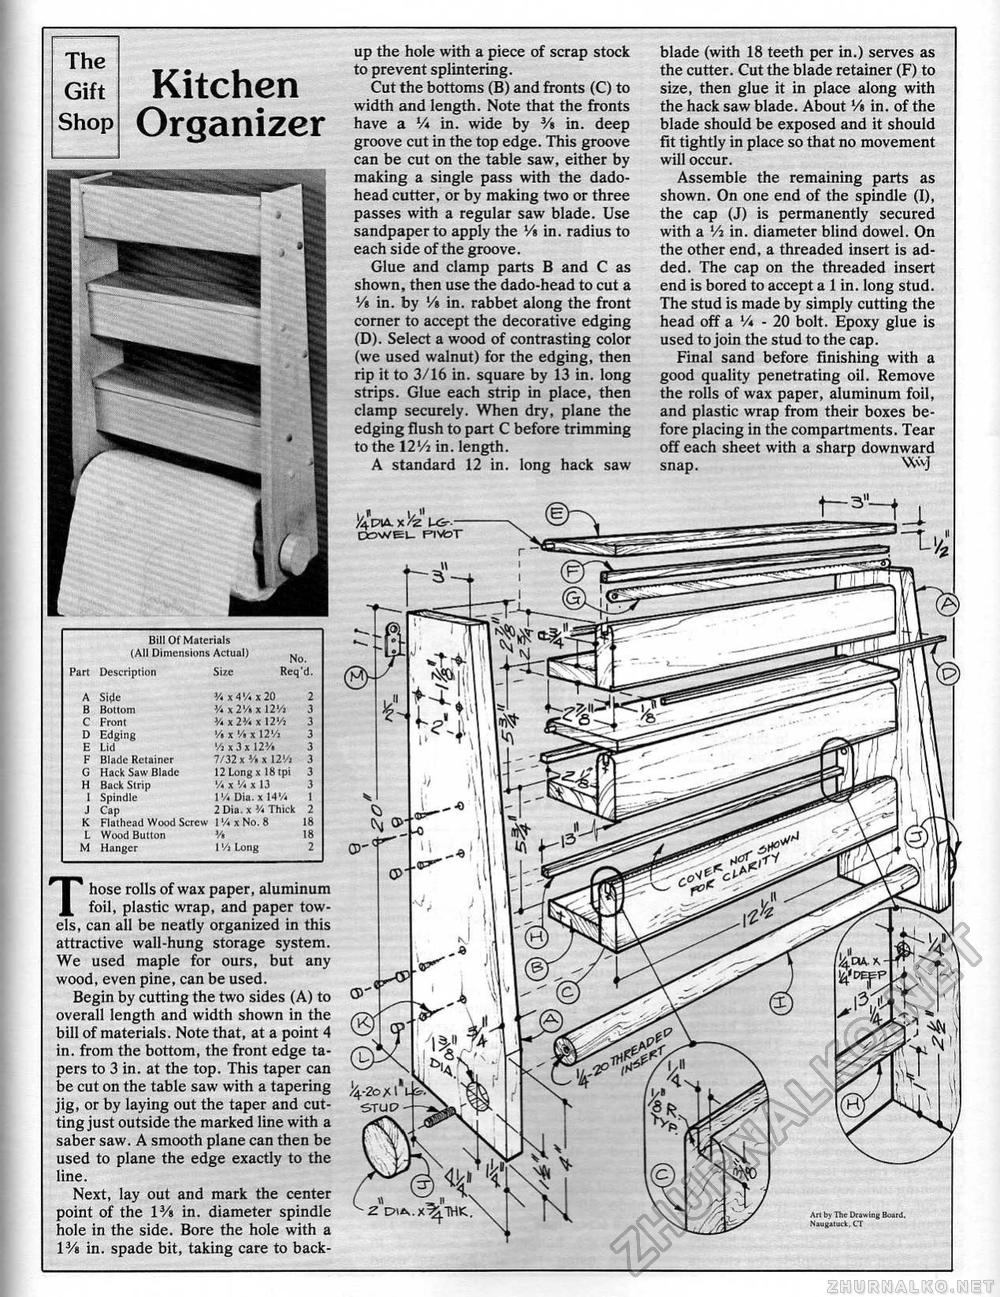
The Gift Shop Those rolls of wax paper, aluminum foil, plastic wrap, and paper towels, can all be neatly organized in this attractive wail-hung storage system. We used maple for ours, but any wood, even pine, can be used. Begin by cutting the two sides (A) to overall length and width shown in the bill of materials. Note that, at a point 4 in. from the bottom, the front edge tapers to 3 in. at the top. This taper can be cut on the table saw with a tapering jig, or by laying out the taper and cutting just outside the marked line with a saber saw. A smooth plane can then be used to plane the edge exactly to the line. Next, lay out and mark the center point of the 13/s in. diameter spindle hole in the side. Bore the hole with a V/t in. spade bit, taking care to back blade (with 18 teeth per in.) serves as the cutter. Cut the blade retainer (F) to size, then glue it in place along with the hack saw blade. About Vt, in. of the blade should be exposed and it should fit tightly in place so that no movement will occur. Assemble the remaining parts as shown. On one end of the spindle (I), the cap (J) is permanently secured with a lA in. diameter blind dowel. On the other end, a threaded insert is added. The cap on the threaded insert end is bored to accept a 1 in. long stud. The stud is made by simply cutting the head off a V* - 20 bolt. Epoxy glue is used to join the stud to the cap. Final sand before finishing with a good quality penetrating oil. Remove the rolis of wax paper, aluminum foil, and plastic wrap from their boxes before placing in the compartments. Tear off each sheet with a sharp downward snap. Kitchen Organizer up the hole with a piece of scrap stock to prevent splintering. Cut the bottoms (B) and fronts (C) to width and length. Note that the fronts have a V* in. wide by Vt in. deep groove cut in the top edge. This groove can be cut on the table saw, either by making a single pass with the dado-head cutter, or by making two or three passes with a regular saw blade. Use sandpaper to apply the Vt in. radius to each side of the groove. Glue and clamp parts B and C as shown, then use the dado-head to cut a Vt in. by Vt in. rabbet along the front corner to accept the decorative edging (D). Select a wood of contrasting color (we used walnut) for the edging, then rip it to 3/16 in. square by 13 in. long strips. Glue each strip in place, then clamp securely. When dry, plane the edging flush to part C before trimming to the 12Vi in. length. A standard 12 in. long hack saw |
||||||||||||||||||||||||||||||||||||||||||||||||


