Woodworker's Journal 1985-9-6, страница 54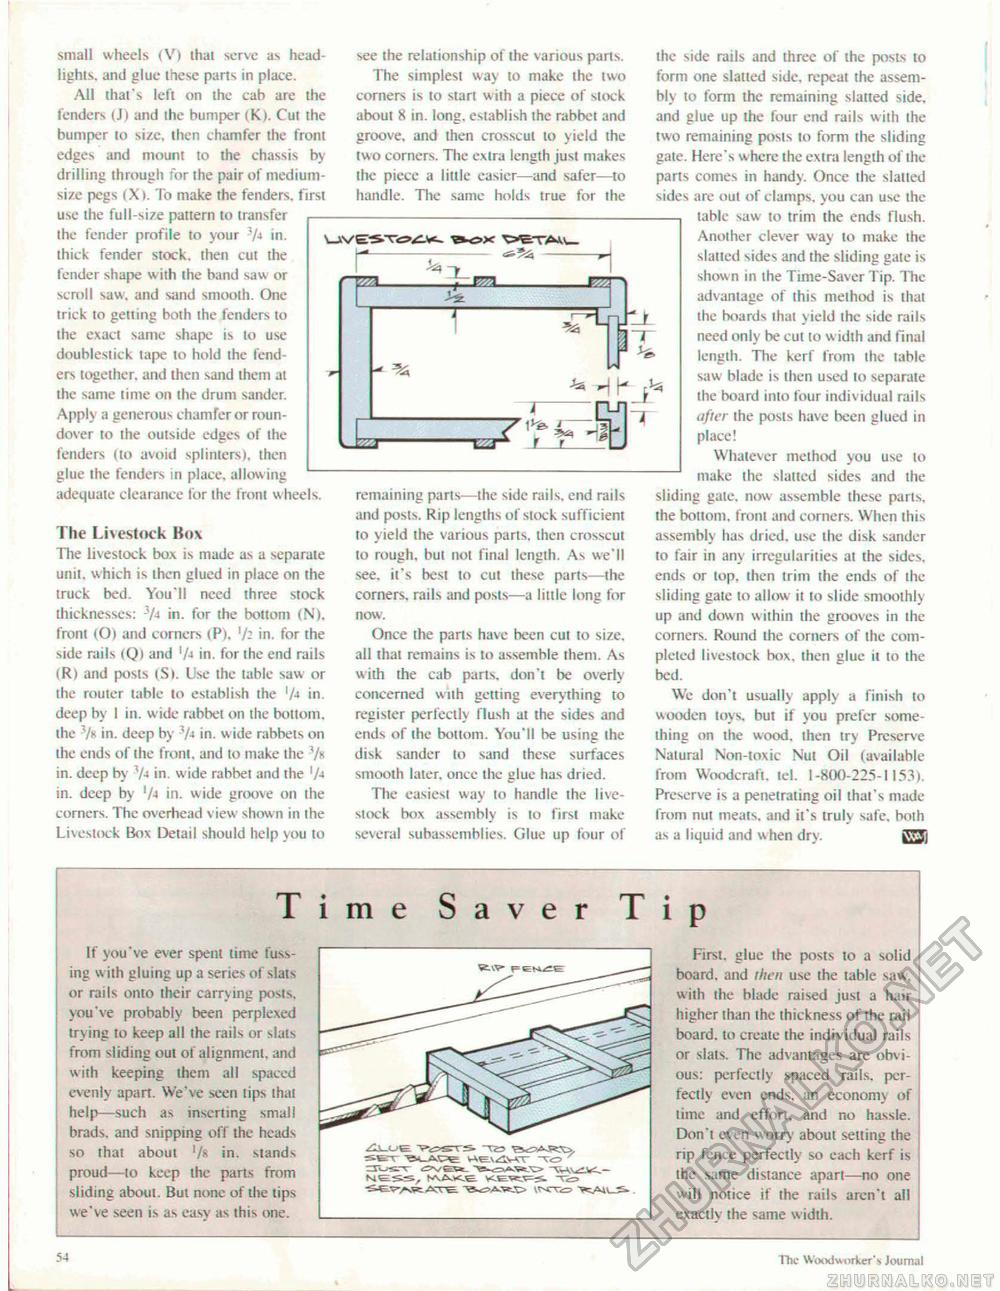
small wheels (V) (hat serve as headlights. and glue these parts in place. All that's left on the cab are the fenders (J) and the bumper (K). Cut the bumper to size, then chamfer the front edges and mount to the chassis by drilling through for the pair of medium-size pegs (X). To make the fenders, first use the full-size pattern to transfer the fender profile to your '/■» in. thick fender stock, then cut the fender shape with the band saw or scroll saw. and sand smooth. One trick to getting both the fenders to the exact same shape is lo use doublesiick tape to hold the fenders together, and then sand them at the same time on ihe drum sander. Apply a generous chamfer or roun-dover to the outside edges of the fenders (to avoid splinters), then glue the fenders in place, allowing adequate clearance for the front wheels. The Livestock Bo\ The livestock box is made as a separate unit, which is then glued in place on the truck bed. You'll need three stock thicknesses: 3/4 in. for the bottom (N). front (O) and comers (P). xfc in. for the side rails (Q( and lU in. for the end rails <R) and posts tS>. Use the table saw or the router table to establish the 'A in. deep by 1 in. wide rabbet on the bottom, the in. deep by V* in. w ide rabbets on the ends of the front, and to make the 7x in. deep by tyi in. wide rabbet and the 'A in. deep by in. wide groove on the corners. The overhead v iew shown in the Livestock Box Detail should help you to see the relationship of the various parts. The simplest way lo make the two corners is to start w ith a piece of stock about 8 in. long, establish the rabbet and groove, and then crosscut to yield the two corners. The extra length just makes the piece a little easier—and safer—to handle. The same holds true for the remaining parts—the side rails, end rails and posts. Rip lengths of slock sufficient to yield the various parts, then crosscut to rough, but not final length. As we'll see. it's best to cut these parts—the corners, rails and posts—a little long for now. Once the parts have been cut to size, all thai remains is to assemble them. As with the cab parts, don't be overly concerned with getting everything to register perfectly flush at the sides and ends of the bottom. You'll be using the disk sander to sand these surfaces smooth later, once the glue has dried. Tlte easiest way lo handle the livestock box assembly is to first make several subassemblies. Glue up lour of the side rails and three of the posts to form one slatted side, repeat the assembly to form the remaining slatted side, and glue up ihe four end rails with the two remaining posts to form the sliding gate. Here's where ihe extra length of the parts comes in handy. Once the slatted sides are out of clamps, you can use the table saw to trim the ends flush. Another clever way to make the slatted sides and the sliding gate is show n in the Time-Saver Tip. The advantage of this method is that the boards that yield the side rails need only be cut to w idth and final length. The kerf from the table saw blade is then used to separate the board into four individual rails after the posts have been glued in place! Whatever method you use lo make the slatted sides and the sliding gale, now assemble these parts, the bottom, front and corners. When this assembly has dried, use the disk sander to fair in any irregularities at the sides, ends or lop, then trim the ends of the sliding gate lo allow it to slide smoothly up and down within the grooves in the corners. Round the corners of the completed livestock box, then glue it to the bed. We don'i usually apply a finish to wooden toys, but if you prefer something on the wood, then try Preserve Natural Non-toxic Nut Oil (available from Woodcraft, tel. 1-800-225-1153). Preserve is a penelrating oil that's made from nut meats, and it's truly safe, both as a liquid and when dry. g^j 1 m e aver 1 P If you've ever spent lime fussing with gluing up a series of slats or rails onto their carrying posts, you've probably been perplexed trying to keep all Ihe rails or slats from sliding oul of alignment, and with keeping them al! spaced evenly apart. We've seen tips that help—such as inserting small brads, and snipping off ihe heads so that about 7* in. stands proud—to keep the parts from sliding about. But none of the tips we've seen is as easy as this one. liLUE >i5ST& SHiWiJSXs. First. glue the posts to a solid board, and then use the table saw, wiih the blade raised jusl a hair higher than the thickness of the rail board. 10 create the individual rails or slats. The advantages are obvious: perfectly spaced rails, perfectly even ends, an economy of lime and effort, and no hassle. Don't even worry about setting the rip fence perfectly so each kerf is the same distance apart—no one will notice if the rails aren't all exact I v the same width. --- - T —VA<\ 1 ^d-iki -ta .dtj* •4K The Woodworker'?. Journal |


