Woodworker's Journal 1993-17-1, страница 53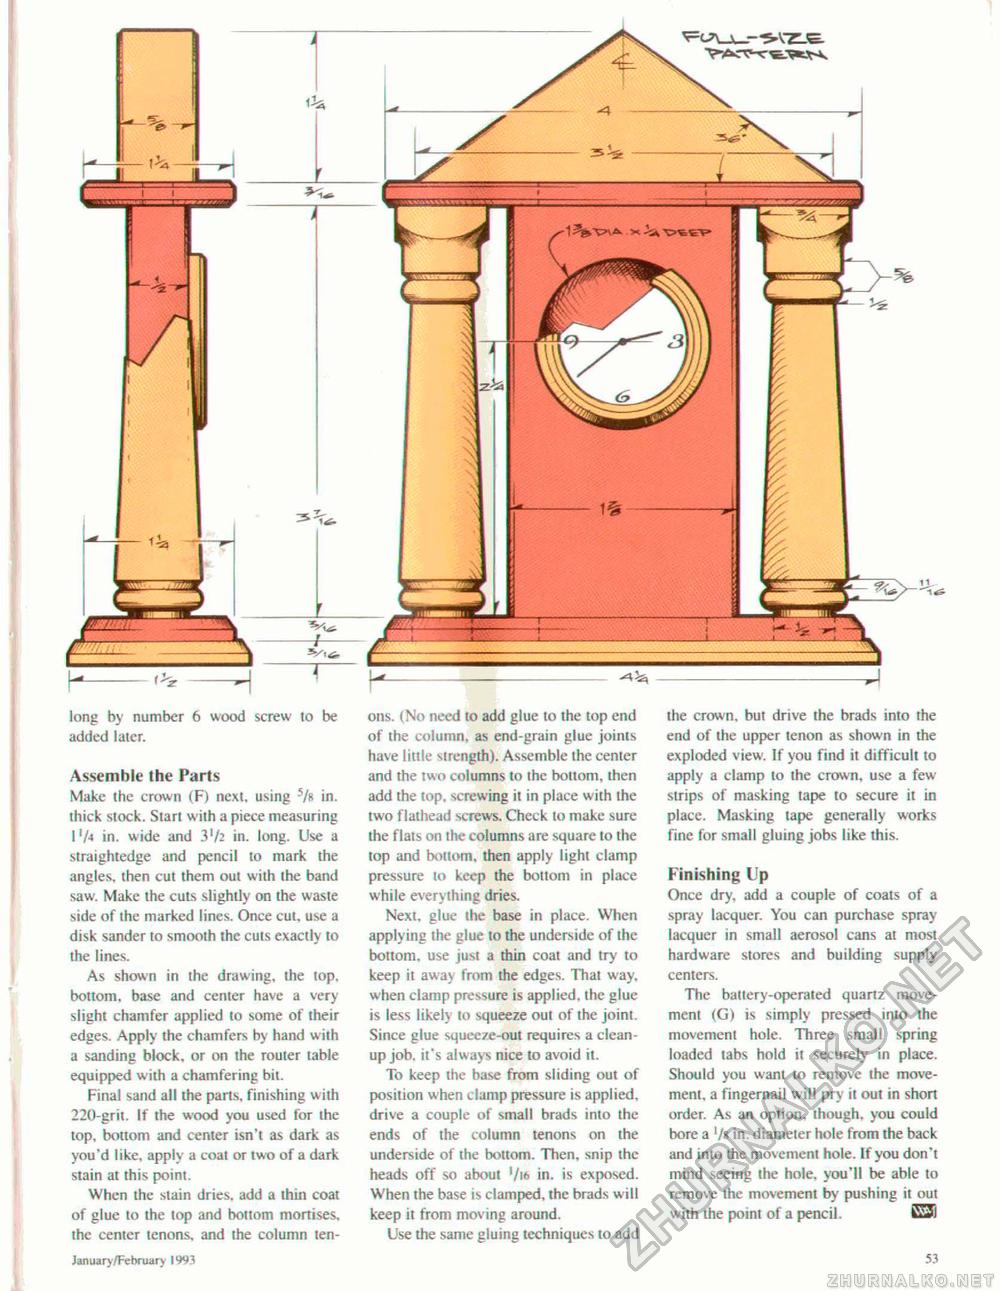
long by number 6 wood screw to be added later. Assemble the I'arts Make the crown (F) next, using in. thick stock. Start with a piece measuring !'A in. wide and Vh in. long. Use a straightedge and pencil to mark the angles, then cut them out with (he band saw. Make the cuts slightly on the waste side of the marked lines. Once cut, use a disk sander to smooth the cuts exactly to the lines. As shown in the drawing, the top, bottom, base and center have a very slight chamfer applied to some of their edges. Apply the chamfers by hand with a sanding block, or on the router table equipped with a chamfering bit. Final sand all the parts, finishing with 220-grit. If the wood you used for the top. bottom and center isn't as dark as you'd like, apply a coat or two of a dark stain at this point. When the slain dries, add a thin coat of glue to the top and bonom mortises, the center tenons, and the column ten ons. (No need to add glue to the top end of the column, as end-grain glue joints have little strength). Assemble the center and the two columns to the bottom, then add the top, screwing it in place with the two f lathead screws. Check to make sure the flats on the columns are square to the top and bottom, then apply lighl clamp pressure to keep the bottom in place while everything dries. Next, glue the base in place. When applying the glue to the underside of the bottom, use just a thin coat and try to keep it away from the edges. That way. when clamp pressure is applied, the glue is less likely to squeeze out of the joint. Since glue squeeze-out requires a cleanup job. it's always nice to avoid it. To keep the base from sliding out of position when clamp pressure is applied, drive a couple of small brads into the ends of the column tenons on the underside of the bottom. Then, snip the heads off so about '/» in. is exposed. When the base is clamped, the brads will keep it from moving around. Use the same gluing techniques to add the crown, but drive the brads into the end of the upper lenon as shown in the exploded view. If you find it difficult to apply a clamp lo ihe crown, use a few-strips of masking tape to secure it in place. Masking tape generally works fine for small gluing jobs like this. Finishing Up Once dry, add a couple of coats of a spray lacquer. You can purchase spray lacquer in small aerosol cans at most hardware stores and building supply centers. The battery-operated quartz movement (G) is simply pressed into the movement hole. Three small spring loaded labs hold it securely in place. Should you want to remove the movement. a fingernail w ill pry it out in short order. As an option, though, you could bore a '/* in. diameter hole from the back and into the movement hole. If you don't mind seeing the hole, you'll be able to remove ihe movement by pushing il out with the point of a pencil. E31 YAV.IiViaII January/February llW Pico if circle No. JO on the Reader Service Card. 7 |


