Woodworker's Journal 1993-17-1, страница 50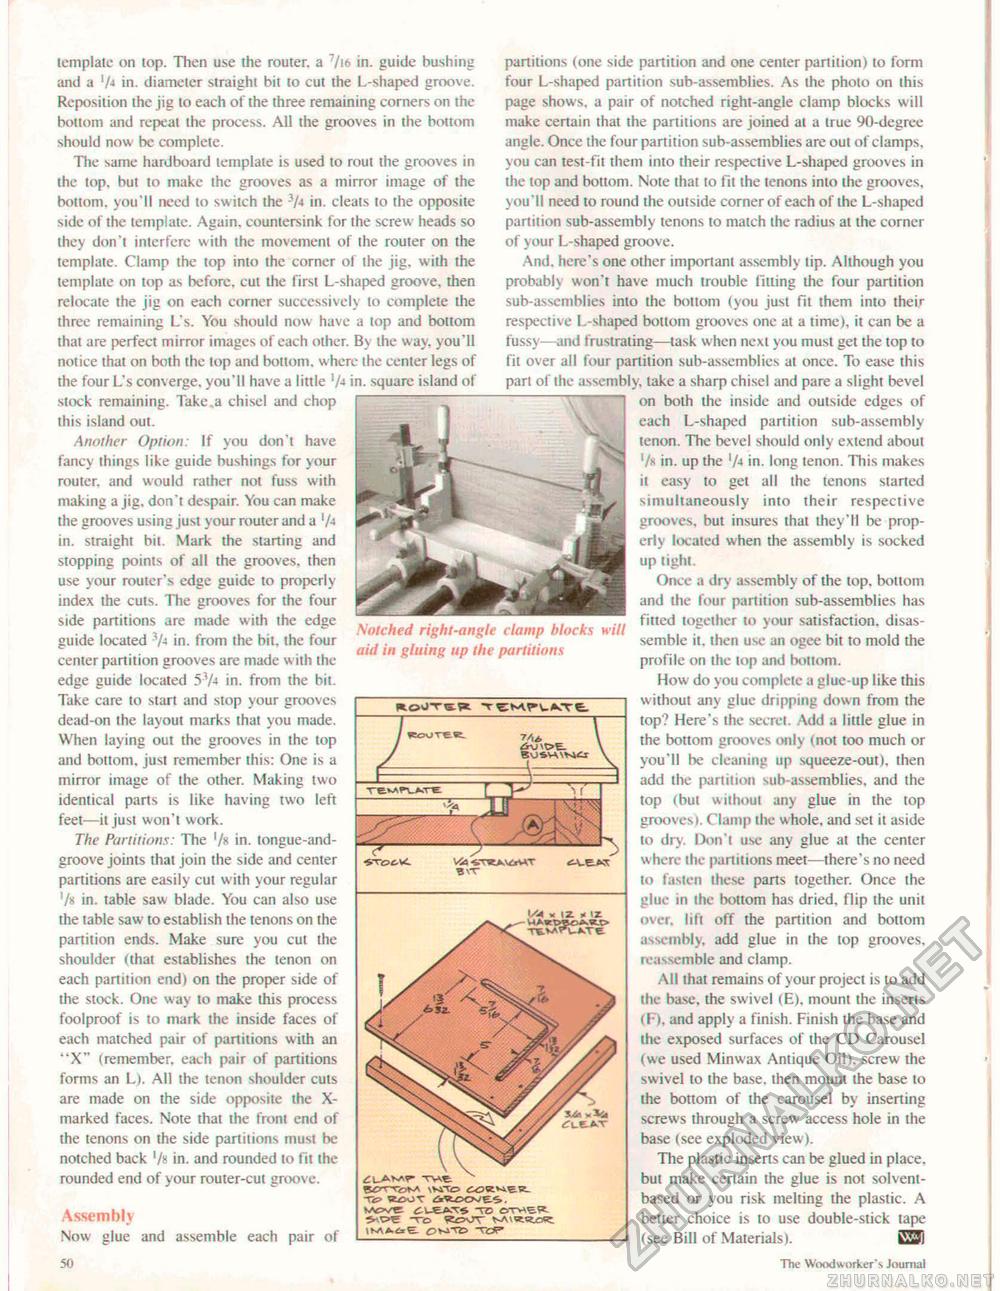
template on top. Then use ihe router, a 7i6 in. guide bushing and a in. diameter straight bit to cut the L-shaped groove. Reposition the jig to each of the three remaining corners on the bottom and repeal ihe process. All the grooves in the bottom should now be complete. The same hardboard template is used to rout the grooves in the top. but to make ihe grooves as a mirror image of the bottom, you'll need to switch the 3/-» in. cleats lo the opposite side of the template. Again, countersink for ihe screw heads so they don't interfere with the movement of the router on the template. Clamp the top into the corner of ihe jig, with the template on top as before, cut the first L-shaped groove, then relocate the jig on each corner successively lo complete the three remaining L's. You should now have a lop and boitom thai are perfect mirror images of each oiher. By ihe way. you'll notice that on both the lop and bottom, where the center legs of the four L's converge, you'll have a little in. square island of stock remaining. Take.a chisel and chop this island out. Another Option: If you don't have fancy things like guide bushings for your router, and would rather not fuss with making a jig, don't despair. You can make the grooves using just your router and a [/a in. straight bit. Mark the starting and stopping points of all the grooves, then use your router's edge guide to properly index the cuts. The grooves for the four side partitions are made with the edge guide located in. from the bit, the four center partition grooves are made with the edge guide located 57* in. from the bit. Take care to start and stop your grooves dead-on the layout marks that you made. When laying out the grooves in the top and bottom, just remember this: One is a mirror image of the other. Making two identical parts is like having two left feet—it just won't work. The Partitions: The '/« in. tongue-and-groove joints that join the side and center partitions are easily cut with your regular '/» in. table saw blade. You can also use the table saw to establish the tenons on the partition ends. Make sure you cut the shoulder (that establishes the lenon on each partilion end) on the proper side of the stock. One way to make this process foolproof is to mark the inside faces of each matched pair of partitions with an '"X" (remember, each pair of partitions forms an L). All the tenon shoulder cuts are made on the side opposite the X-marked faces. Note that the front end of the tenons on the side partitions must be notched back '/» in. and rounded to fit the rounded end of your router-cut groove. Notched right-angle clamp blocks will aid in gluing up the partitions RoOTt* T^MrUKTe. Via bvt Assembly Now glue and assemble each pair of ^LAM^ TVit \AOSC. TO OTM5R ^Ot -TO feJCV KM^StC*^. partitions (one side partition and one center partition) lo form four L-shaped partition sub-assemblies. As the pholo on this page shows, a pair of notched right-angle clamp blocks will make certain that the partitions are joined ai a true 90-degree angle. Once the four partition sub-assemblies are out of clamps, you can test-fit them into their respective L-shaped grooves in the top and bottom. Note that to fit ihe tenons into the grooves, you'll need to round the outside corner of each of the L-shaped partition sub-assembly tenons to match the radius at the corner of your L-shaped groove. And. here's one other important assembly tip. Although you probably won't have much trouble fitting the four partition sub-assemblies into the bottom (you just fit them into their respective L-shaped bottom grooves one at a time), it can be a fussy—and frustrating—task when next you must get the top to fit over all four partition sub-assemblies at once. To ease this pari of ihe assembly, take a sharp chisel and pare a slight bevel on both the inside and outside edges of each L-shaped partition sub-assembly tenon. The bevel should only extend about '/« in. up the 'A in. long tenon. This makes it easy to get all the tenons started simultaneously into their respective grooves, but insures that they'll be properly loeated when the assembly is socked up tight. Once a dry assembly of the top. bottom and the four partition sub-assemblies has fitted together to your satisfaction, disassemble it. then use an ogee bit to mold the profile on the lop and bottom. How do you complete a glue-up like this without any glue dripping down from the top? Here's the secret. Add a little glue in the bottom grooves only (not too much or you'll be cleaning up squeeze-out), then add ihe partition sub-assemblies, and the top (bul without any glue in the top grooves). Clamp ihe whole, and sel it aside to dry. Don't use any glue at the center where the partitions meet—there's no need to fasten these parts together. Once the glue in the bottom has dried, flip the unit over, lift off the partition and bottom assembly, add glue in the top grooves, reassemble and clamp. All that remains of your project is to add ihe base, the swivel (E), mount the inserts (F), and apply a finish. Finish the base and the exposed surfaces of the CD Carousel (we used Minwax Antique Oil), screw the swivel to the base, then mouni the base to the bottom of the carousel by inserting screws through a screw access hole in the base (see exploded view). The plastic inserts can be glued in place, but make certain the glue is not solvent-based or you risk melting the plastic. A better choice is to use double-stick tape (see Bill of Materials). CZJj < IZ x tZ IX The Woodworker'1, Journal |


