Woodworker's Journal 1993-17-5, страница 38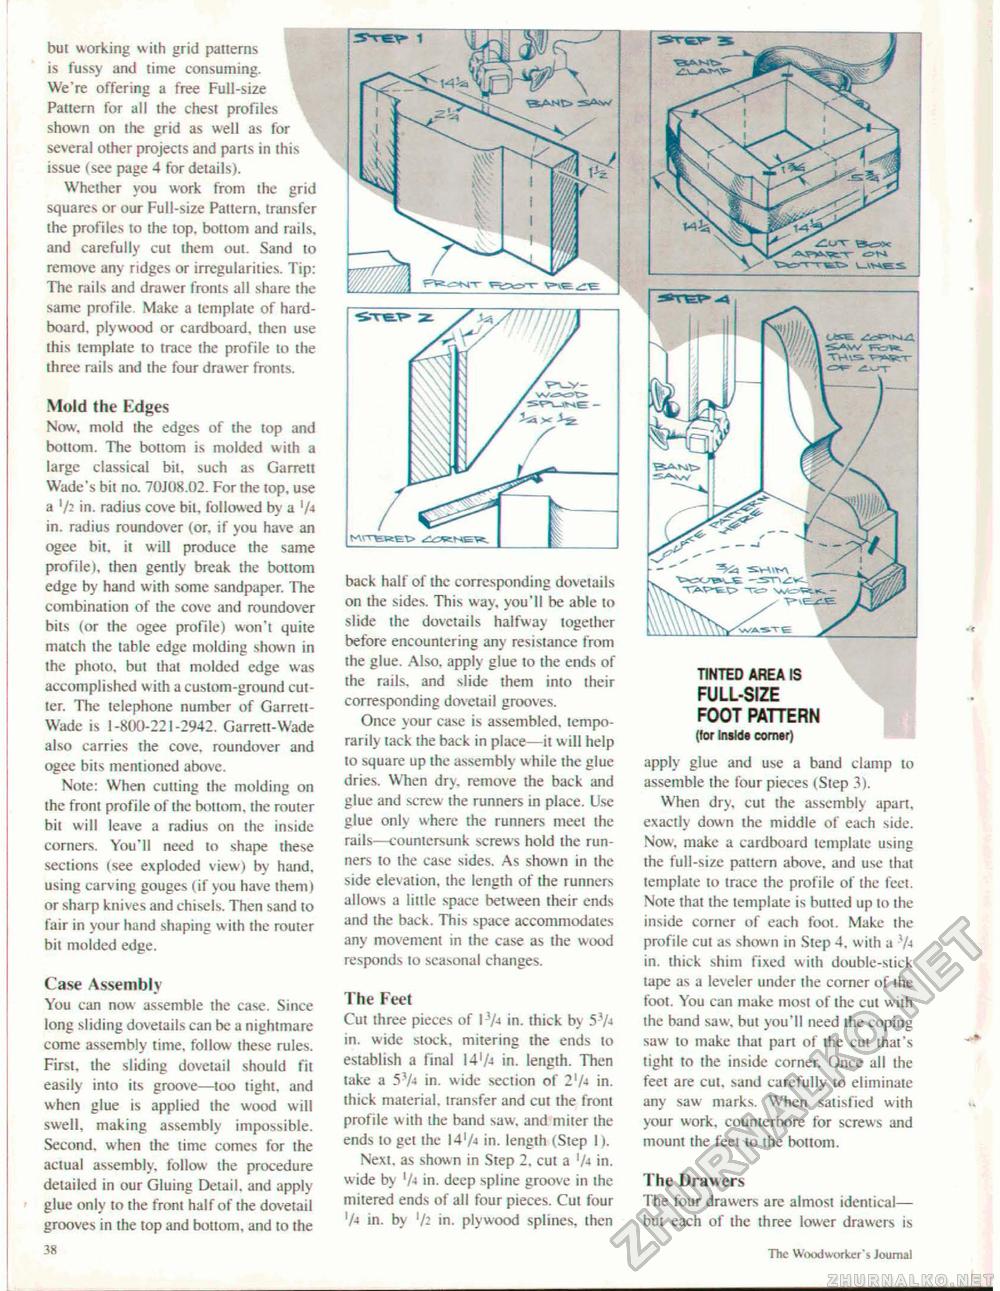
bui working with grid patterns is fussy and time consuming. We're offering a free Full-size Pattern for all the chest profiles shown on the grid as well as for several other projects and parts in this issue (see page 4 for details). Whether you work from the grid squares or our Full-size Pattern, transfer the profiles to the top. bottom and rails, and carefully cut them out. Sand to remove any ridges or irregularities. Tip: The rails and drawer fronts all share the same profile. Make a template of hard-board. plywood or cardboard, then use this template to trace the profile to the three rails and the four drawer fronts. Mold the Kdges Now. mold the edges of the top and bottom. The bottom is molded with a large classical bit. such as Garrett Wade's bit no. 70J08.02. For the top, use a '/- in. radius cove bit, followed by a 'A in. radius roundover (or, if you have an ogee bit. it will produce the same profile), then gently break the bottom edge by hand with some sandpaper. The combination of the cove and roundover bits (or the ogee profile) won't quite match the table edge molding shown in the photo, but that molded edge was accomplished with a custom-ground cutter. The telephone number of Garrett-Wade is I-800-221-2942. Garrett-Wade also carries the cove, roundover and ogee bits mentioned above. Note: When cutting the molding on the front profile of the bottom, the router bit will leave a radius on the inside corners. You'll need to shape these sections (see exploded view) by hand, using carving gouges (if you have them) or sharp knives and chisels. Then sand to fair in your hand shaping with the router bit molded edge. Case Assembly You can now assemble the case. Since long sliding dovetails can be a nightmare come assembly time, follow these rules. First, the sliding dovetail should fit easily inlo its groove—too tight, and when glue is applied the wood will swell, making assembly impossible. Second, when the lime comes for the actual assembly, follow the procedure detailed in our Gluing Detail, and apply glue only to the front half of the dovetail grooves in the top and bottom, and to the 38 back half of the corresponding dovetails on the sides. This way, you'll be able to slide the dovetails halfway together before encountering any resistance from the glue. Also, apply glue to the ends of the rails, and slide them into their corresponding dovetail grooves. Once your case is assembled, temporarily tack the back in place—it will help to square up the assembly while the glue dries. When dr>, remove the back and glue and screw the runners in place. Use glue only where the runners meet the rails—countersunk screws hold the runners to the case sides. As shown in the side elevation, the length of the runners allows a little space between their ends and the back. This space accommodates any movement in the case as the wood responds lo seasonal changes. The Feet Cut three pieces of \ifa in. thick by 57* in. wide stock, mitering the ends to establish a final 147-* in. length. Then take a 57* in. wide section of 27-* in. thick material, transfer and cut the front profile with the band saw, and miter the ends to get the 1474 in. length (Step I). Next, as shown in Step 2, cut a 7< in, w ide by in. deep spline groove in the mitered ends of all four pieces. Cut four 7^ in. by l/i in. plywood splines, then TINTED AREA IS FULL-SIZE FOOT PATTERN (lor Inside comer) apply glue and use a band clamp to assemble the four pieces (Step 3). When dry. cut the assembly apart, exactly down the middle of each side. Now. make a cardboard template using the full-size patlcrn above, and use that template to trace the profile of the feet. Note that the template is butted up to the inside corner of each foot. Make the profile cut as shown in Step 4, with a 3/t in. thick shim fixed with double-stick tape as a leveler under the corner of the foot. You can make most of the cut with the band saw. but you'll need the coping saw to make that part of the cut that's tight to the inside corner. Once ail the feet are cul, sand carefully to eliminate any saw marks. When satisfied with your work, counterbore for screws and mouni the feet lo the bottom. The Drawers The four drawers are almost identical— but each of the three lower drawers is 38 The Woodw orker'5 Journal |


