Woodworker's Journal 1993-17-5, страница 40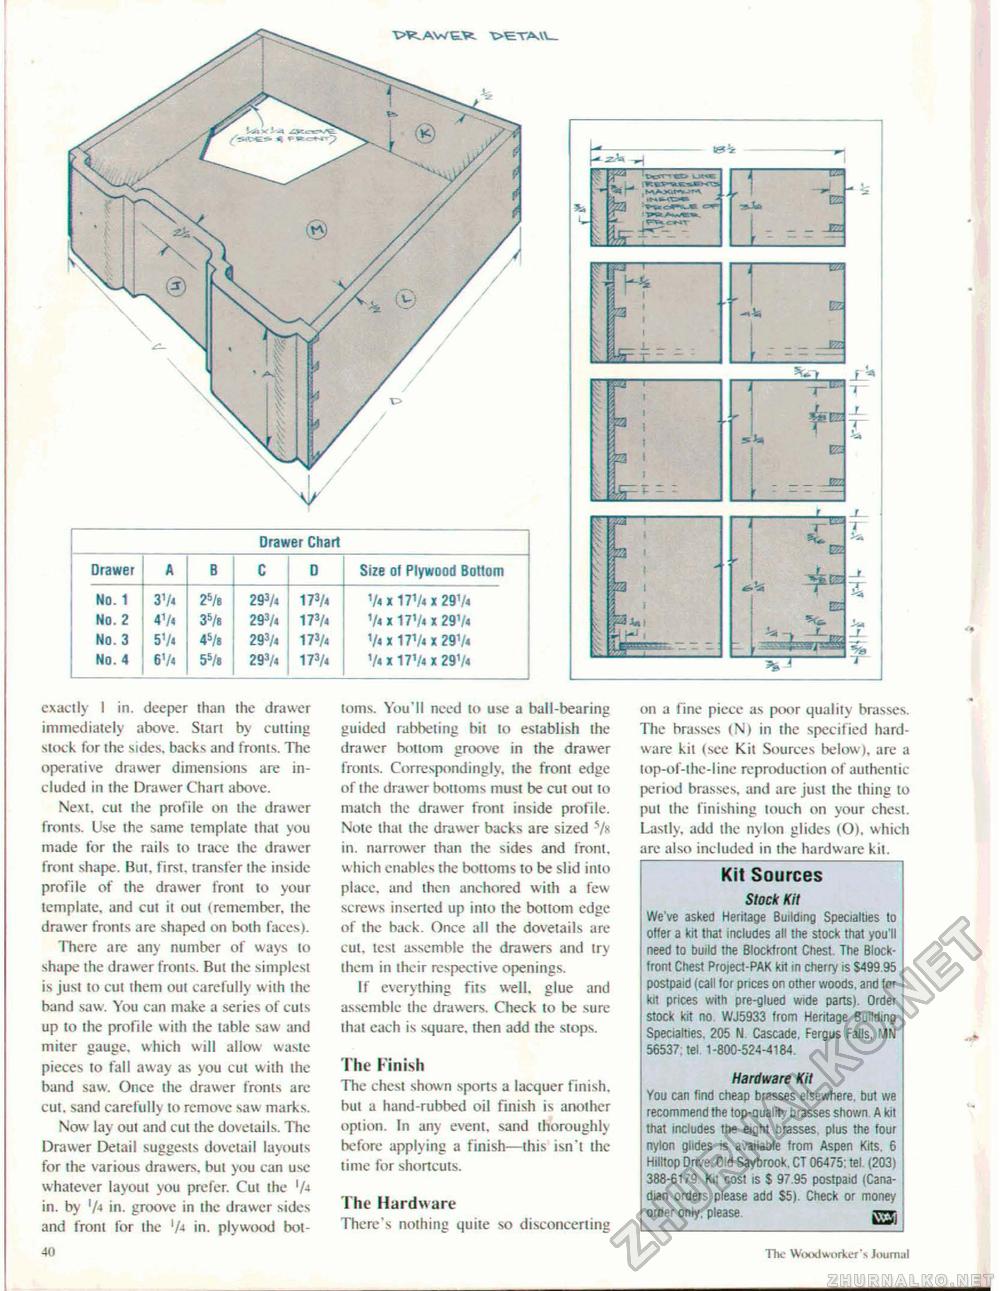
aJb,
-rn^ JL E2 V i exactly ! in. deeper than the drawer immediately above. Start by cutting stock for the sides, backs and fronts. The operative drawer dimensions are included in the Drawer Chart above. Next, cut the profile on the drawer fronts. Use the same template that you made for the rails to trace the drawer front shape. But, first, transfer the inside profile of the drawer front to your template, and cut it out (remember, the drawer fronts are shaped on both faces). There are any number of ways to shape the drawer fronts. But the simplest is just lo cut them out carefully with the band saw. You can make a series of cuts up to the profile with the table saw and miter gauge, which will allow waste pieces to fall away as you cut with the band saw. Once the drawer fronts arc-cut. sand carefully to remove saw marks. Now lay out and cut the dovetails. The Drawer Detail suggests dovetail layouts for the various drawers, but you can use whatever layout you prefer. Cut the 'A in. by 'A in. groove in the drawer sides and front for the 'A in. plywood bot-40 toms. You'll need to use a ball-bearing guided rabbeting bit to establish the drawer bottom groove in the drawer fronts. Correspondingly, the front edge of the drawer bottoms must be cut out to match the drawer front inside profile. Note that the drawer backs are sized s/s in. narrower than the sides and front, which enables the bottoms to be slid into place, and then anchored with a few screws inserted up into the bottom edge of the back. Once all the dovetails are cut. test assemble the drawers and try them in their respective openings. If everything fits well, glue and assemble the drawers. Check to be sure that each is square, then add the stops. The Finish The chest shown sports a lacquer finish, but a hand-rubbed oil finish is another option. In any event, sand thoroughly before applying a finish—this isn't the time for shortcuts. The Hardware There's nothing quite so disconcerting on a fine piece as poor quality brasses. The brasses (N) in the specified hardware kit (see Kit Sources below), are a top-of-the-line reproduction of authentic period brasses, and are just the thing to put the finishing touch on your chest. Lastly, add the nylon glides (O). which are also included in the hardware kit. Kit Sources Stock Kit We've asked Heritage Building Specialties to offer a kit that includes all the stock that you'll need to build the Blockfront Chest. The Block-front Chest Project-PAK kit in cherry is S499 95 postpaid (call tor prices on other woods, and tor kit prices with pre-glued wide parts). Order stock kit no WJ5933 from Heritage Building Specialties. 205 N Cascade. Fergus Falls, MN 56537; tel. 1-800-524-4164. Hardware Kit You can find cheap brasses elsewhere, but we recommend the top-quality brasses shown A kit that includes the eight brasses plus the four nylon glides is available from Aspen Kits, 6 Hilltop Drive. Old Saybrook, CT 06475: tel (203) 388-6179. KI1 cost is $ 97.95 postpaid {Canadian orders please add 85). Check or money order only, please. sw. The Woodworker's Joumut |
||||||||||||||||||||||||||||||||||||||||||||||||||||||||||||||||||||||||||||||


