Woodworker's Journal 1993-17-5, страница 54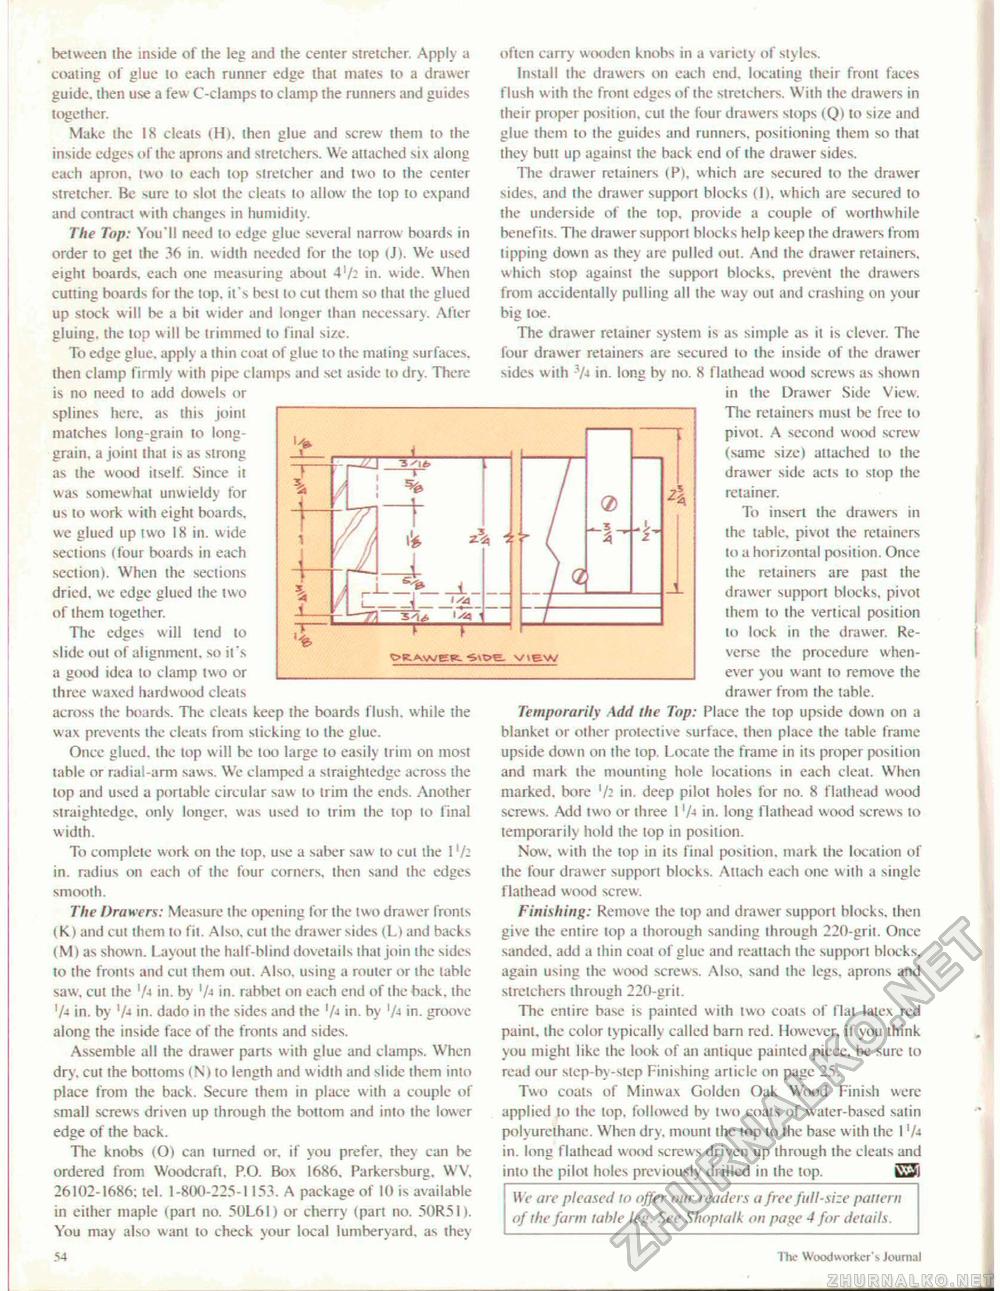
between the inside of the leg and the center stretcher. Apply a coating of glue lo each runner edge that mates to a drawer guide, then use a few C-clamps to clamp the runners and guides together. Make the 18 cleats (H). then glue and screw them to the inside edges of the aprons and stretchers. We attached six along each apron, two lo each top slrelcher and two lo the center stretcher. Be sure to slot the cleats to allow the lop to expand and contract with changes in humidity. The Top: You'll need to edge glue several narrow boards in order to gel the 36 in. width needed for the top iJ). We used eight boards, each one measuring aboul 4'A in. wide. When cutting boards for the lop. it's besi lo cut them so thai the glued up stock will be a bit wider and longer than necessary. After gluing, the lop will be trimmed lo final size. To edge glue, apply a thin coat of glue lo the mating surfaces, then clamp firmly with pipe clamps and set aside lo dry. There is no need to add dowels or splines here, as this join! matches long-grain to long-grain. a joint that is as strong as the wood iiself. Since il was somewhat unwieldy for us to work w ith eighi boards, we glued up two 18 in. wide sections (four boards in each section). When the seciions dried, we edge glued the two of them together. The edges will tend lo slide out of alignment, so it 's a good idea lo clamp two or three waxed hardwood cleats across the boards. The cleats keep the boards flush, while the wax prevents the cleats from slicking lo the glue. Once glued, the lop will be loo large lo easily trim on most table or radial-arm saws. We clamped a straightedge across the lop and used a portable circular saw lo trim ihe ends. Another straightedge, only longer, was used to trim the top lo final width. To complete work on the lop. use a saber saw to eul ihe 1 'A in. radius on each of the four corners, ihen sand the edges smooth. The Drawers: Measure the opening for the two drawer fronts (K) and cut ihem to fit. Also, cut the drawer sides (L) and backs (M) as shown. Layout ihe half-blind dovetails lhal join the sides lo the fronts and cut them out. Also, using a router or the (able saw, cut the 'A in. by 'A in. rabbet on each end of the back, ihe 'A in. by 'A in. dado in the sides and the 'A in. by 'A in. groove along the inside face of the fronts and sides. Assemble all the drawer parts with glue and clamps. When dry. cut the bottoms (N) to length and w idth and slide ihem into place from the back. Secure them in place with a couple of small screws driven up through the boltom and into the lower edge of the back. The knobs (O) can turned or. if you prefer, they can be ordered from Woodcraft, P.O. Box 1686, Parkersburg, WV, 26102-1686: tel. 1-800-225-1153. A package of 10 is available in either maple (pari no. 50L6I) or cherry (pari no. 50R51). You may also want lo check your local lumberyard, as they 54 <Z> _ 4 sxt'sweie. ^.ipt view often carry wooden knobs in a variety of styles. Install ihe drawers on each end, locating their front faces flush with ihe front edges of ihe stretchers. With the drawers in iheir proper position, cut the four drawers stops (Q) to size and glue them to the guides and runners, positioning them so that they butt up against ihe back end of the drawer sides. Ihe drawer retainers (P). which are secured lo the drawer sides, and the drawer support blocks (I), which are secured to the underside of the top, prov ide a couple of worthwhile benefits. The drawer support hi<icks help keep the drawers from lipping down as they are pulled out. And Ihe drawer retainers, which stop against the support blocks, prevent the drawers from accidentally pulling all the way oui and crashing on your big loe. The drawer retainer system is as simple as it is clever. The four drawer retainers are secured to the inside of ihe drawer sides wilh 3A in. long by no. 8 flalhead wood screws as shown in ihe Drawer Side View. The retainers ntusi be free to pivot. A second wood screw (same size) attached to the drawer side acls to slop the retainer. To insert the drawers in the table, pivot the retainers to a horizontal position. Once ihe retainers are past the drawer support blocks, pivot them to the vertical position to lock in the drawer. Reverse the procedure whenever you want to remove the drawer from the table. Temporarily Add the Top: Place the top upside down on a blankel or other prolective surface, then place the (able frame upside down on the top. Locate the frame in its proper position and mark the mounting hole locations in each cleat. When marked, bore 'A in. deep pilot holes for no. 8 flalhead wood screws. Add two or ihree I 'A in. long flalhead wood screws io temporarily hold ihe top in position. Now. w ith ihe top in its final position, mark ihe location of ihe four drawer support blocks. Attach each one with a single flalhead wood screw. Finishing: Remove the lop and drawer support blocks, then give the entire top a thorough sanding through 220-gril. Once sanded, add a ihin coal of glue and reattach the support blocks, again using the wood screws. Also, sand the legs, aprons and stretchers through 220-gril. The eniire base is painted with two coals of flal latex red paint, the color typically called barn red. However, if you think you might like the look of an antique painted piece, be sure to read our step-by-step Finishing arliclc on page 25. Two coals of Minwax Golden Oak Wood Finish were applied lo the lop. followed by two coals of water-based satin polyurethane. When dry. mount ihe lop lo the base w ith the 1 'A in. long flalhead wood screws driven up through the cleats and into the pilot holes previously drilled in the top. t^l We are pleased lo offer our readers a free full-size pattern of the farm table leg. See Shopialk on page 4 for details. The Woodw orker'5 Journal |


