Woodworker's Journal 1994-18-2, страница 32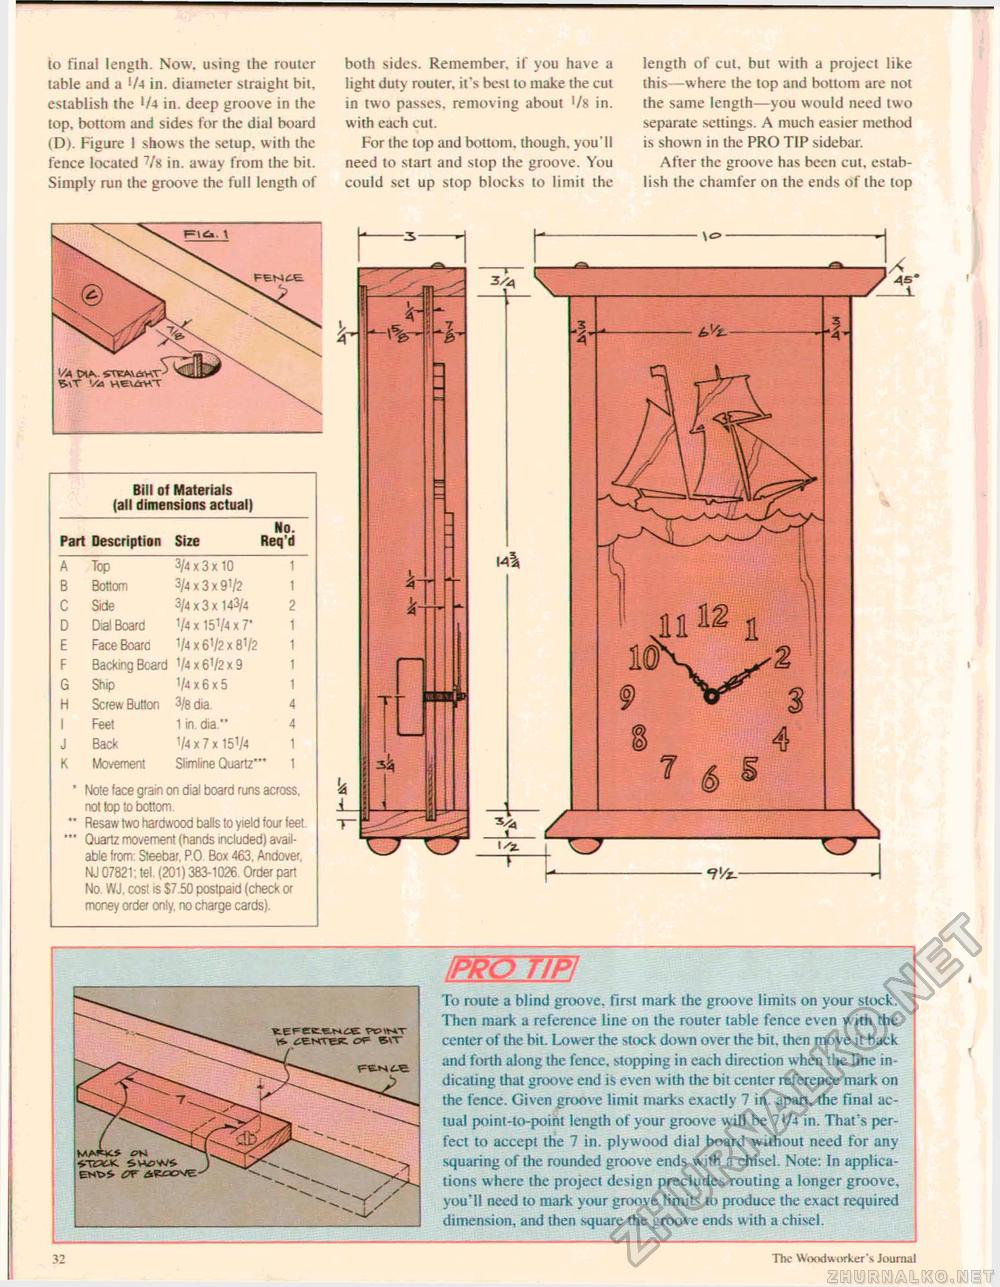
to final length. Now. using the router table and a '/4 in. diameter straight bit, establish the '/4 in. deep groove in the top, bottom and sides for the dial board (D). Figure 1 shows the setup, with the fence located ~7« in. away from the bit. Simply run the groove the full length of both sides. Remember, if you have a light duty router, it's best to make the cut in two passes, removing about '/8 in. with each cut. For the lop and bottom, though, you'll need to start and stop the groove. You could set up stop blocks to limit the length of cut, but with a project like this—where the top and bottom are not the same length—you would need two separate settings. A much easier method is shown in the PRO TIP sidebar. After the groove has been cut. establish the chamfer on the ends of the top Top Bottom Side Dial Board Face Board Backing Beard Ship Screw Button Feet Back Movement 3/4x3x10 3/4 x 3 x 9V2 3/4x3x143/4 1/4 x 151/4 x T 1/4 x 61/2 x 81/2 1/4x6V2x9 1/4x6x5 3/8 dia. 1 in. dia." 1/4 x 7 x 15V4 Slimline Quartz* Note face grain on dial board runs across, not top to bottom. Resaw two hardwood balls to yield four feet Quariz movement (hands included) available from: Steebar, PO Box 463. Andover, NJ 07821; tel. (201) 383-1026. Order pan No. WJ, cost is $7.50 postpaid (check or money order only, no charge cards). O O"
IPRO TIE To route a blind groove, first mark the groove limits on your stock. Then mark a reference line on the router table fence even with the center of the bit. Lower the stock down over the bit. then move it back and forth along the fence, stopping in each direction when the line indicating that groove end is even with the bit center reference mark on the fence. Given groove limit marks exactly 7 in. apart, the final actual point-to-point length of your groove will be 7'/4 in. That's perfect to accept the 7 in. plywood dial board without need for any squaring of the rounded groove ends with a chisel. Note: In applications where the project design precludes routing a longer groove, you'll need to mark your groove limits to produce the exact required dimension, and then square the groove ends with a chisel. i T 32 t he Woodworker's Journal |


