Woodworker's Journal 1994-18-2, страница 49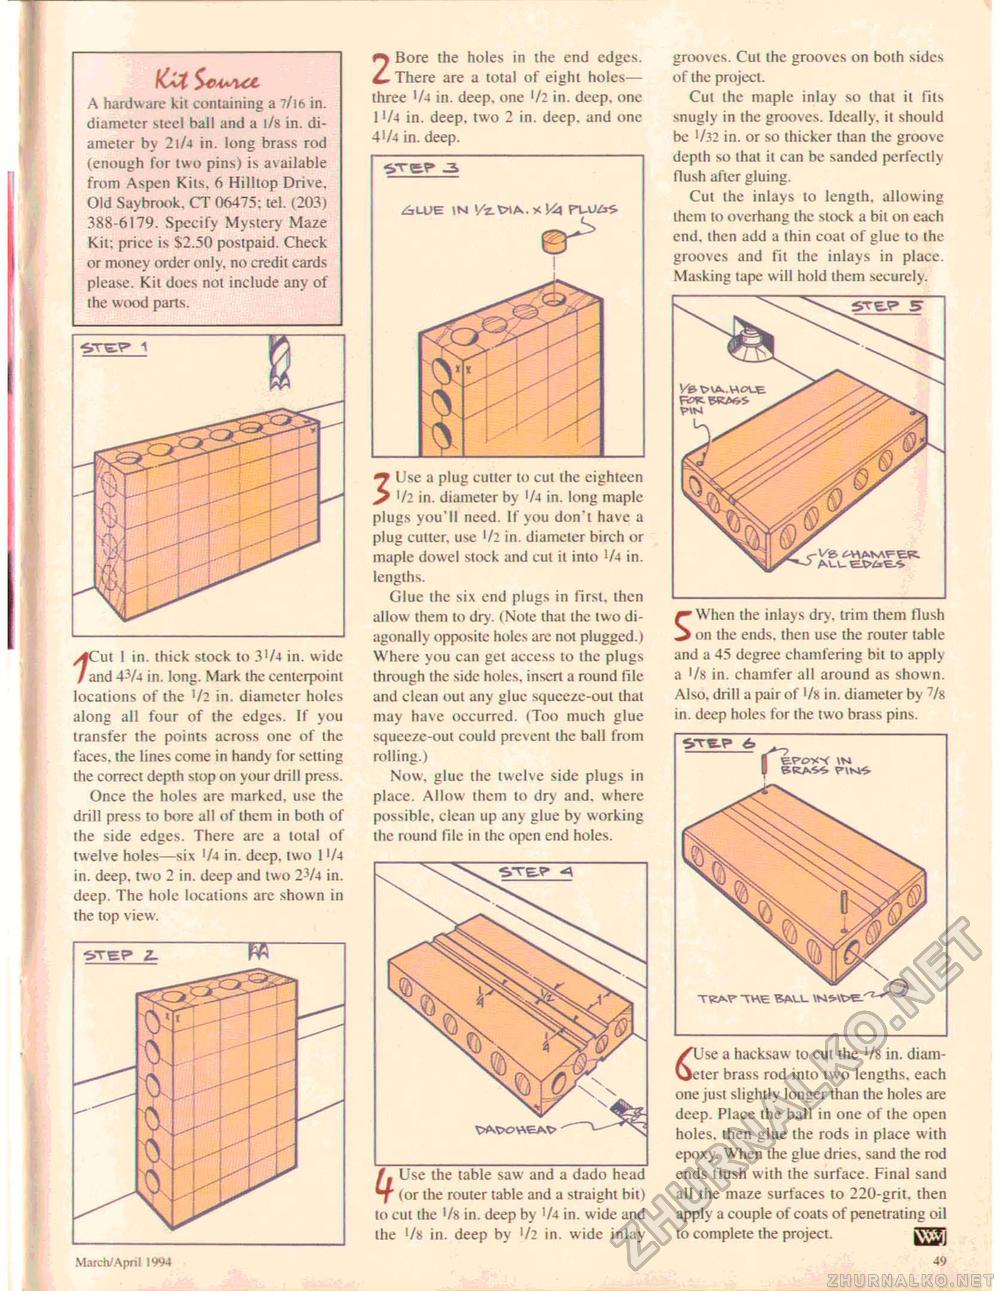
iCit A hardware kit containing a ll\b in. diameter steel hall and a l/s in. diameter by 21/4 in. long brass rod (enough for two pins) is available from Aspen Kits. 6 Hilltop Drive, Old Say brook. CT 06475: tel. (203) 388-6179. Specify Mystery Maze Kit: price is $2.50 postpaid. Check or money order only, no credit cards please. Kit does not include any of the wtxxi parts. 2 Bore the holes in the end edges. There are a total of eight holes— three J/4 in. deep, one '/2 in. deep, one l '/4 in. deep, two 2 in. deep, and one 41/4 in. deep. grooves. Cul the grooves on both sides of the project. Cul the maple inlay so that it fits snugly in the grooves. Ideally, it should be 1/32 in. or so thicker than ihe groove depth so that it can be sanded perfectly flush after gluing. Cul the inlays to length, allowing them to overhang the stock a bit on each end. then add a thin coal of glue to the grooves and fit ihe inlays in place. Masking tape will hold them securely. SWhen the inlays dry. trim them Hush on the ends, then use the router table and a 45 degree chamfering bit to apply a '/s in. chamfer all around as shown. Also, drill a pair of in. diameter by 7/8 in. deep holes for the two brass pins. /Use a hacksaw to cut the */8 in. diam-Vjeter brass rod into two lengths, each one just slightly longer than the holes are deep. Place the ball in one of the open holes, then glue the rods in place with epoxy. When the glue dries, sand the rod ends tlush with the surface. Final sand all the maze surfaces to 220-grit. then apply a couple of coats of penetrating oil to complete the project. gSg^] 49 fCut 1 in. thick stock to 3!/4 in. wide and 4-V4 in. long. Mark the centerpoint locations of the '/2 in. diameter holes along all four of the edges. If you transfer the points across one of the faces, the lines come in handy for setting the correct depth stop on your drill press. Once the holes are marked, use the drill press to bore all of them in both of the side edges. There are a total of twelve holes—six '/4 in. deep, two 1 !/4 in. deep, two 2 in. deep and two 2-V4 in. deep. The hole locations arc shown in the top view. •yrgp Z. W March/ April 1994 Use a plug cutter to cut the eighteen 1/2 in. diameter by '/4 in. long maple plugs you'll need. If you don't have a plug cutter, use '/2 in. diameter birch or maple dowel stock and cul it inio l/4 in. lengths. Glue the six end plugs in first, then allow them to dry. (Note thai the two diagonally opposite holes are not plugged.) Where you can get access to the plugs through the side holes, insert a round tile and clean out any glue squeeze-out that may have occurred. (Too much glue squeeze-out could prevent ihe ball from rolling.) Now. glue the twelve side plugs in place. Allow them to dry and. where possible, clean up any glue by working the round file in the open end holes. /. Use the table saw and a dado head f* (or the router table and a straight bit) to cut the •/« in. deep by '/4 in. wide and the •/» in. deep by ]/2 in. wide inlay TV£A.r THE |


